Install vnc server and client on Ubuntu
VNC stands for Virtual Network Computing or in simple terms its ‘Remote Desktop’. It allows a system to access the desktop of another system. Now lets see how vnc can be done on ubuntu.
Install Packages
$ sudo apt-get install vnc4server xvnc4viewer
1. vnc4server – This is the vnc server application. It is run on the system which is to be viewed remotely.
2. xvnc4viewer – This is the client application. It will connect to a remote vnc system.
Setup the vnc password
The vnc client that will connect to this vnc server will need to use a password. Hence a password must first be setup. This can be done using the vncpasswd command. Remember that the password file is located at ~/.vnc/passwd
$ vncpasswd ~/.vnc/passwd
Password:
Verify:
Or you can simply run the vncpasswd command only
$ vncpasswd
Password:
Verify:
Launch the vnc server
desktop:~$ vncserver :12 -geometry 1024x768

New 'enlightened-desktop:12 (enlightened)' desktop is enlightened-desktop:12

Starting applications specified in /home/enlightened/.vnc/xstartup
Log file is /home/enlightened/.vnc/enlightened-desktop:12.log
The :12 is the display number. It can be any number and will open vncserver on that number. You can have multiple vncservers running. If you are running vncserver command for the first time it will ask for a password.
Connect using VNC Client
Once vncserver is running , its time to run the vnc client.
$ vncviewer localhost:12

VNC Viewer Free Edition 4.1.1 for X - built Feb  5 2012 20:01:21
Copyright (C) 2002-2005 RealVNC Ltd.
See http://www.realvnc.com for information on VNC.

Tue Aug  7 18:27:59 2012
 CConn:       connected to host localhost port 5912
 CConnection: Server supports RFB protocol version 3.8
 CConnection: Using RFB protocol version 3.8
Password:
It will first ask for the server. Enter localhost:12 . The format can be ipaddress:display_number
Next it will ask for the password. Use the password that was setup in the previous steps.
Now a VNC window will open up with a terminal showing.
The man page of xvnc4viewer says :
vncviewer is a viewer (client) for Virtual Network Computing. This manual page documents version 4 for the X win-dow system.If you run the viewer with no arguments it will prompt you for a VNC server to connect to. Alternatively, specify the VNC server as an argument, e.g. :
vncviewer snoopy:2
where ‘snoopy’ is the name of the machine, and ‘2’ is the display number of the VNC server on that machine. Either the machine name or display number can be omitted. So for example “:1” means display number 1 on the same machine, and “snoopy” means “snoopy:0” i.e. display 0 on machine “snoopy”.
If the VNC server is successfully contacted, you will be prompted for a password to authenticate you. If the password is correct, a window will appear showing the desktop of the VNC server.
Close server after finishing
After the vnc session is complete the vnc server should close the display.
$ vncserver -kill :12
Killing Xvnc4 process ID 23664
Limitations
The above approach of establishing a vnc connection has certain limitations. It requires the server machine to have a publicly accessible IP address or have the necessary port forwarding setup so that vnc client can reach it on the correct port number.
Reverse VNC
In reverse vnc, the vnc server connects to the vnc client. This is done when the server neither has a public ip, nor can do port forwarding. However the client must have a public ip or must be able to do the necessary port forwarding.
Setup remote desktop sharing on kde using vnc
VNC – Virtual Network Computing
VNC is a remote desktop sharing protocol that can be used to control the desktop of a remote system over the local network of internet. To setup desktop sharing with vnc, a vnc server has to be installed on the remote desktop that shall be controlled. And a vnc client is needed on the local system that shall be controlling the remote system.
For example you might be at your office and want to control your home pc. Or you want to provide remote assistance to your client on his desktop. Remote desktop is widely used for a variety of needs.
On linux there are plenty of vnc service/client applications available for both gnome and kde. Lets see how to setup vnc based remote desktop on kde. Setting up remote desktop sharing on KDE desktop is quite easy. First install the krfb and krdc packages.
$ sudo apt-get install krfb krdc
Krfb is the server application that will open a vnc server to enable any vnc client to access your current kde desktop. Krdc is a vnc client for kde. If you want to connect from some other system like a windows or mac then you can use any vnc client on that particular system.
Start vnc server
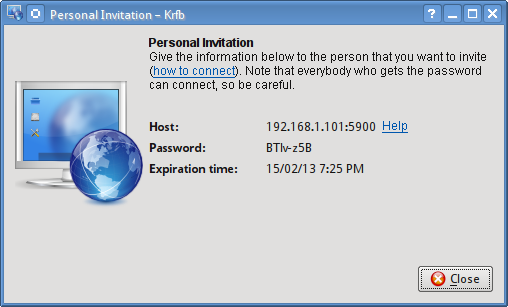
So the first thing to do is to start the vnc server on your kde desktop. A good thing about krfb is that it allows to create discrete invitations and manage them. Each invitation has its own password and an expiration time of 1 hour.
Apart from invited connections, it also allows uninvited connections which have a common password and do not expire.
Lets take a look

The invitation details contain the ip, port and password to be used by the vnc client on the other end. This is quite easy.
For uninvited connections setup a strong password in the Settings > Configure Desktop Sharing window.

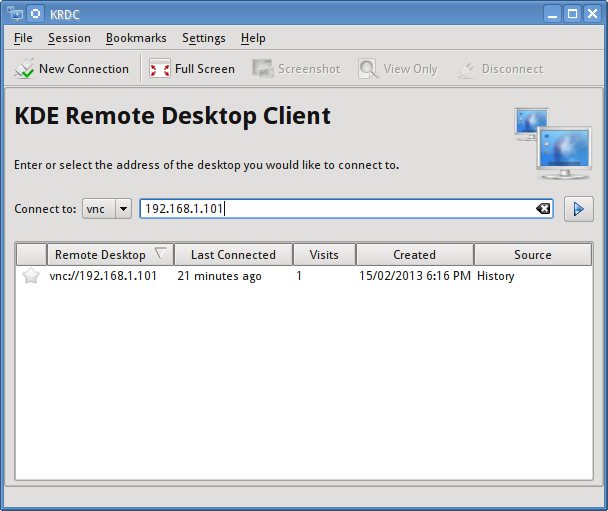
Connect using vnc client
In this example we are using the krdc vnc client on kde itself. Launch krdc and enter the ip and port in the connection text input.
After connecting it shall ask for the optimal connection speed and the password. Then it should display the remote desktop.
Keep note that if the vnc server is behind a LAN or router then port forwarding has to be setup for the client to be able to connect.
Using ssh to browse remote file system in Dolphin & Konqueror on KDE
Dolphin/Konqueror
Dolphin and konqueror are 2 powerful file managers available for the KDE desktop on linux. Both of them support accessing remote file systems over protocols like ftp.
So if you want to access the files on your server over ftp simply type
ftp://username@servername_or_ip
It will then ask for the password and open the remote file system like a local file system. The user can navigate and work with the files very easily.
Use SSH protocol to browse files
Ssh is a protocol to manage remote systems over the terminal. There is a related command called scp that can be used to copy file across the remote and local system from the terminal. However when it comes to moving files, its a lot easier with a gui interface like a file browser.
So instead of scp, we can right away use ssh protocol inside dolphin and konqueror just like ftp. The url will be like this
fish://username@server_name_or_ip
It will then ask for the password and will then open the remote file system just like ftp.
Fish stands for File transfer over SSH (File transfer over shell protocol).
And it can be used very much like ftp. Read the wikipedia article for more information.
Ftp clients like gftp also support using ssh for file transfer.
By using ssh for both terminal access and file access, you can avoid installing a separate ftp server. Ftp is not secure as it transmits data in plain text format unless using SSL encryptiong
It should be noted that Fish is not “Ftp over SSH”.
Use SFTP to browse files
Along with the FISH protocol, the same OpenSSH server provides another great service for file transfer, called SFTP. The usage is same as FISH and it allows for remote file system management just like FTP.
To connect to the server over SFTP just change the protocol of the url
sftp://username@server_name_or_ip
Simple as that.
If the key of the remote server already exists in the ~/.ssh/known_hosts file then dolphin/konqueror might give an error like this
The host key for this server was not found, but another type of key exists. An attacker might change the default server key to confuse your client into thinking the key does not exist. Please contact your system administrator.
To fix this, first remove the key from the known_hosts file using the ssh-keygen command
$ ssh-keygen -R example.com
This will remove the ssh key for example.com that was saved earlier. Now try connecting with sftp and it shall prompt again to save the key file and will work fine.
Use active mode ftp in dolphin/konqueror in kde
Dolphin and Konqueror are the main file system browser on the kde desktop on linux. And they can open remote ftp file systems with the “ftp://” urls. By default they use passive mode ftp, but can be configured to use active mode ftp as well.
The ftp protocol operates in 2 modes. Namely passive and active. Unlike http, ftp connection relies on 2 connections from 2 different ports. Now how the 2 connections are made, determine whether its an active mode ftp or passive mode ftp.
If the client make the first connection to the server and the server makes the second connection to the client then its active mode, since the server has actively connected back to the client. In passive mode however the client makes both the connections to the server, because the server is not able to connect to the client. This can be for many reasons. For example the client might be behind a firewall or router that does not allow incoming connections. To solve this, the passive mode ftp is used.
The configuration setting for dolphin to use active mode ftp is hidden in the KDE system settings. Go to
KDE System Settings > Network Settings > Connection Preferences.
Over there you see the FTP Options. Uncheck the "Enable passive mode (PASV)".
Now dolphin and konqueror shall use active mode connection to ftp servers.
When ftp servers are installed on servers, then by default they are not configured to use passive mode. In such a case if a client connects in passive mode, then it will be able to login, but the directory contents would not be navigable and neither would any file upload or download work. Ftp servers need additional configuration to serve passive mode connections properly.
For a detailed explanation on active and passive mode ftp check out this article.
How to configure vsftpd to use SSL/TLS (FTPS) on CentOS/Ubuntu
Securing FTP
Vsftpd is a widely used ftp server, and if you are setting it up on your server for transferring files, then be aware of the security issues that come along. The ftp protocol has weak security inherent to its design. It transfers all data in plain text (unencrypted), and on public/unsecure network this is something too risky.
To fix the issue we have FTPS. It secures FTP communication by encrypting it with SSL/TLS. And this post shows how to setup SSL encryption with vsftpd.
Install vsftpd
Vsftpd is available in the default repositories of all major distros including debian,ubuntu, centos and fedora and can be installed without any hassles. There is only one configuration file named vsftpd.conf that resides in the /etc directory.
# ubuntu/debian
$ sudo apt-get install vsftpd

# centos/fedora
# sudo yum install vsftpd
The remaining is to configure vsftpd to use ssl encryption for the ftp communication. It is just a 2 step process.
Generate a SSL certificate
The first step is to create an ssl certificate and key file that vsftpd is going to use for the encryption. The configuration parameter “rsa_cert_file” shall hold the path to the certificate file. It does have a default value that can be found in the man page.
$ man vsftpd.conf | grep rsa_cert_file -A 5
       rsa_cert_file
              This option specifies the location of the RSA certificate to
              use for SSL encrypted connections.

              Default: /usr/share/ssl/certs/vsftpd.pem
Its different across Ubuntu and CentOS. We can store it at any location we like.
Create an ssl certificate with the openssl command. We are putting the certificate and key together in a single file.
# openssl req -x509 -nodes -days 365 -newkey rsa:1024 -keyout /etc/ssl/private/vsftpd.pem -out /etc/ssl/private/vsftpd.pem
Answer the questions that follow and in a few seconds the certificate file should be ready. THe output would look something like this
# openssl req -x509 -nodes -days 365 -newkey rsa:1024 -keyout /etc/ssl/private/vsftpd.pem -out /etc/ssl/private/vsftpd.pem
Generating a 1024 bit RSA private key
.............++++++
....++++++
writing new private key to '/etc/ssl/private/vsftpd.pem'
-----
You are about to be asked to enter information that will be incorporated
into your certificate request.
What you are about to enter is what is called a Distinguished Name or a DN.
There are quite a few fields but you can leave some blank
For some fields there will be a default value,
If you enter '.', the field will be left blank.
-----
Country Name (2 letter code) [XX]:US
State or Province Name (full name) []:NY
Locality Name (eg, city) [Default City]:
Organization Name (eg, company) [Default Company Ltd]:
Organizational Unit Name (eg, section) []:
Common Name (eg, your name or your server's hostname) []:
Email Address []:
Configure Vsftpd for SSL
The next task is to configure vsftpd to use this ssl certificate for encryption. The vsftpd.conf file can be found at the following location
# Ubuntu/Debian
/etc/vsftpd.conf

# CentOS/Fedora
/etc/vsftpd/vsftpd.conf
Open the vsftpd.conf file, and edit as shown below
The following will tell vsftpd the location of the certificate/key file to use.
rsa_cert_file=/etc/ssl/private/vsftpd.pem
rsa_private_key_file=/etc/ssl/private/vsftpd.pem
Add the following options to turn on SSL. It will enable SSL and force encryption for data transfers as well as logins.
ssl_enable=YES
allow_anon_ssl=NO
force_local_data_ssl=YES
force_local_logins_ssl=YES
The following lines will tell vsftpd to use TLS when applicable, which is more secure than its predecessor SSL.
ssl_tlsv1=YES
ssl_sslv2=YES
ssl_sslv3=YES
All the necessary configuration directives have been added. Save the file and restart vsftpd
# service vsftpd restart

# or

# sudo /etc/init.d/vsftpd restart
Test SSL on vsftpd
Now that our setup is complete, its time to test it.
First try to connect using the plain ftp command and it should fail asking for encryption.
$ ftp 192.168.1.5
Connected to 192.168.1.5.
220 (vsFTPd 2.2.2)
Name (192.168.1.5:enlightened): pal
530 Non-anonymous sessions must use encryption.
Login failed.
ftp>
Next verify that SSL encryption is working fine. Gui ftp clients like FileZilla can use FTPS, but for convenience sake, we shall resort to the command line tool called curl, and here is the very simple command that should connect to the FTPS server and list the files
$ curl --ftp-ssl --insecure --ftp-port 192.168.1.2:6003 --user pal:pal ftp://192.168.1.5
-rw-r--r--    1 0        0               0 Jan 03 06:10 abcd.txt
-rw-r--r--    1 0        0               0 Jan 03 06:10 cdefg.txt
Those files are in the home directory of user pal on the ftp server. Make sure that you do have some files in the server home to get them listed and verify. Otherwise curl would just return blank.
Here is quick explanation of the curl options we used.
ftp-ssl : Tells curl to use ftps insecure : Tells curl not to use any ssl certificate to authenticate and just connect right away. ftp-port : Tells curl that we are in ACTIVE mode. In ACTIVE mode the client has to tell the server the hostname and port number to connect back to. If you have configured passive mode ftp, then do not use this. user : Specifies the username and password joined with a colon. The last thing is the ftp url.
If you do not specify the ftp-port on ACTIVE mode ftp connections you would get “No route to host
” error.
If you get “bind() failed, we ran out of ports!” error then simply change the port number.
You can also use a url like this
$ curl ftps://192.168.1.5 ...
But then curl would try to connect to port 990 and unless you have configured vsftpd to serve on that port, it wont work.
If curl fails to connect to vsftpd or list the files properly, use the verbose (-v) option and see further details on what went wrong and then fix it.
Additional Notes
FTPS secures FTP by adding SSL encryption to the communication channel. Another recommended way to establish secure connections is by using SFTP (SSH File Transfer Protocol). The popular OpenSSH package that provides the ssh service, provides SFTP too along side without the need of any additional setup or configuration. However not all FTP clients and web development tools support SFTP.