Do you care about your privacy more than anything? This app is just for you then. Introducing Xprivacy…. A simple android application (module) that allows you to change the app permissions
Xprivacy is actually an xposed module developed by M. Bokhorst (M66B) to prevent leaking of your private data. It can restrict the categories of data an application can access. For example, the famous game Angry Birds acquires phone numbers for no reason, you can block AngryBirds from accessing the phone numbers by feeding it with no or fake data using Xprivacy.
DID YOU KNOW
75% of apps that you installed on your phone or tablet are accessing your private data without your knowledge (for no reason).
Why you should care about your privacy ? Honestly, I don’t want to talk the boring stuff. I just want to say “If you are vulnerable or careless about your privacy, you will become a target for hackers”. Just remember the incidents happened last year, snapchat hack, celebrity hacks (Fappening) and more. If you don’t want to be a victim of a hack, you know what to do — care about your privacy.
Ready to use XPrivacy? Then, here are the things you must have, to install XPrivacy.
If your device have proper root access, download Xposed Installer and then install it in your device. Then open Xposed installer, tap on “Framework“.
It will show a pop up box saying “In some cases, your device might no longer boot after installing Xposed. If you never heard about ‘soft brick’ and ‘boot loop’ before or if you don’t know how to recover from such a situation, do not install Xposed. In any case, having a recent backup is highly recommended.”
Tap on “OK“. Then tap on “Install/ Update“.
Now, a pop up box will display (super user request). Just tap on” Grant“.
After the update, It will show a message like this:
Tap on “OK“.
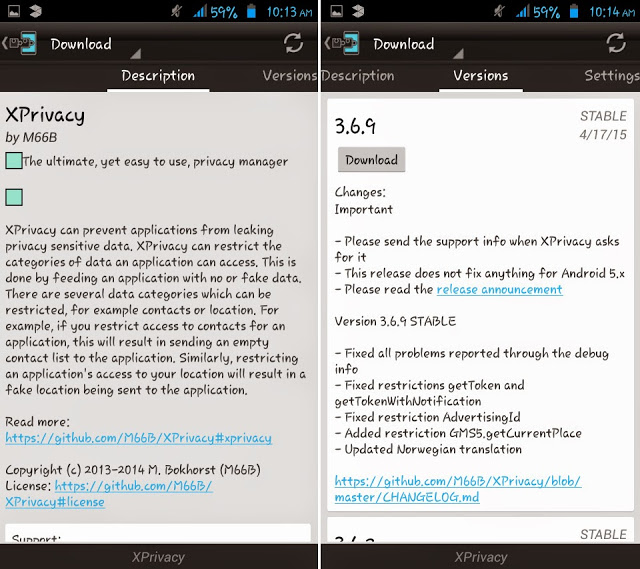
After rebooting your device, open Xposed Installer… Then tap on “Download“.
Search for “XPrivacy” and then tap on it. Then select the “versions” tab and tap on “Download“
After the download, it automatically opens Xprivacy Install page. Tap on “Install“. Then tap on “Done“.
Then go to the Xposed Installer again and tap on “Modules“. Enable Xprivacy and then restart your device.
For Kitkat and Lollipop users, after installing the Xprivacy, the device will display a notification -“Xposed Module is not activated. Activate & Reboot“. Just tap on “Activate & Reboot“.
Now the Xprivacy is ready to use.
HOW TO USE XPRIVACY
Step 1: Find the application to restrict in the main application list.
Step 2: Tap on the application icon or name.
Step 3: Tap the first check box of any category you want to restrict. The second checkbox allows you to restrict category or function on demand. That is, the restrictions will be asked.
If you have any doubts using it, refer this:
If you are a non-rooted device, you can get the app called “UU AppPurifier” to block applications from accessing your private data.
If you don’t want to give your phone number to a website while creating an account, DON’T GIVE IT TO THEM, because today I’m going to show you a trick that you can use to bypass SMS verification of any website/service.
Bypassing SMS Verification:
Using Recieve-SMS-Online.info
Recieve SMS Online is a free service that allows anyone to receive SMS messages online. It has a fine list of disposable numbers from India, Romania, Germany, USA, United Kingdom, Netherlands, Italy, Spain and France.
Here is how to use Recieve SMS Online to bypass SMS verification:
Do you want to call your friend as someone else? If yes, you are at the right place.
Before going into the how to guide, let’s take a look at some of the reasons to spoof caller ID:
Prank calls.
Impress your friends by calling from unique numbers like 000-000-0000 or 123-456-7890.
Hide your real phone number.
Call someone from a number that you want them to call back.
Note: Most of the services described in this article are banned in India and some other countries, so….if you experience any trouble while accessing the services, use a proxy website.
First, go to www.crazycall.net, and then select your country from the drop down menu.
Then enter the number you want to appear on the victim’s phone when he/she receives the call. Also fill the second box with the number of the person (victim) you want to fool.
If you want to change your voice, you can change it to low pitch or high picth.
Then click on the ” GET ME A CODE” button.
The page will reload and display a unique code and phone numbers:
Make a call from your phone to one of those numbers and enter the code when asked.
As soon as you enter the correct code, CrazyCall will connect your call to the victim with the CallerID and voice you have selected.
There are many free (trial) caller id spoofing services available, some of them are given below:
SpoofCard is a very good service that allows users to call from any number. It also has some interesting features such as voice changer, sound mixer, call recorder and group spoof. You can try a live demo for free. If you want more minutes, you have to buy the credits.
Caller ID Faker is just like a normal spoofing service. It doesn’t have any new features. You can try the service for free, unlimited usage available for $29.95.
Advanced Privacy and Anonymity Using VMs, VPN’s, Tor, etc
Part 1 – Introduction
By mirimir (gpg key 0x17C2E43E)
If you’re here, you may be using (or considering) a VPN service to provide online privacy and anonymity, and perhaps to circumvent Internet censorship. This series of guides goes far beyond that. It explains how to obtain vastly greater freedom, privacy and anonymity through compartmentalization (aka compartmentation) and isolation, by using multiple virtual machines (VMs) with Internet access through nested chains of VPNs and Tor.
These are advanced guides, and the full setup will require at least a few days of focused work. Before choosing which aspects to implement, it’s best to consider your threat model. Start by reading An Introduction to Privacy & Anonymity and Applying Risk Management to Privacy. What are you protecting? Who are you protecting it from? What might happen if you were compromised?
The key threats, and corresponding defenses, are:
THREAT
DEFENSE
Tracking and profiling
Compartmentalize and isolate activity using multiple pseudonyms, workspace VMs, VPN services and Tor
Leaks and exploits that circumvent VPNs or Tor
Compartmentalize and isolate workspace and networking in separate VMs
VPN compromise via traffic analysis or provider collusion
Compartmentalize Internet access and distribute trust using nested chains of VPNs and Tor
Heightened surveillance of Tor users
Connect to Tor network through VPN(s)
Heightened surveillance of VPN users
Connect to VPN server(s) via secure, private proxies (not yet included in these guides)
Unauthorized local access
Use full disk encryption (FDE) on host machines (and VMs)
For example, if you just want to circumvent Internet censorship and data retention by your ISP, you don’t need more than a good VPN service (unless consequences of getting caught are serious). If you just want to circumvent commercial tracking and behavioral marketing, you don’t need the full setup described here. However, if you want better privacy and anonymity than browser extensions can provide, you might consider a basic setup (covered in Part 2) to compartmentalize your activities using VMs and VPN services.
Conversely, if you’re a political dissident who might suffer serious consequences if compromised, using the full setup (covered in Parts 3-8) would be prudent. The approaches described there would probably protect against non-targeted surveillance by national-scale government agencies. For such agencies with limited resources, they might even protect against targeted surveillance.
Although it appears that global-scale intelligence agencies intercept virtually all Internet traffic, the approaches described here might protect against routine non-targeted surveillance, given the need to correlate traffic through multiple VPN tunnels and Tor. While there’s no way to be sure of that, it’s clear that nothing less would suffice.
However, it’s unlikely that even the full setup described here would protect against directed surveillance by global-scale intelligence agencies. That would require far more resources and expertise than most nations (let alone individuals) possess.
Using Tor
As I write this, the Tor network is under extreme stress. Since August 20, the number of Tor clients has increased from about 0.5 million to over 4.0 million. Based on reports from Fox-IT and TrendLabs, it appears that the approximately 3.5 million new Tor clients are part of a Mevade botnet. So far, these Mevade bots are not sending much traffic, and are stressing Tor primarily by querying its directory servers. See this Tor Project blog post for more.
At this point, this has probably not reduced the level of anonymity that Tor can provide. It’s just made Tor slower and less reliable. However, if more than a few thousand of these bots were to become relays, there would be cause for concern, because they could collude to deanonymize other Tor users. A recent paper by Tor researchers, Johnson et al (2013) Users Get Routed: Traffic Correlation on Tor by Realistic Adversaries analyzes the network’s vulnerability to potential adversaries. I recommend periodically checking the Tor Project blog for status updates, and also checking Tor client andrelay counts.
Summary
PART 2 – BASIC SETUP USING VMS, VPNS AND TOR
This guide covers a basic setup to protect online privacy and anonymity. There are multiple workspace VMs to compartmentalize and isolate activity. Each VM has its own Internet connectivity, and firewall rules to prevent leaks. It uses simple nested chains of VPNs and Tor to mitigate risks of tracking and profiling, and to distribute trust among multiple providers. But it does not protect against exploits that circumvent VPNs, Tor and/or firewall rules by isolating workspace and networking in separate VMs.
PART 3 – PLANNING ADVANCED VM AND VPN SETUP
This guide presents relevant considerations for planning an advanced setup to protect online privacy and anonymity. As in the basic setup, there are multiple workspace VMs to compartmentalize and isolate activity, and each VM has its own Internet connectivity. The nested chains of VPNs and Tor are more complex, to better mitigate risks of tracking and profiling, and to distribute trust among more providers. The setup isolates workspace and networking in separate VMs to defeat exploits that circumvent VPNs, Tor and/or firewall rules.
PART 4 – SETTING UP SECURE HOST MACHINES
This guide explains how to set up Linux host machines for securely running numerous VMs. Linux distributions are open-source and free, so there’s less risk of backdoors, and no money trail to one’s true name. With clean installations, there’s little (if any) risk from prior compromise. RAID arrays provide faster disk I/O, greater capacity and better reliability. Using full disk encryption (FDE) prevents forensic analysis, unless the host is accessed while in use.
PART 5 – INSTALLING VIRTUALBOX AND CREATING LINUX VMS
This guide covers installing VirtualBox, and creating Linux workstation VMs and read-only LiveCD VMs.
PART 6 – CREATING PFSENSE VMS AS VPN CLIENTS
This guide covers creating pfSense router/firewall VMs, and configuring them as secure VPN clients, with routing and firewall rules to prevent leaks. It also explains how to test for leaks using Wireshark.
PART 7 – PAYING ANONYMOUSLY WITH CASH AND BITCOINS
This guide explains how to anonymously buy VPN services using cash by mail and anonymized Bitcoins. It also covers how to buy Bitcoins, and how to anonymize them using Multibit clients and mixing services, with all connections via Tor.
PART 8 – CREATING NESTED CHAINS OF VPNS AND TOR
This tutorial explains how to create arbitrarily complex nested chains of VPNs and Tor through virtual networking, with pfSense VPN-client VMs and Tor-client VMs.
Acknowledgement
These guides reflect my participation at Wilders Security Forums for the past few years. I acknowledge the administrators and moderators for the venue, and for their care and guidance. But mostly I acknowledge the Wilders’ user community (especially fellow privacy lovers) for great answers, tough questions, and lively discussions.
I also acknowledge IVPN for invaluable support and encouragement.
Finally, I acknowledge the global open source community, without which none of this would have been possible.
Part 2 – Basic Setup Using VMs, VPNs and Tor
By mirimir (gpg key 0x17C2E43E)
Introduction
This guide covers a basic setup to protect online privacy and anonymity. It’s appropriate for reliably circumventing Internet censorship and data retention by ISPs, and for reliably circumventing commercial tracking and behavioral marketing. It may be adequate for political dissidents in countries that respect human rights. However, it is not adequate for political dissidents who might suffer serious consequences if compromised. For them, using the full setup (covered in Parts 3-8) would be prudent.
In this setup, the host machine reaches the Internet through a VPN service, with firewall rules to prevent leaks. The host runs VirtualBox, and there are multiple Linux workspace VMs to compartmentalize and isolate activity. Each Linux workspace VM initially reaches the Internet through the host machine’s VPN service. It then connects through a different VPN service, or through the Tor network, to reach Internet sites. There are firewall rules to prevent leaks. For Tor connectivity, the guide uses Whonix, which comprises Tor gateway and workstation VMs that are based on Linux (Debian).
VirtualBox by default isolates resources (storage, memory and processing) that each VM is using, both from itself and from other VMs. Although the Linux workspace VMs (and the Whonix gateway VM) all use the host machine’s VPN connection through network address translation (NAT), VirtualBox doesn’t permit VM-to-VM traffic in that arrangement. Linux workspace VMs (and the Whonix workstation VM) are also isolated from each other on the Internet, because they have different IP addresses and network latencies.
Because Whonix isolates workspace and networking in separate VMs, it resists attacks that compromise or circumvent Tor and/or firewall rules. However, the VPN client running in each Linux workspace VM is vulnerable to such attacks. Even so, the VPN client running on the host is isolated, and so damage is limited. In the full setup (covered in Parts 3-8), all workspaces and networking (VPN and Tor clients) are isolated in separate VMs.
Setting Up VPN on Host Machine
If you’re already using a VPN service, you can skip to the next step. If you’re not already using a VPN service, choose one and install the client following the provider’s instructions. For Linux, you can use the instructions below, in “Setting Up VPN on Linux Workstation VM”.
Unless you’ve already set up firewall rules to prevent leaks, it’s prudent to do so. All traffic (including DNS queries) should go through the VPN tunnel, and there should be no Internet connectivity if the VPN connection fails. Also, just in case, DNS queries should use the VPN provider’s DNS server(s), or reliable third-party DNS servers, and not your ISP’s DNS servers.
There are instructions below (in “Installing and Checking VPN-Firewall on Linux Workstation”) for using adrelanos’ firewall setup in Linux. For Windows, you can ask your provider, or use (for example) Comodo. For OS X, you can ask your provider, or use (for example) PF.
It’s also prudent to test for leaks. There are instructions below (in “Installing and Checking VPN-Firewall on Linux Workstation”) for leak testing in Linux. The same approach applies in Windows or OS X, except for installing and configuring Wireshark. For Windows, see (for example) HOW TO : Install Wireshark on Windows 7. For OS X, see (for example)WireShark Install on Mac OS X.
Installing VirtualBox
This step is trivial. Download the version of VirtualBox for your host machine OS fromhttps://www.virtualbox.org/wiki/Downloads. For Windows hosts, install by executing the downloaded file. For OS X hosts, double click the downloaded file, and drag the app to the Applications icon. For Ubuntu hosts, open the downloaded package with Ubuntu Software Center, and install. For Debian hosts, use dpkg in a terminal. After installing VirtualBox, download the Extension Pack, and open it with VirtualBox to install. That’s it. With VirtualBox running, hitting F1 opens the user manual, which is excellent and comprehensive.
Creating Linux Workstation VM
Creating VMs is very easy, and section 1.7 of the VirtualBox manual (hit F1) explains it well. It’s a two-stage process. First, you configure the new VM in VirtualBox. Second, you start the VM, and install the OS, just as you would on a physical machine.
Linux is the best choice for a secure and private workstation VM. It’s open-source and free, so there’s no money trail linking you to a product ID. Ubuntu is a good choice for new Linux users. It’s best to use releases with long-term support (currently 12 .04). For those who dislike the Unity desktop, Xubuntu and Mint (both based on Ubuntu) are good alternatives. Debian is arguably more secure, but not as user-friendly.
First download the 32-bit (aka i386) installer image file for the Linux distro that you’ve chosen. Then open VirtualBox, and click the New icon. Enter your desired VM name, and select the proper OS type (Linux) and version (Ubuntu for Ubuntu, Mint or Xubuntu) or Debian. Specify 1 GB memory to avoid disk swapping. If host RAM is limited, you can reduce it later. Use the defaults for virtual hard disk type (dynamically allocated VDI) and location, but specify at least 100-200 GB maximum size. The initial size of the virtual disk will be at most 5-6 GB. But with large maximum size, it’s very easy to accommodate unplanned growth. After reviewing the final summary screen, hit Create.
Next, tweak the new VM’s settings. In the General/Advanced tab, leave Shared Clipboard and Drag’n’Drop set toDisabled (for security). Under System/Motherboard, change the boot order to Hard Disk, CD/DVD, and deselect Enable absolute pointing device. Under System/Processor, select Enable PAE/NX (if your host supports it). Under Display/Video, increase video memory to 128 MB (unless host RAM is limited). Under USB settings, deselect Enable USB Controller (for security).
Now add the OS installer image. Under Storage, highlight the CD icon (named Empty) under IDE Controller. Then hit the CD icon to the far right of CD/DVD Drive, and select Choose a virtual CD/DVD disk file. Navigate to wherever you put your installer image, and select it. Then click OK to exit the settings screen.
Then double click on the new VM, and go through the install process. It’s OK to accept all defaults. But you can select the encrypted LVM option for disk partitioning , if you like. Although whole-disk encrypted VMs may leave plaintext on host machines, that’s better than nothing if the host is compromised while running. As the VM is rebooting after installation completes, click Devices in the main menu, highlight CD/DVD Devices, and select Remove disk from virtual drive.
To get better VM performance, you may want to install VirtualBox guest additions (customized kernel modules). Guest additions also provide better display and mouse integration, and enable mounting host folders (aka shared folders) in the VM. However, some of the kernel customizations may reduce guest-host isolation, and using shared folders definitely does. It’s a typical convenience vs security trade-off.
Ubuntu or Xubuntu will prompt you to install the guest-additions kernel-module package as additional drivers. If not, use the Settings menu. You can also install guest additions by clicking Devices in the VirtualBox menu, and then Install Guest Additions. But don’t do both. Debian 7.10 automatically installs the guest-additions kernel-module package.
Now reboot, use Update Manager to download and install updates, and let the system reboot again. You’re done.
Setting Up VPN on Linux Workstation VM
These instructions are for OpenVPN-based services. For IPsec-based VPN services, follow your provider’s instructions. Avoid PPTP-based VPN services, because that protocol is extremely insecure.
Start by setting up Network Manager with OpenVPN. Open a Terminal window, and run these commands:
Then review your VPN credentials – certificates (.crt) and keys (.key) – and configuration files (*.conf or *.ovpn). Some VPN services provide configuration files with embedded credentials, with each of the credentials bracketed by corresponding [name] and [/name] tags. In that case, copy each of the credentials, and save as an appropriately-named text file. There may be as many as four credentials:
ca.crt
client.crt
client.key
ta.key
All of these files should be downloaded via HTTPS, and kept private. You might want to avoid providers that don’t use HTTPS for this. Establishing a VPN connection may also require a username and password, which may differ from the account name and password for the VPN service’s website. Some low-end services email connection username and password. In that case, immediately go to the provider’s website, and change the password.
Virtually all VPN services provide a ca.crt (certificate authority) certificate. These certificates enable clients to verify the authenticity of VPN servers before connecting. Most VPN services also provide a client.crt (client certificate) and client.key (for unlocking and using the client certificate). Client certificates allow VPN servers to verify the authenticity of clients before accepting connections. A few high-end VPN services also provide a ta.key to enable TLS authentication, whichincreases connection security.
You’ll also need other information from the OpenVPN configuration file. First, you’ll need to choose the VPN server that you’ll be connecting to. Avoid the United States, United Kingdom and France. Germany and the Netherlands are OK. It’s probably good to avoid Eastern Europe, Russia, China etc, which might attract attention. You’ll need the IP address of the server, rather than the hostname, in order for VPN-Firewall (see below) to work properly. If you just have hostnames, you can get the IP address by running this command:
user@ubuntu:~$ host hostname.that.you.have
Second, you’ll need to know the server port number and connection type (UDP or TCP). It’s generally best to use UDP (unless you’re routing via Tor). You’ll also need to know the cipher type (from the cipher … line) and whether LZO compression should be enabled (if you see comp-lzo). If cipher type isn’t specified, use the Network Manager default. For VPNs that provide ta.key, you’ll need to know the key direction, which is the number at the end of the tls-auth line (typically 1).
Start the setup by copying all of the VPN certificate and key files to /etc/openvpn. Open a Terminal window, and run these commands:
Of course, edit the second command for the files that you actually have.
Then open Network Manager, select the VPN tab, and click the Add button. Select OpenVPN as type, and click the Createbutton. Enter a short name for the connection, and the IP address of the server that you’ll be accessing. The next steps depend on the configuration of the VPN service.
There are three common VPN-configuration setups. Some VPN services (such as Private Internet Access) provide only ca.key, and require username and password for connection. For them, select Password as authentication type, enter your username and password, and click the CA Certificate button. In the Places window, click File System. Double click etc, and then double click openvpn. Finally, select ca.crt and click Open.
Now click the Advanced button. In the General tab, check Use custom gateway port and enter the appropriate port number. If appropriate, check Use LZO data compression (typical) and Use a TCP connection (rarely appropriate unless you’re routing via Tor). If you know the cipher type, click Cipher in the Security tab, select the appropriate one, and clickOK. Now click Save in the VPN window, and close Network Manager.
Some VPN services (such as AirVPN) provide ca.key, client.crt and client.key, but not ta.key, and don’t require username and password for connection. For them, select Certificates (TLS) as authentication type, and then specify User Certificate(client.crt), CA Certificate (ca.crt) and Private Key (client.key) as described above. Then complete the same steps in theAdvanced window as described above, save the VPN configuration, and close Network Manager.
Some VPN services (such as IVPN) provide ca.key, client.crt, client.key and ta.key, and also require username and password for connection. For them, select Password with Certificates (TLS) as authentication type, and enter your username and password. Then specify User Certificate (client.crt), CA Certificate (ca.crt) and Private Key (client.key) as described above. Complete the same steps in the Advanced window as described above. In the TLS Authentication window, check Use additional TLS authentication, and specify Key File (ta.key) and Key Direction (typically 1). Then save the VPN configuration, and close Network Manager.
Now use Network Manager to establish the new VPN connection. Once it connects, verify that it works by visitinghttp://whatismyipaddress.com. If it doesn’t connect, or doesn’t work, recheck the configuration.
Installing and Checking VPN-Firewall on Linux Workstation
Install adrelanos’ VPN-Firewall scripts as described at https://github.com/adrelanos/VPN-Firewall. You want the firewall (iptables rules) to load at bootup, so install both the firewall and init scripts. Reboot the VM, but don’t reconnect the VPN via Network Manager. Check VPN-Firewall status by running the following in a Terminal window:
user@ubuntu:~$ sudo service vpnfirewall status
It should reply 0. Then verify that the VM has no Internet connectivity by trying to visit http://whatismyipaddress.com. If it connects, there’s something wrong with the VPN-Firewall setup.
Now use Network Manager to establish your VPN connection, and verify that it works by visitinghttp://whatismyipaddress.com. If it doesn’t connect, recheck the configuration. If it does connect, test VPN-Firewall by killing the openvpn process (run sudo killall openvpn in a Terminal window) and verifying that the VM has no Internet connectivity. Then use Network Manager to reestablish the VPN connection, and verify that it works by visitinghttp://whatismyipaddress.com.
Check your DNS servers by running the standard DNS test at https://www.grc.com/dns/. It should report only the DNS servers that your VPN service is pushing. It should not report any DNS servers that are associated with your ISP, or are specified by your LAN router. If it does, there’s something wrong with the VPN setup.
You can also check for leaks using Wireshark. To install Wireshark, open a Terminal window in the VM, and run these commands:
Reboot the VM, and establish your VPN connection. Then open Wireshark, and start capturing on eth0. Use Firefox to checkhttp://whatismyipaddress.com, run the DNS test at https://www.grc.com/dns/, etc. Now stop the capture, and run Statistics/Endpoints. You should only see one non-private aka public IP address, that of the VPN server that you’re connected to.
Now kill the openvpn process (run sudo killall openvpn in a Terminal window) and start a fresh capture on eth0. Verify that Firefox can’t see anything. VPN-Firewall blocks pings, by the way. Stop the capture, and run Statistics/Endpoints. You should only see traffic with local private IP addresses, and reconnection attempts from the VPN server that you were connected to.
Finally, reestablish the VPN connection in Network Manager, and verify that it’s working. Then start Update Manager, download and install updates, and let the VM reboot.
Installing Whonix
Whonix comprises a pair of Debian VMs: a gateway VM that connects to the Tor network, and a workstation VM that connects through the gateway VM. Installing Whonix is easy. Start by downloading Whonix-Gateway and Whonix-Workstation to your host machine, using your VPN service. It’s best to verify the downloads as instructed using the OpenPGP signatures and the Whonix signing key. If you can’t be bothered with that, at least download them using BitTorrent (which is more secure, as explained).
Import the gateway and workstation VMs, using File / Import Appliance in VirtualBox (reinitializing MAC addresses). If you’ll be using just one Whonix instance, just start the Whonix gateway, and then the workstation. Download and install updates as instructed. After rebooting both VMs, you’re done. Enjoy!
If you’ll be using multiple Whonix instances, each gateway and workstation VM must have a unique name (which determines the name of its folder). After importing the first pair of gateway and workstation VMs, edit their names in the VirtualBox GUI, adding a unique suffix (or whatever) to distinguish them from others that you’ll be importing (and to facilitate keeping track of them).
Also, the gateway and workstation VMs of each Whonix instance must share a uniquely named internal network. First edit the settings for Adapter 2 of the gateway VM (under Network). Change Whonix to Whonix-1 or whatever. Don’t change the settings for Adapter 1. The default (“NAT”) will have it connect through your host’s VPN service. Then edit the settings for Adapter 1 of the workstation VM, changing Whonix to whatever you just used for Adapter 2 of the gateway VM.
Now start the first Whonix gateway, and then the workstation. Download and install updates as instructed. After rebooting both VMs, you’re done. Enjoy!
Part 3 – Planning Advanced VM and VPN Setup
By mirimir (gpg key 0x17C2E43E)
Introduction
This guide introduces an advanced setup (implemented in Parts 4-8) which provides vastly greater privacy, anonymity and freedom than the basic setup presented in Part 2. Basic Setup Using VMs, VPNs and Tor. It employs compartmentalization(aka compartmentation) and isolation, by using multiple virtual machines (VMs) with Internet access through arbitrarily complex nested and branched chains of VPNs and Tor. The full setup will require at least a few days of focused work. Please review Part 1. Introduction and consider your threat model before choosing which aspects to implement.
This advanced setup broadly resembles the basic setup presented in Part 2. The host machine reaches the Internet through a VPN service, with firewall rules to prevent leaks. There are multiple Linux workspace VMs to compartmentalize and isolate activity, and the various workspace VMs independently reach the Internet through VPN services or the Tor network. It’s easy to deter profiling and tracking by using multiple pseudonyms in multiple workspace VMs, with different Internet IP addresses. Impacts of malware and hacking are limited, as long as the VMs networking services and VPN client are not compromised or circumvented.
However, the advanced setup goes far beyond the basic setup in a few key ways. Rather than using an existing and potentially compromised system (typically Windows or OS X) as VM host, this setup uses a fresh Linux installation. Because Linux is open-source, there is also less risk of backdoors. Furthermore, because most Linux distributions are free, there is no money trail that might link you to a product key, or other unique information in the installation.
In the basic setup, the Linux workspace VMs (except Whonix) contain both applications and networking services (routing, firewall, VPN client, etc). By exploiting vulnerabilities in applications and users, attacks may readily compromise or circumvent the VPN client, and then deanonymize users by contacting a monitoring server directly, rather than through the VPN tunnel. Attacks may also install malware that deanonymizes by “calling home” when the VPN is not connected. Indeed, any document that automatically loads remote resources, such as this IVPN logo , can do the same.
In this advanced setup, all workspaces and networking services (VPN and Tor clients) are isolated in separate workspace and gateway VMs (pfSense VPN-client VMs and Tor-client VMs). Attacks that exploit vulnerabilities in applications and users can’t reach networking services unless they can also compromise or circumvent VM-host barriers. And because workspace VMs can only reach the Internet through their gateway VMs, there’s no access to remote resources when the gateway is down or broken, except through deliberate user error.
Furthermore, in this setup, the arrangement of gateway VMs and VirtualBox internal networks transparently creates layers of encrypted routing instructions, which then direct packets through specified chains of VPN servers and Tor entry relays. That is, packet routing through the Internet reflects local routing of gateway VMs in VirtualBox. Using the VirtualBox GUI, it’s trivial to create and modify arbitrarily complex nested and branched chains of VPN and Tor connections. It’s also possible, using the VBoxManage command-line interface, to automate changes in routing topology (not included in these guides).
Indeed, this is a simple (and static) implementation of onion routing:
Onion routing is a technique for anonymous communication over a computer network. Messages are repeatedly encrypted and then sent through several network nodes called onion routers. Like someone peeling an onion, each onion router removes a layer of encryption to uncover routing instructions, and sends the message to the next router where this is repeated. This prevents these intermediary nodes from knowing the origin, destination, and contents of the message.
Initial Privacy Considerations
If you’re, for example, a political dissident who might suffer serious consequences if compromised, it would be prudent to read these guides, and download required software, using a secure VPN service. Otherwise, your ISP and other local observers can see what you’re doing, and you might be flagged for increased scrutiny. Ideally, local observers should see only that you’re using a VPN service, and nothing else. If you’ll be chaining multiple VPNs, as described below, it’s best to pick one now that you will connect to directly. Consistently using just one direct-connect VPN service arguably attracts less attention than using many VPN services and Tor.
If you’re currently using a VPN service, adopting it as your direct-connect VPN would be best, as long as it’s privacy-friendly and its performance is adequate. Unbiased sources for information about VPN services include discussions at Wilders Security Forums (which uses a self-signed certificate) and annual reviews at TorrentFreak. Connecting indirectly to your current VPN service through a new direct-connect VPN would arguably be pointless, because there are potentially records associating your account there with your ISP-assigned IP address.
If you’re not currently using a VPN service, now is a good time to pick one that you’ll be connecting to directly. For direct-connect VPNs, the key features are speed (high bandwidth and low latency), uncapped usage (throughput) and mainstream popularity (so you stand out less). You’ll typically be using just one direct VPN connection, and so it’s arguably better to reserve services that permit multiple simultaneous connections, and have exit servers in many countries, for use as indirect VPNs (which you will access through your direct-connect VPN).
Unless you’re already using a VPN service and/or Tor, install your chosen direct-connect VPN client on the machine that you’re reading this on, following the provider’s instructions. Also download all required software on this machine, so your ISP etc can’t see what you’re doing.
At the cost of increased complexity, by choosing the high-privacy option in the next tutorial (Part 4. Setting Up Secure Host Machines), you can hide all evidence of your new setup from your ISP and other local observers. They’ll just see downloading through your direct-connect VPN service.
Using Nested Chains of VPNs and Tor to Distribute Trust
It’s crucial to keep in mind that, by using VPN services, we are merely choosing to trust our VPN providers, instead of our ISPs and governments. We can choose VPN providers that use multiple hops, promise not to keep logs, carefully segregate our account data and their VPN servers, and even claim that they will move or shut down before compromising our privacy. But there is no reliable way to know whether our trust has been warranted, unless we discover that it hasn’t.
If privacy and pseudonymity really matter to us, therefore, it’s not prudent to rely merely on a single VPN provider. Instead, we can distribute our trust by routing one VPN tunnel through another, from a different provider. More generally, we can create nested chains of VPN tunnels from multiple providers. In order to compromise our privacy, an adversary would need to compromise or subvert most (if not all) of the VPN services in our chain(s).
This approach is vulnerable in at least two ways. First, there may be money trails to “inner” (in a topological sense) VPN services that we access indirectly through other VPN services. Using free VPN services is an option, but they typically cap bandwidth and throughput. The best option is paying with cash by anonymous snail mail. Another option is paying with Bitcoins that have been thoroughly anonymized using multiple anonymous accounts and mixing services.
Second, some (or all) of the VPN services in our chain(s) may be vulnerable to compromise or subversion by broadly resourceful adversaries. To mitigate this risk, it’s prudent to choose providers that operate from poorly-cooperating geopolitical spheres of influence (SOIs). It’s best to avoid providers in the SOI where you live. For your direct-connect VPN, it’s arguably best to choose a provider in a relatively-neutral SOI, which doesn’t attract too much attention, and yet is at least somewhat hard to subvert. For your terminal/innermost VPN, it’s arguably best to choose a provider in an effectively non-cooperating SOI. If you’re using three or more VPNs overall, it’s arguably best to alternate between distinct poorly-cooperating SOIs for the middle VPNs.
We can also rely on Tor, a highly sophisticated implementation of onion routing, where trust by design is distributed among numerous participants with disparate goals. It provides far greater anonymity than VPNs (even complex nested chains of VPNs) could ever manage. However, configuring applications to use Tor properly (with no leaks) is nontrivial, and it’s best to use packaged setups.
The Tor Browser Bundle comprises Tor and the Tor Project’s version of Firefox, which is optimized for anonymity. Although it’s very easy to install and use, it’s vulnerable to malware exploits and leaks from applications misconfigured by users. The Amnesic Incognito Live System (Tails) is a LiveCD (read-only by default) which can also be run as a VM. It’s preconfigured with many applications. But it’s still vulnerable to malware exploits that circumvent Tor. Both Whonix and Incognito isolate workspace and networking services in separate gateway and workstation VMs. That protects against deanonymization through user error, misconfigured applications or malware exploits.
It’s best to incorporate Tor at or near the end of nested VPN chains. VPN services are popular for P2P file sharing, and using them arguably attracts less unwanted attention than using Tor, except where file sharing and dissent are both forbidden. Indeed, access to the Tor network is blocked in some places. One can circumvent blocks by connecting through bridge relays. However, as bridge relays are identified and blocked, users must switch to new ones. Given the trial and error process of using bridge relays, they do not reliably hide Tor use. It would be safest to use both VPNs and obfuscated bridges, which obfuscate Tor traffic patterns.
Some Internet sites don’t accept connections from Tor exit relays. Some sites block all Tor exits, while others block only those that appear on various blacklists. A simple solution is routing a VPN service through Tor. Tor can carry only TCP traffic, so one must use TCP mode for the VPN connection. But the resulting VPN tunnel carries both TCP and UDP traffic, increasing application compatibility and reducing the chance of leaks.
Preventing VPN Leaks
VPN connections are prone to (at least) two types of leaks. One type involves DNS servers. Normally, after a VPN client requests a connection, the server configures the tunnel, and pushes required information to the client. Included are changes in network routing, so all Internet traffic uses the VPN tunnel, and DNS servers to be queried for translating hostnames to IP addresses.
But if something goes wrong, the client machine may instead query DNS servers provided by the user’s ISP. And that may reveal the ISP’s identity to those observing the VPN exit server. It may also reveal to the ISP what domains are being accessed. If the user’s ISP can see both user traffic to the VPN entry server and queries to its DNS servers, timing analysis could readily reveal what domains the user is accessing. In other words, the VPN would be compromised for that user.
Preventing such DNS leaks may be nontrivial. It may require temporarily hard coding the VPN’s DNS servers in the client machine’s network configuration, and undoing that after the VPN connection is closed. That’s what the VPN client should be doing, by the way, but sometimes it doesn’t work, especially with uncommon operating systems that the VPN configuration doesn’t fully support.
The other type of leak involves traffic bypassing the VPN tunnel to reach the Internet directly. The operating system may not properly implement changes in network routing pushed by the VPN server to direct all Internet traffic through the VPN tunnel. Or the VPN connection may fail in some way. For example, VPN servers may go offline, or VPN client software may hang or die, perhaps after intermittent network outages. Whatever the cause, it’s crucial that there be no Internet connectivity except through the VPN tunnel, even if the VPN connection is improperly configured, or fails in any way.
Unfortunately, OpenVPN was designed to provide secure connectivity to remote networks, but not Internet anonymity. Indeed, Internet traffic exits locally by default in OpenVPN, in order to conserve VPN bandwidth. While it’s easy to configure VPN tunnels to carry all network traffic, it’s difficult to prevent traffic from using the client machine’s physical adapter after the VPN client software terminates. By default, all changes to network routing made during VPN connection are reversed when the VPN disconnects. That’s generally a good thing, because users might otherwise be left without Internet access (even to reconnect the VPN).
Some VPN providers use proprietary clients that reportedly fail closed. But generally, the only reliable protections are network routing and firewall rules that restrict network connectivity to the VPN tunnel. In Windows and OS X, you can use, respectively, Comodo and PF. In Linux, you can use VPN-Firewall. It’s a bash script that creates iptables rules which block all Internet connections except through the designated OpenVPN server, and yet permit transparent VPN reconnection. It’s part of the high-privacy option in the next tutorial, Part 4. Setting Up Secure Host Machines. Whatever method you use, it’s prudent to test for leaks. That’s also covered in the next tutorial.
Using pfSense VMs as VPN Clients
Advanced networking expertise is required to securely route one VPN tunnel through another, with no leaks, on an individual machine. However, doing that is trivial by networking virtual machines (VMs) that serve as gateway routers. Indeed, it’s possible to create arbitrarily complex nested and branched chains of VPNs (and Tor).
pfSense, a hardened router/firewall operating system based on FreeBSD and its stateful packet filter PF, is an excellent choice for VPN-client VMs. pfSense VMs are small and resource-light. Creating VPN connections and preventing leaks is very easy in pfSense. The pfSense WebGUI is highly intuitive, and yet exposes virtually all pfSense capabilities. Using pfSense VMs as VPN clients is covered in Part 6. Creating pfSense VMs as VPN Clients.
Visualizing Nested VPN Tunnels
Chains of nested VPN tunnels provide better privacy and anonymity for accessing content servers, Tor entry relays, peers of P2P networks (such as BitTorrent, Freenet and I2P) and other remote servers. With no VPN, remote servers see your ISP-assigned IP address. Also, your ISP and other local observers see the IP addresses of remote servers. And unless connections are end-to-end encrypted, they can eavesdrop and carry out man-in-the-middle (MITM) attacks.
With one VPN, remote content servers instead see the VPN’s exit IP address. Your ISP and other local observers see the VPN’s entry IP address, and the VPN tunnel is encrypted. However, the VPN provider knows both your ISP-assigned IP address and the IP addresses of remote servers.
With two nested VPNs, remote content servers see the second (inner) VPN’s exit IP address. Your ISP and other local observers see the first (outer) VPN’s entry IP address. Both VPN tunnels are encrypted. Neither VPN provider knows both your ISP-assigned IP address and the IP addresses of remote servers. The first (outer) VPN provider knows your ISP-assigned IP address, and also the second (inner) VPN’s entry IP address. The second (inner) VPN provider knows the IP addresses of remote content servers, and also the first (outer) VPN’s exit IP address.
With three or more nested VPNs, information about your Internet activity would be further fragmented, and harder to compromise. However, as VPN tunnels are nested more deeply, two factors limit usability. First, each VPN level adds 50-100 ms latency, and may also restrict bandwidth. Second, overall reliability (being the product of the individual VPN reliabilities) is lower.
Planning Initial Setup
You might want to start by creating a setup such as this.
Each star denotes a VPN exit, with an invariant IP address that’s shared by all users. Two VPN services (VPN1 and VPN2) form the backbone. A third VPN service, routed through VPN2, provides multiple simultaneous exits (VPN3a and VPN3b). A Tor client, also routed through VPN2, provides Internet access through a cloud of frequently changing exit IP addresses that are shared by many other users. Finally, a fourth VPN service (VPN4) is routed through the Tor connection.
Each VPN tunnel in a nested chain provides some degree of separation and anonymity. How much depends on such factors as the number of concurrent users, what the service logs, and the availability of any logs to adversaries. But generally, your risk of association is greatest with the VPN1 exit, less with the VPN2 exit, and even less with the VPN3a and VPN3b exits. Tor connections arguably provide far more separation and anonymity, so your risk of association through the Tor exit cloud is far less than through the VPN3 exits.
Routing VPN4 through the Tor connection, however, weakens anonymity. That’s obviously so if there are email or money trails from you to VPN4. But even free VPN services, with no such linkages, weaken Tor anonymity. Tor clients plan and test numerous circuits, with diverse paths and exit relays. They normally use multiple concurrent circuits to isolate application data streams, and they change circuits frequently. But once a VPN tunnel is established using a particular circuit, the Tor client can’t move it to a new circuit, until the VPN disconnects and reconnects. Even so, the VPN4 exit is still potentially far less associated with the VPN2 exit than the VPN2 exit is with you.
Everyone using a given VPN exit server has the same IP address. That’s good, because crowding increases anonymity. However, using a particular VPN exit for multiple pseudonyms is somewhat counterproductive, given the shared IP address. It’s best, therefore, to use just one primary pseudonym with each pfSense VPN-client VM, and its corresponding VPN exit and position in the overall nested VPN chain.
It’s also best for each pseudonym to consistently use a particular VPN exit. Changes in IP address can trigger account-verification requirements by some providers, such as Facebook and Google, and may even lead to blacklisting. That’s hard to avoid with Tor, because clients use multiple concurrent circuits (including exit relays) to isolate application data streams, and they change circuits frequently. VPNs can be routed through Tor, but that decreases anonymity.
In creating and using these setups, it’s crucial to keep in mind that associations among you and the various elements – exit IP addresses, and the pseudonyms and workstations that use them – can never be decreased, but only increased. For example, consider VPN4 that’s been routed through Tor. If you use that connection with a pseudonym or workstation that’s more closely associated with you, it’s prudent to assume that the association persists. Or consider a pseudonym created using VPN4. Using that pseudonym without Tor, even through nested VPNs, permanently associates it more closely with you.
Multiple pseudonyms should never share a workstation VM, given the risk of cross-correlation through routine tracking, malware and active attacks. It’s also prudent to compartmentalize information for a given pseudonym among multiple workstation VMs. One workstation VM might serve for routine online activity. Using a diskless LiveCD VM would provide some protection for visiting questionable websites or opening questionable files (but not as much as a diskless machine booting from a LiveCD). Another workstation VM might host a Bitcoin client, and hold other financial information. Highly sensitive information might be secured in one or more VMs that are routinely offline, and never share LANs with potentially compromised VMs.
In particular, a workstation should not contain information about the VPN account that it’s connecting through. The identity of the VPN service is obvious. Remote servers see VPN exit IP addresses, and may even reveal them in forum posts or email headers. However, account details such as email address and payment method may reveal true identity (or, at least, a weaker pseudonym). Although information about VPN service(s) purchased for extending the nested VPN chain is less sensitive, it’s prudent to segregate it (with other financial information) from routine online activity.
That’s a problematic issue, because configuration and management of pfSense VMs require workstation VMs for accessing the pfSense webGUI. For VPN-client setup, workstation VMs must have VPN credentials, which may be linked to email address and payment method. To reduce the risk of compromise and cross-correlation, it’s best to administer each pfSense VPN-client VM with a dedicated workstation VM, which contains no information about any pseudonyms that connect through that pfSense VM. Alternatively, you can use a diskless LiveCD VM for administering all of your pfSense VMs, and download VPN configuration files when needed.
Part 4 – Setting Up Secure Host Machines
By mirimir (gpg key 0x17C2E43E)
Introduction
This guide explains how to set up full-disk encrypted host machines for securely running multiple VMs. Using hardened router/firewall VMs (such as pfSense) as VPN clients, it’s easy to route one VPN tunnel through another. With multiple workstation VMs, we can maintain multiple pseudonyms that complicate profiling and tracking, and we can mitigate the impact of malware and hacking. We can easily route Tor through VPNs to avoid attracting unwanted attention. And we can easily route VPNs through Tor to evade Tor exit blocking, increase application compatibility, and reduce the chance of leaks.
As discussed in Part 3. Planning Advanced VM and VPN Setup, it’s prudent to read these guides, and download required software, through a VPN service and/or TOR. That way, your ISP and other local observers can’t see what you’re doing. Furthermore, consistently using a particular VPN service arguably attracts less attention than switching among several. If you haven’t yet chosen a direct-connect VPN service, now is a good time. Please see “Initial Privacy Considerations” in Part 3 for more on this recommendation.
Depending on your risk model, it may also be prudent to restrict your new host machine’s Internet traffic to the direct-connect VPN service, even while you’re setting it up. Using this high-privacy option would prevent your ISP and other local observers from seeing software downloads and other Internet connections that occur during installation of the operating system.
As an example, this guide includes a high-privacy option using Ubuntu as the host operating system. With this option, the new host machine would have no Internet connectivity during Ubuntu installation. Before providing Internet connectivity, you would install your direct-connect VPN service, and then configure iptables to block all non-VPN connections. After providing Internet connectivity, you would establish the VPN connection, and update the system.
With this approach, your ISP and other local observers would see only downloading (albeit increased, perhaps) through your direct-connect VPN service. Because the iptables rules take effect before network configuration during bootup, the new host machine will only have direct non-VPN Internet connectivity if you disable the iptables rules. Unless you did that, your ISP and other local observers would see no specific evidence of the new host machine’s existence.
Hardware
Gaming-class machines or workstations are best for simultaneously running more than a few VMs. Servers are good too, but normally lack audio and high-resolution video. If you’ll be maxing out RAM and hard disks, you may need to upgrade the power supply to at least 600 W.
Midrange quad-core CPUs (such as Intel i5 Quad, Intel Core 2 Quad and AMD Athlon Quad) can simultaneously run at least ten VMs, each configured with one core. CPU cores are only a soft limit for VM capacity, and overloading the CPU(s) just slows everything down. The CPU(s) must support virtualization. It’s typically disabled by default, and must be enabled in the BIOS.
Memory, on the other hand, is a hard limit for VM capacity. VMs can crash without warning if host memory becomes over-committed. However, RAM is currently quite inexpensive, and it’s best to install as much as you can. That’s especially important if you plan to run Windows VMs, which require substantially more memory than Linux or BSD VMs. With a 64-bit host OS, by the way, there’s no 4 GB memory limit.
You also want fast storage, because multiple VMs will be competing for disk access. It’s tempting to use solid state drives (SSDs), given their breathtaking speed, increasing capacity and declining cost. However, it may be problematic to secure SDDs, because their wear-leveling mechanisms may compromise full-disk encryption by leaving plaintext data in the clear after shutdown. While some SDDs may be securable, if you implement full-disk encryption at first use, thorough research and testing would be prudent.
The safest option is still probably RAID with multiple SATA (or SAS, if your budget allows) hard disk drives (HDDs). If you have a SATA optical drive, you can remove it to free up a SATA port, and use an external USB optical drive when needed.
It’s best to avoid consumer HDDs because they do extended error recovery (which doesn’t play well with RAID) and also because they’re not designed to be hammered. Older RAID-ready enterprise 7.2 Krpm SATA HDDs (such as Western Digital RE3s and RE4s) don’t cost much more than consumer HDDs, and they perform well.
If you only have four free SATA ports, RAID10 with four HDDs is the best option. RAID10 with four 1 TB 7.2 Krpm WD RE3 HDDs provides 2 TB capacity. You’d see ~170 MBps disk bandwidth with seek time ~12 ms, and you could lose one disk (or perhaps two, if you’re lucky) without data loss. The use of RAID5 is no longer recommended, by the way.
If you have five free SATA ports, RAID6 with five 1 TB 7.2 Krpm WD RE3 HDDs provides 3 TB capacity. You’d see ~270 MBps disk bandwidth with seek time ~7 ms, and you could lose any two disks without immediate data loss. However, RAID6 arrays rebuild slowly after failed disks have been replaced, and read errors can hose rebuilds.
Using five HDDs for RAID10 with one hot spare would provide less capacity (2 TB) and less speed (~170 MBps with seek time ~12 ms) but substantially better reliability. Although you could lose only one disk (or perhaps two, if you’re lucky) without data loss, RAID10 arrays rebuild far faster than RAID6 arrays do. Once the array had finished rebuilding, you’d have RAID10 with no hot spares. At that point, you could lose another disk (or perhaps two, if you’re lucky) without data loss.
You may want to enable booting with degraded RAID. If you don’t, and one of the disks fails, you might need to boot with a LiveCD and repair the damage before the machine will boot. If you just boot with degraded RAID, on the other hand, you may not realize that the RAID array is degraded until it entirely fails (which is too late). It’s prudent to periodically check HDD SMART and RAID status in Disk Utility.
Effective cooling is essential, especially for RAID with multiple HDDs. With consumer-grade hardware, adding a high-capacity rear case fan is wise. Some models provide little ventilation for drives, and are notorious for baking HDDs. It may be necessary to drill an array of small holes in the case, in front of the HDD cage, making sure not to leave metal fragments inside. You can also add a grill, if appearance matters.
Choosing an Operating System
Linux is the best choice for a secure and private host OS. It’s open-source and free, so there’s no money trail linking you to a product ID. Its software RAID implementation is fast, efficient and reliable. The LUKS package provides native full-disk encryption, with everything encrypted except for the boot partition. And finally, VirtualBox runs very well under it.
Unless carefully configured, all operating systems leave disk caches and logs behind. With Windows or OS X, which are closed-source, it’s very difficult to even know what’s being left behind. Knowledge of Windows shellbags, for example, was until recently largely restricted to the computer forensics community.
Ubuntu is a good choice for new Linux users. The Ubuntu Software Center simplifies package management. And the alternate install ISO provides full access to Debian’s disk partitioning tools, including LUKS full-disk encryption, and LVM for flexible partition management. It’s best to use releases with long-term support (currently 12.04). For those who dislike the Unity desktop, Xubuntu (based on Ubuntu) is the best alternative. Mint (also based on Ubuntu) doesn’t provide an alternate install ISO. Debian is probably the most secure option, and Debian 7.0 was just released. As noted above, there is no 4GB memory limit with a 64-bit OS, so use that if your hardware supports it.
Although the high-privacy option (explained below) is written for Ubuntu 12.04.2, it should work for any Linux distribution, if suitably tweaked. In principle, an analogous approach should work for Windows and OS X, but avoiding compromise through required authentication would be problematic.
VM Security Issues
To protect VM privacy, and limit access to log files and disk-cache residue, it’s prudent to use dedicated host machines with full-disk encryption. However, encrypted disks are decrypted while in use, and keys are stored in memory, so it’s prudent to shut down hosts when idle. Using full-disk encryption for individual VMs would limit access to idle VMs while other VMs are in use, but it won’t prevent access to information that’s been logged or cached on the host machine.
Under most circumstances, it’s safe to assume that VMs are isolated from each other, unless they have direct network connectivity or share disks (including USB and other removable drives) or clipboard. However, the possibility of malware breakout from VM to host can’t be excluded. If that occurred, other VMs would be readily compromised. Other machines with direct network connectivity or shared disks would also be compromised. When isolation is crucial or malware risk is high, it’s prudent to segregate VMs on different host machines, and to avoid direct network connectivity and disk sharing.
Plausible Deniability
Although encrypted data appears random, files, partitions and disks containing random data may engender suspicion, especially when there’s evidence that they’re in use. Also, there may be header information that flags the data as encrypted. In particular, the Linux Unified Key Setup (LUKS) for dm-crypt writes headers that begin with “LUKS”, and that disclose such information as the type of encryption being used.
Conversely, a well-known feature of TrueCrypt is the ability to write hidden partitions, and even to run hidden operating systems. If challenged, one can disclose the passphrase for the decoy partition. Adversaries can mount the decoy partition, and run a decoy OS that’s installed on it, but they can’t detect any hidden partition or OS that may exist. And so it’s arguably plausible to deny that any hidden partition exists.
However, merely having decoy partitions doesn’t make them plausible, unless they contain plausible information, and are used daily. If an adversary knows that you were online yesterday, based on information from your ISP, but your hidden OS hasn’t been used for a week, it seems odd. Also, even if you have disclosed the passphrase for a hidden TrueCrypt partition, or even if you use TrueCrypt without hidden partitions, an adversary may not believe you.
This tutorial uses Linux with LUKS and dm-crypt full-disk encryption. That may be unworkable if your circumstances require plausible deniability. Future tutorials will cover strategies for plausible deniability.
Installing Ubuntu with RAID, LUKS Encryption and LVM
First download the Ubuntu 12.04.2 alternate (64-bit) installer image, using the BitTorrent link or the nearest mirror. Use another machine that’s protected by a VPN service and/or Tor for all of these downloads. If you don’t have them already, download the credentials for your direct-connect VPN service. Also download adrelanos’ “VPN-Firewall” scripts.
If you’ll be going with the high-privacy option, you’ll also need the package files required for setting up Network Manager with OpenVPN. Get them through a VPN service and/or Tor. The installer would normally download them from the Ubuntu repository, but that won’t be possible without Internet connectivity. There are seven files to get:
Those are the package files needed to set up Network Manager with OpenVPN in a fresh Ubuntu 12.04.2 64-bit installation. You could get them from a non-US archive, if you like. It’s possible that this hack won’t work with an updated Ubuntu bug-fix release (e.g., 12.04.3). In that case, error messages from the package installer (which you’ll use near the end of this tutorial) will tell you what’s wrong.
Connect the machine to your LAN router. Otherwise, networking won’t get set up properly. If you’re going with the high-privacy option, just disable Internet connectivity to your LAN. After finishing the installation, you’ll install VPN-Firewall and your direct-connect VPN client, restore Internet connectivity, and establish the VPN connection. Then you’ll download and install updates, reboot and proceed to the next tutorial for VirtualBox setup.
If you’re not going with the high-privacy option, just proceed with normal Internet connectivity via LAN. And don’t bother downloading the package files for Network Manager with OpenVPN.
Installing Ubuntu (or Xubuntu or Debian) is quite easy, even using the old-school Debian wizard on the alternate install ISO. Create an install CD, and then boot your host machine with it. You can also use a USB flash drive, if your machine will boot from it.
Just use defaults until you reach the hostname screen. Although hostname isn’t visible beyond LAN, that will change with IPv6, so it may be prudent to go with the default “ubuntu” (or “xubuntu” or “debian”). Just hit enter after typing the hostname.
The most anonymous username is probably “User”, and it’s probably counterproductive to use something cute like “Anne O. Nymous”. A strong password is always prudent, but it matters less here because full-disk encryption is the primary defense. Don’t encrypt your home directory, because that can conflict with full-disk encryption.
On the clock screen, select No and set the time zone to UTC (the last choice). The host machine will generally be accessing the Internet directly, so there’s no point in picking a non-local time zone. However, picking UTC is not uncommon, and it might prevent information leaks.
On the disk partitioning screen, select Manual and hit enter. While the following may seem complicated, it’s really not. Also, the installer remembers your preferences, so repeating steps on multiple partitions goes quickly. Read it through a few times, so you have a general idea of what you’re doing, and are not just following the steps. Basically, you’ll be creating two partitions on each disk: 1) a small one for the boot RAID array; and, 2) a large one for the RAID array that will be encrypted using dm-crypt with LUKS, and then split into logical volumes (swap, root and home) using the Logical Volume Manager (LVM).
Start with the boot-array partitions. We put them at the beginning of each disk, furthest out where access is faster. Here are the steps for each of the physical disks:
highlight disk, hit enter, select Yes and hit enter to create partition table
highlight FREE SPACE line under disk and hit enter
highlight Create a new partition (default) and hit enter
you want 300 MB total boot space, so use these partition sizes:
300MB for RAID1 with two disks
150MB for RAID10 with four disks
100MB for RAID5 with four disks
100MB for RAID6 with five disks
hit enter after typing desired partition size
select Primary as partition type (default) and hit enter
select Beginning as location (default) and hit enter
select Use as line, hit enter, select physical volume for RAID and hit enter
highlight Bootable flag and hit enter to set on
highlight Done setting up the partition and hit enter
Repeat the above steps for each of the other physical disks.
Now create a second partition on each physical disk, using the remaining space. We will use them for a RAID array that will hold everything else except boot. Here are the steps for each disk:
highlight FREE SPACE line under disk and hit enter
highlight Create a new partition (default) and hit enter
accept default size (because you’re using all remaining free space) and hit enter
select Logical as partition type (default) and hit enter
select Use as line, hit enter, select physical volume for RAID and hit enter
highlight Done setting up the partition and hit enter
Repeat the above steps for each of the other physical disks.
You should be back at the main disk partitioning screen. Configuring software RAID is next. Here are the steps for the boot RAID array:
select Configure software RAID and hit enter
select Yes to Write changes to the storage devices and configure RAID and hit enter
select Create MD device (default) and hit enter (this will be md0, by the way)
select desired RAID type and hit enter
enter number of active devices (total disks, less any hot spares that you decide to use) and hit enter
enter number of hot spares (typically zero unless you have five HDDs, and are going with RAID10) and hit enter
check (using space bar) which partitions to use (the small ones, sda1 etc)
hit enter to get back to the RAID configuration screen
Now repeat that process to create md1 from the set of large partitions (sda5 etc). We will encrypt that using dm-crypt with LUKS, and then use it for LVM.
Select Finish and hit enter to get back to the main disk partitioning screen.
At this point, you should see two RAID devices on the main disk partitioning screen: “RAID… device #0″ (aka md0) being the boot array, and “RAID… device #1″ (aka md1) being the array for encryption and LVM. Let’s do RAID device md1 first.
select #1 line below main “RAID… device #1″ partition line, and hit enter
select Use as line, hit enter, choose use as physical volume for encryption, and hit enter
select Done setting up the partition and hit enter
you should be back at main disk partitioning screen
select Configure encrypted volumes and hit enter
select Yes to Keep current partition layout and configure encrypted volumes and hit enter
select Create encrypted volumes and hit enter
check /dev/md1 (using space bar) and hit enter
select Finish and hit enter
Now you’ll be asked for your passphrase. Use a complex one, at least 25 characters long with lowercase and uppercase letters, numbers and other printable characters. Record it in a private and secure place, because there is truly no way to recover it if it’s lost.
You should be back at the main disk partitioning screen, and should now see the encrypted volume md1_crypt at the top of the list. Now we configure logical volumes in that partition, as follows:
select #1 line below main md1_crypt partition line, and hit enter
select Use as line, hit enter, choose use as physical volume for LVM, and hit enter
select Done setting up the partition and hit enter
you should be back at main disk partitioning screen
select Configure the Logical Volume Manager and hit enter
select Yes to Keep current partition layout and configure LVM, and hit enter
select Create volume group and hit enter
name it (e.g., cryptovg) and hit enter
check /dev/mapper/md1_crypt (using space bar) and hit enter
Now you create your logical volumes. Although you can get fancy, swap, root (“/”) and home are enough. We do swap first to put it at the beginning of the logical volume, further out on the disk where access is faster. The steps for swap are:
select Create logical volume and hit enter
hit enter to accept default volume group cryptovg
name it swap and hit enter
set size as twice your installed memory and hit enter
The steps for root are:
select Create logical volume and hit enter
hit enter to accept default volume group cryptovg
name it root and hit enter
set size as 20 GB and hit enter
The steps for home are:
select Create logical volume and hit enter
hit enter to accept default volume group cryptovg
name it home and hit enter
accept default size (remaining space) and hit enter
select Finish and hit enter
you should be back at main disk partitioning screen
Now you finish configuring your home volume, as follows:
select #1 line below main home partition line, and hit enter
select Use as line, hit enter, choose use as Ext4 journaling file system, and hit enter
select Mount point line, hit enter, choose /home and hit enter
select Done setting up the partition and hit enter
Now you finish configuring your root (aka /) volume, as follows:
select #1 line below main ‘root” partition line, and hit enter
select Use as line, hit enter, choose use as Ext4 journaling file system, and hit enter
select Mount point line, hit enter, choose / and hit enter
select Done setting up the partition and hit enter
Now you finish configuring your swap volume, as follows:
select #1 line below main swap partition line, and hit enter
select Use as line, hit enter, choose use as swap area, and hit enter
select Done setting up the partition and hit enter
Then, page down the main disk partitioning screen to your boot RAID array (“RAID… device #0″ aka md0), and finish configuring it:
select #1 line below main “RAID… device #0″ partition line, and hit enter
select Use as line, hit enter, choose use as Ext4 journaling file system, and hit enter
select Mount point line, hit enter, choose /boot and hit enter
select Done setting up the partition
Finally, go to the bottom of the main disk partitioning screen, select Finish partitioning and write changes to disk, and hit enter. After rechecking the partition configuration, select Yes to write changes to the disks, and hit enter.
The rest of the install process should complete with little input. If you need an HTTP proxy, you’ll probably know what it is. You do want to install the GRUB bootloader, unless you’re doing a dual-boot system (and know what you’re doing). The system clock is set for UTC.
Now remove the installation CD, and let the machine reboot.
Setting Up Network Manager with OpenVPN
It’s convenient to configure your direct-connect VPN on the host machine before installing drivers and updates, and setting up VirtualBox. If you’ve chosen the high-privacy option, doing that is essential, and it’s somewhat more complicated. In that case, your new host machine (and its LAN) shouldn’t have Internet connectivity now .
First you’ll need to set up Network Manager with OpenVPN. If you have not chosen the high-privacy option, just open a Terminal window, and run these commands:
If you have chosen the high-privacy option, open a Terminal window, and run these commands:
user@ubuntu:~$ cd /home/user
user@ubuntu:~$ mkdir nmo
Then copy the seven Network Manager and OpenVPN package files (which you’ve downloaded previously via a VPN service or Tor) to /home/user/nmo/ using your preferred method. Then run these commands in a Terminal window:
The first command installs the packages, and the second command corrects errors caused by not installing them in the proper sequence. If the second and third commands complete without errors, you’re good to go.
If the second command fails, the errors should tell you what package files are missing. Just get them through a private channel, add them to /home/user/nmo/ and rerun the previous three commands.
Installing Direct-Connect VPN
First review your VPN credentials – certificates (.crt) and keys (.key) – and configuration files (*.conf or *.ovpn). Some VPN services provide configuration files with embedded credentials, with each of the credentials bracketed by corresponding [name] and [/name] tags. In that case, copy each of the credentials, and save as an appropriately-named text file. There may be as many as four credentials:
ca.crt
client.crt
client.key
ta.key
All of these files should be downloaded via HTTPS, and kept private. You might want to avoid providers that don’t use HTTPS for this. Establishing a VPN connection may also require a username and password, which may differ from the account name and password for the VPN service’s website. Some low-end services email connection username and password. In that case, immediately go to the provider’s website, and change the password.
Virtually all VPN services provide a ca.crt (certificate authority) certificate. These certificates enable clients to verify the authenticity of VPN servers before connecting. Most VPN services also provide a client.crt (client certificate) and client.key (for unlocking and using the client certificate). Client certificates allow VPN servers to verify the authenticity of clients before accepting connections. A few high-end VPN services also provide a ta.key to enable TLS authentication, whichincreases connection security.
You’ll also need other information from the OpenVPN configuration file. First, you’ll need to choose the VPN server that you’ll be connecting to. Avoid the United States, United Kingdom and France. Germany and the Netherlands are OK. It’s probably good to avoid Eastern Europe, Russia, China etc, which might attract attention. You’ll need the IP address of the server, rather than the hostname, in order for VPN-Firewall (see below) to work properly. If you just have hostnames, you can get the IP address by running this command:
user@ubuntu:~$ host hostname.that.you.have
Second, you’ll need to know the server port number and connection type (UDP or TCP). It’s generally best to use UDP (unless you’re routing via Tor). You’ll also need to know the cipher type (from the cipher … line) and whether LZO compression should be enabled (if you see comp-lzo). If cipher type isn’t specified, use the Network Manager default. For VPNs that provide ta.key, you’ll need to know the key direction, which is the number at the end of the tls-auth line (typically 1).
Start the setup by copying all of the VPN credential files to /etc/openvpn. Open a Terminal window, and run these commands:
Of course, edit the second command for the files that you actually have.
Then open Network Manager, select the VPN tab, and click the Add button. Select OpenVPN as type, and click the Createbutton. Enter a short name for the connection, and the IP address of the server that you’ll be accessing. The next steps depend on the configuration of the VPN service.
There are three common VPN-configuration setups. Some VPN services (such as Private Internet Access) provide only ca.key, and require username and password for connection. For them, select Password as authentication type, enter your username and password, and click the CA Certificate button. In the Places window, click File System. Double click etc, and then double click openvpn. Finally, select ca.crt and click Open.
Now click the Advanced button”. In the General tab, check Use custom gateway port and enter the appropriate port number. If appropriate, check Use LZO data compression (typical) and Use a TCP connection (rarely appropriate unless you’re routing via Tor). If you know the cipher type, click Cipher in the Security tab, select the appropriate one, and clickOK. Now click Save in the VPN window, and close Network Manager.
Some VPN services (such as AirVPN) provide ca.key, client.crt and client.key, but not ta.key, and don’t require username and password for connection. For them, select Certificates (TLS) as authentication type, and then specify User Certificate(client.crt), CA Certificate (ca.crt) and Private Key (client.key) as described above. Then complete the same steps in theAdvanced window as described above, save the VPN configuration, and close Network Manager.
Some VPN services (such as IVPN) provide ca.key, client.crt, client.key and ta.key, and also require username and password for connection. For them, select Password with Certificates (TLS) as authentication type, and enter your username and password. Then specify User Certificate (client.crt), CA Certificate (ca.crt) and Private Key (client.key) as described above. Complete the same steps in the Advanced window as described above. In the TLS Authentication window, check Use additional TLS authentication, and specify Key File (ta.key) and Key Direction (typically 1). Then save the VPN configuration, and close Network Manager.
Installing and Checking VPN-Firewall
Install adrelanos’ VPN-Firewall scripts as described at https://github.com/adrelanos/VPN-Firewall. You want the firewall (iptables rules) to load at bootup, so install both the firewall and init scripts. Reboot the machine, and check VPN-Firewall status by running sudo service vpnfirewall status in a Terminal window. It should reply 0.
If you’ve chosen the high-privacy option, now restore Internet connectivity to your new VM host. Then verify that your new machine has no Internet connectivity by trying to visit https://duckduckgo.com/. If it connects, there’s something wrong with the VPN-Firewall setup.
Now use Network Manager to establish your direct-connect VPN connection, and verify that it works by visitinghttp://whatismyipaddress.com. If it doesn’t connect, recheck the configuration. If it does connect, test VPN-Firewall by killing the openvpn process (run sudo killall openvpn in a Terminal window) and verifying that the machine has no Internet connectivity. Then use Network Manager to reestablish the VPN connection, and verify that it works again by visiting http://whatismyipaddress.com.
Check your DNS servers by running the standard DNS leak test at https://www.grc.com/dns/. It should report only the DNS servers that your direct-connect VPN service specified. And it should not report any DNS servers associated with your ISP, or specified by your LAN router. If it does, there’s something wrong with the VPN setup.
You can also check for leaks using Wireshark. To install Wireshark, open a Terminal window, and run these commands:
Reboot the machine, and establish your direct-connect VPN connection. Then open Wireshark, and start capturing on eth0. Use Firefox to check http://whatismyipaddress.com, run the DNS test at https://www.grc.com/dns/, etc. Now stop the capture, and run Statistics/Endpoints. You should only see only local non-public IPs and the VPN server that you’re connected to.
Now kill the openvpn process (run sudo killall openvpn in a Terminal window) and start a fresh capture on eth0. Verify that Firefox can’t see anything. The iptables setup blocks pings, by the way. Stop the capture after about 10 minutes, and run Statistics/Endpoints. You should only see traffic with local non-public IPs, and reconnection attempts from the VPN server that you were connected to.
Finally, reestablish your direct-connect VPN connection, and verify that it’s working again.
Viewing Network Manager OpenVPN Logs
If there are problems with the OpenVPN connection, it may help to have debugging information from Network Manager. Getting that takes a little work, however. First, you must edit its configuration file to maximize logging. Run the following command in a terminal window:
Add these two lines at the end of the file, after a blank line:
[logging]
level=DEBUG
Save the altered file by typing Ctrl-O, and exit nano by typing Ctrl-X. Then restart Network Manager by running the following command in a terminal window:
user@ubuntu:~$ sudo service network-manager restart
Finally, connect the VPN using the Network Manager icon in the top panel bar. Wait until it either connects, or gives up. In order to see the openvpn connection log, run the following command in a terminal window:
user@ubuntu:~$ grep nm-openvpn /var/log/syslog
Completing the Installation
You’re almost done. If desired, activate proprietary drivers and reboot. Then start Update Manager, download and install updates, and let the machine reboot.
Your VM host machine will have no Internet connectivity whenever it boots, given that VPN-Firewall is active and no VPN is running. That’s arguably the best default, because you must actively choose how to proceed.
Now you are done, and can proceed to the next guide,
Part 5 – Installing VirtualBox and Creating Linux VMs
By mirimir (gpg key 0x17C2E43E)
Introduction
This tutorial covers installing VirtualBox, and creating Linux (Ubuntu, Xubuntu or Debian) workstation and LiveCD VMs. Installing VirtualBox is trivial. Download the version of VirtualBox for your host machine OS fromhttps://www.virtualbox.org/wiki/Downloads. Then open the downloaded package with the Ubuntu Software Center, and install. For Debian hosts, use dpkg in a terminal. Finally, download the Extension Pack, and open it with VirtualBox to install. That’s it. With VirtualBox running, hitting F1 opens the user manual, which is excellent and comprehensive.
VirtualBox Networking Basics
By default, VM network adapters are attached to <span “NAT”. That is, they use the host machine’s active network gateway (wired, wireless, VPN, etc) with network address translation (NAT) and VirtualBox’s built-in DHCP server. Multiple VMs using VirtualBox NAT are isolated from each other. VM network adapters can also be attached to VirtualBox internal networks, and multiple VMs can communicate through shared internal networks. But there is no network connectivity with the host machine for VMs that are attached to either NAT or internal networks.
Router/firewall VMs (such as pfSense and OpenWRT) have at least two network adapters, WAN and LAN, and typically run a DHCP server on LAN. For example, you can attach the WAN adapter to the host via NAT, and the LAN adapter to an internal network. You can also use router/firewall VMs to establish connections with remote VPN servers or Tor through WAN, and route those connections to LAN. That’s the basis of the setup that we’re creating.
VM network adapters can be attached to the host machine in two other ways. First, through selecting “Bridged Adapter”, they can be bridged to the host’s physical network adapters. For example, VMs with WAN bridged to the host’s LAN adapter behave just like other machines on the host’s LAN, perhaps with IP addresses from the LAN router. Conversely, by bridging the LAN adapter of a router/firewall VM to another host network adapter, you can provide routed resources (such as a VPN or Tor tunnel) to other physical machines or networks.
Second, through selecting “Host-only Adapter”, VM network adapters can be bridged to virtual network adapters on the host. The two bridging modes work well together. In particular, it’s possible to route traffic from the host machine’s LAN (with “Bridged Adapter”) to a VM (or even a network of VMs) and then back to the host (with “Host-only Adapter”) through a virtual network adapter. For example, you could have the host machine access the Internet through an intrusion prevention system (IPS) and/or a nested chain of VPNs and Tor. Although that’s not part of this series of guides, it’s discussed here in some detail.
Creating Linux Workstation VM
Creating VMs is very easy, and section 1.7 of the VirtualBox manual (hit F1) explains it well. It’s a two-stage process. First, you configure the new VM in VirtualBox. Second, you start the VM, and install the OS, just as you would on a physical machine.
Linux is the best choice for a secure and private workstation VM. It’s open-source and free, so there’s no money trail linking you to a product ID. Ubuntu is a good choice for new Linux users. It’s best to use releases with long-term support (currently 12.04). For those who dislike the Unity desktop, Xubuntu and Mint (both based on Ubuntu) are good alternatives. Debian is arguably more secure, but not as user-friendly.
You can use the same 64-bit alternative installer image file (Ubuntu, Xubuntu or Debian) that you used for the host machine. Or you can download a 32-bit (aka i386) regular desktop installer image file for the Linux distro that you’ve chosen. In any case, you’ll need the standard desktop installer image file for creating LiveCD VMs (explained below).
First open VirtualBox, and click the New icon. Enter your desired VM name, and select the proper OS type (Linux) and version (Ubuntu for Ubuntu, Mint or Xubuntu) or Debian, choosing 32-bit or 64-bit as appropriate. Specify 1 GB memory to avoid disk swapping. If host RAM is limited, you can reduce it later. Use the defaults for virtual hard disk type (dynamically allocated VDI) and location, but specify at least 100-200 GB maximum size. The initial size of the virtual disk will be at most 5-6 GB. But with large maximum size, it’s very easy to accommodate unplanned growth. After reviewing the final summary screen, hit Create.
Next, tweak the new VM’s settings. In the General/Advanced tab, leave Shared Clipboard and Drag’n’Drop set toDisabled (for security). Under System/Motherboard, change the boot order to Hard Disk, CD/DVD, and deselect Enable absolute pointing device. Under System/Processor, select Enable PAE/NX (if your host supports it). Under Display/Video, increase video memory to 128 MB (unless host RAM is limited). Under USB settings, deselect Enable USB Controller (for security).
Now add the OS installer image. Under Storage, highlight the CD icon (named Empty) under IDE Controller. Then hit the CD icon to the far right of CD/DVD Drive, and select Choose a virtual CD/DVD disk file. Navigate to wherever you put your installer image, and select it. Then click OK to exit the settings screen.
Then double click on the new VM, and go through the install process. It’s OK to accept all defaults. But you can select the encrypted LVM option for disk partitioning , if you like. Although whole-disk encrypted VMs may leave plaintext on host machines, that’s better than nothing if the host is compromised while running. As the VM is rebooting after installation completes, click Devices in the main menu, highlight CD/DVD Devices, and select Remove disk from virtual drive.
To get better VM performance, you may want to install VirtualBox guest additions (customized kernel modules). Guest additions also provide better display and mouse integration, and enable mounting host folders (aka shared folders) in the VM. However, some of the kernel customizations may reduce guest-host isolation, and using shared folders definitely does. It’s a typical convenience vs security trade-off.
Ubuntu or Xubuntu will prompt you to install the guest-additions kernel-module package as additional drivers. If not, use the Settings menu. You can also install guest additions by clicking Devices in the VirtualBox menu, and then Install Guest Additions. But don’t do both. Debian 7.10 automatically installs the guest-additions kernel-module package.
Now reboot, use Update Manager to download and install updates, and let the system reboot again. You’re done.
Creating Diskless Linux LiveCD VM
Diskless LiveCD VMs are useful whenever isolation matters, because VM storage in ramdisk doesn’t survive rebooting (although traces may remain in host memory cache). Using them may be prudent for some online work, and they’re definitely useful for administering multiple pfSense VPN-client VMs. For example, you could download configuration files for a new VPN service through the appropriate nested VPN chain, and then configure and test the new pfSense VM. After rebooting the LiveCD VM, you could safely get configuration files for another new VPN service (even from a shared host folder) and then configure and test its new pfSense VM.
Although you might want a few diskless LiveCD VMs for convenience, you’ll still need less workstation VMs overall. Also, they don’t require updating, and upgrading them to a new release is simple. The LiveCD image is read-only, and loads to ramdisks during boot, so at least two or three VMs can typically share an image.
You must use a regular Ubuntu (or Xubuntu or Debian) desktop installer image, which works as a LiveCD. As described above, select the proper OS type and version, and specify 1 GB memory to avoid disk swapping. Then specify Do not add a virtual hard drive, and hit Create. Tweak the new VM’s settings as described above, except for the Storage tab.
Under Storage, delete the IDE controller and attached CD/DVD drive. Under the SATA controller, create two CD/DVD drives. For the SATA port 0 drive, add the installer image, and enable Live CD/DVD. For the SATA port 1 drive, add VBoxGuestAdditions.iso (located in /usr/share/virtualbox/). Then click OK to exit the settings screen.
Start the new VM, and choose the option to try without installing. That’s it.
Installing VirtualBox guest additions will improve performance, and is necessary for using shared host folders. But you’ll need to repeat the installation after each reboot, because the VM intentionally has no persistent storage. Once the VM has finished booting, open a terminal and run these commands:
ubuntu@ubuntu:~$ sudo mkdir /media/cdrom1
ubuntu@ubuntu:~$ sudo mount /dev/sr1 /media/cdrom1
ubuntu@ubuntu:~$ cd /media/cdrom1
ubuntu@ubuntu:~$ sudo ./VBoxLinuxAdditions.run
The installer will complain about missing headers for the running kernel, but will succeed anyway. Installation worked if the mouse pointer is no longer captured.
If you want a shared folder, start by creating a new folder on the host, for example /home/user/LiveCD. Then click Devicesin the top menu bar, and select Shared Folders. Click the + icon (upper right) and navigate to the host folder that you just created. Note the folder name, here LiveCD, and OK out.
Now open a terminal in the VM, and run these commands, replacing LiveCD with the name of your shared folder:
The VM folder /home/ubuntu/host is now linked to the host folder /home/user/LiveCD. The link (and its configuration) will be gone after rebooting. To unmount before rebooting, open a terminal in the VM and run this command:
ubuntu@ubuntu:~$ sudo umount /home/ubuntu/host
Part 6 – Creating pfSense® 2.1.5 VMs as VPN Clients
By mirimir (gpg key 0x17C2E43E)
Introduction
At this point, if you’ve followed Setting Up Secure Host Machines, your new VM host machine can only access the Internet through your chosen direct-connect VPN service. If you’ve followed Installing VirtualBox and Creating Linux VMs, you’ve created Linux workspace and LiveCD VMs. By default, their network adapters are NATed to the host machine, and they reach the Internet through your chosen direct-connect VPN service.
This tutorial covers creating pfSense® 2.1.5 (hereinafter “pfSense”) router/firewall VMs, configuring them as VPN clients, and testing for leaks using Wireshark. Your Linux workspace and LiveCD VMs will access the Internet through nested chains of these VPN gateway VMs and Tor gateway VMs, as discussed in Planning Advanced VM and VPN Setup. Using Tor gateway VMs is covered in Paying Anonymously with Cash and Bitcoins and Creating Nested Chains of VPNs and Tor.
If you want the host machine to routinely access the Internet directly, you can create a pfSense VM client for your chosen direct-connect VPN service. You can use that in your nested VPN chains, instead of the VPN client on the host machine, and connect via the VPN client on the host machine only when you want to hide software downloads or whatever. However, if you’ve chosen the high-privacy option, it’s crucial to continue using the host machine client for your direct-connect VPN.
Create New VPN Account
Your VM host machine is still using your direct-connect VPN service. The first pfSense VPN-client VM that you create can use either that VPN service, or another that will connect through it. It’s best to use a second VPN service for your first pfSense VM, in order to avoid leaks during the host-client to VM-client transition.
You’ll need an account with another VPN provider. It’s best to start with a free VPN service, because there’s no money trail. There are bandwidth and usage limits, however. Paying Anonymously with Cash and Bitcoins covers methods for anonymously buying VPN services.
Although SecurityKISS has a good free option, it does require an email address. But you can use free webmail accounts. The fastest (and perhaps most anonymous) option is AnonBox from the Chaos Computer Club. But accounts last at most one day, and are deleted after messages have been read. For persistent accounts, VFEmail is a good choice, because it only asks for a name.
It’s OK to use the host machine (running the direct-connect VPN) for this. For better isolation, you could dedicate a Linux VM (possibly full-disk encrypted) for this and other sensitive work on the host machine. Once you have a client ID and password from SecurityKISS, download the OpenVPN configuration files for Linux.
Creating & Configuring pfSense VM
Download “pfSense-LiveCD-2.1.5-RELEASE-amd64.iso.gz” from pfSense’s Coltex (Amsterdam, NL) mirror to the host machine (using the direct-connect VPN) and extract the installer image.
Create a pfSense VM, basically as described for Linux VMs in Installing VirtualBox and Creating Linux VMs.
Select BSD as the OS, and FreeBSD (64 bit) as the version.
Specify 512MB memory.
Create a new hard disk using the defaults (VDI, dynamically allocated, 2GB) and finish.
Then tweak the settings. Change the boot order to Hard Disk, CD/DVD and enable PAE/NX.
Add the installer image to the virtual CD/DVD drive.
Disable audio and USB support.
Leave the default network adapter «Adapter 1» attached to NAT (host) and don’t change advanced settings. If this VM will connect through another pfSense VPN-gateway VM, however, attach this adapter to its internal network.
Add a second network adapter «Adapter 2» and attach it to an internal network named, for example, pfS-SK (but don’t change advanced settings).
Start the pfSense VM. In the console window, hit 1 to boot, and then hit i to start the installer.
On the Configure Console screen, select Accept these Settings.
On the Select Task screen, select Quick/Easy Install.
Under Are you SURE?, select OK. Wait a while.
On the Install Kernel(s) screen, select Standard kernel.
On the Reboot screen, select Reboot.
While it’s rebooting, using the Devices | CD/DVD Devices menu at the top, select Remove disk from virtual drive. To speed booting, you can hit F1 and then 1 in the console.
Enter n to decline setting up vLANs.
Type em0 as the WAN interface, and hit enter.
Type em1 as the LAN interface, and hit enter.
Hit enter to pass on OPT interface setup. Enter y to accept choices, and wait for pfSense to finish booting.
Edit the settings for the LiveCD VM, attaching the network adapter «Adapter 1» to the same internal network as the new pfSense VM (for example, pfS-SK). Then start the LiveCD VM, and download your OpenVPN configuration files for Linux from SecurityKISS. Don’t visit any other websites, to mitigate tracking risk. If necessary, you could also access your initial download (above) via shared folders, but that would require installing VirtualBox Guest Additions.
Freshly installed, pfSense routes all outbound connections (from computers on its LAN) through its WAN. But it blocks all new inbound connections from WAN, allowing only those that were established from LAN. If the LiveCD VM can’t see the Internet, recheck your host and the pfSense VM settings.
Configuring pfSense and Creating VPN Client
Now browse to the WebGUI at https://192.168.1.1 and create a server certificate exception. Login as admin with passwordpfsense, and complete the setup wizard. Decline the Gold support option, unless you have an anonymous credit/debit card. The next screen asks for DNS servers that pfSense should use internally, and whether to “[a]llow DNS servers to be overridden by DHCP/PPP on WAN”. I prefer to hard code DNS servers. Using DNS servers pushed by WAN can also be OK, but there are two risks. First, it may not work for some VPN combinations in nested VPN chains. Second, there is the risk that pfSense will end up using your ISP’s DNS servers (if they’ve been passed along to pfSense WAN). Even so, as long as you specify DNS servers in “Services: DHCP server”, the DNS servers that pfSense uses internally will not be pushed to DHCP clients (that is, your workspace VM, and other gateway VMs that connect through this one).
I recommend specifying reliable third-party DNS servers, such as those listed by WikiLeaks or JonDoNYM. If you’ve chosen the high-privacy option, you could specify DNS server(s) pushed by your direct-connect VPN service, or allow DNS servers to be overridden by DHCP on WAN. The key points are: 1) avoid using DNS servers pushed by your ISP; and 2) avoid using the same DNS servers at multiple levels of your VPN chain.
Accept the default timeserver and timezone, and hit Next. On the WAN screen, accept defaults, except for unchecking “Block private networks” and “Block bogon networks”, and hit Next. Accept all defaults on the LAN screen, and hit Next. Set a strong password on the next screen, and let pfSense reload. Now you’re at the pfSense WebGUI Dashboard. It’s best to reboot pfSense before proceeding. In the pfSense VM console window, reboot by entering 5 and then y to confirm.
You may find that the pfSense menu wraps “Help” under “System”, and prevents selecting submenu items for “System”. In that case, browse https://192.168.1.1/system.php, change “Theme” (at the bottom) to “pfsense-dropdown”, and save changes. Some of the other themes also work.
Before creating an iVPN client, tweak pfSense settings. In “System: General Setup”, check “Do not use the DNS Forwarder as a DNS server for the firewall”, and save. In “Services: DNS forwarder”, uncheck “Enable DNS forwarder”, and save. Those help prevent propagation of DNS server specifications through pfSense. In the webGUI in “System: Advanced: Networking”, uncheck “Allow IPv6″ and save. In “System: Advanced: Miscellaneous”, check “Skip rules when gateway is down”. That provides backup protection against leaks to WAN if the iVPN connection goes down. Now reboot pfSense again, from the console, by entering 5 and then y to confirm.
Although I have never seen outbound traffic use the WAN interface when a VPN is down, pfSense documentation does say this: “By default, when a rule has a specific gateway set and this gateway is down, a rule is created and traffic is sent to the default gateway. This option overrides that behavior and the rule is not created when gateway is down, so instead of flowing via the default gateway, the traffic will continue to attempt to use the gateway that is in a down state, and it will most likely not proceed. This is useful if you have traffic that should only ever use one specific WAN and never flow over any other WAN, regardless of how the firewall’s routing table has for the default route.”
For “normal” network setups, it’s important to specify good DNS servers, and to minimize the need for hard coding. In such cases, it’s best to allow system DNS servers to be overridden by DHCP/PPP on WAN, and to enable DNS forwarding. That allows DNS server specifications to transparently propagate through complex networks of pfSense routers. However, in nesting VPNs using pfSense VMs, it’s crucial to use different DNS servers at each level. Using the same DNS servers across levels would be a serious information leak.
Review the Setting Up VPN on Linux Workstation VM section of Basic Setup Using VMs, VPNs and Tor. Then, in the pfSense WebGUI Dashboard, go to System: Certificate Authority Manager. Add ca.crt in the CAs tab. If you haveclient.crt and client.key, add them in the Certificates tab.
For services (such as iVPN) that require username-password authentication, go to Diagnostics: Edit file. Browse to/usr/local/share/misc/, type your username and password in the text box (on separate lines) and save as user-pass. Now go to VPN: OpenVPN: Client and hit the + icon to create a client. The specifics depend on what the OpenVPN server supports, and what it expects from its clients. Use an OpenVPN configuration file (with extension .conf or .ovpn) from the service as a guide. In particular, note the server address and port, and the encryption algorithm. In chaining VPNs, it’s simpler to use IP addresses, rather than hostnames, although reliability may be lower (because you’ve broken failover for the VPN service).
For SecurityKISS, accept the defaults in VPN: OpenVPN: Client setup, except as noted:
Server host or address: 46.165.197.1 or 46.165.221.230 or 62.75.181.139 (Germany)
Server port: 123
Server host name resolution: enable (check) Infinitely resolve server
TLS Authentication: disable (uncheck) Enable authentication of TLS packets.
Client Certificate: client
Encryption algorithm: BF-CBC (128-bit)
Compression: enable (check) Compress tunnel packets using the LZO algorithm.
Advanced: remote-cert-tls server;verb 5
For services that don’t provide client.crt and client.key, use webConfigurator default.
Some services (such as IVPN) use TLS authentication. Under TLS Authentication, leave Enable authentication of TLS packets. checked, but disable (uncheck) Automatically generate a shared TLS authentication key. Then paste ta.key in the text box.
To automate username-password authentication for services (such as IVPN) that require it, enter the following in theAdvanced box:
Save the client configuration, and check Status: OpenVPN. The status should be up. Then check Status: System logs: OpenVPN. You should see Initialization Sequence Completed near the bottom. A few lines above, you should see a line that starts (after the timestamp) with PUSH: Received control message …. If you don’t see redirect-gateway def1 in that line, edit the VPN: OpenVPN: Client setup, and add redirect-gateway def1; to the Advanced text box. If the VPN isn’t connecting, look for errors in Status: System logs: OpenVPN. You may need to tweak the Advanced string by adding other options from the service’s configuration file. If you see it complain about cipher mismatch, use the one it wants in your client configuration.
Once the VPN is connecting, check Status: System logs: OpenVPN again, find the PUSH: Received control message … line, and look for dhcp-option DNS server followed by an IP address. Then go to Services: DHCP server, and specify that IP address as DNS server. That works for most VPN services. But if it doesn’t, which you’ll discover soon, you’ll need to instead use third-party DNS servers, such as those from WikiLeaks or JonDoNYM. However, do not use any of the ones that you used above in the setup wizard (which appear in System: General Setup) because you don’t want to short-circuit VPN anonymity by using the same DNS server(s) for both entry and exit traffic.
At this point, pfSense is not routing anything through iVPN, and your LiveCD VM has no Internet connectivity. That’s normal. Don’t worry. Go to Interfaces: Assign network ports, hit the + icon, and hit Save to add OPT1. Then go toInterfaces: OPT1, enable it, rename it as SKISS or whatever, save and apply changes. In Firewall: NAT: Outbound, selectManual Outbound NAT rule generation, save, and then apply changes. In the same tab, edit each of the three rules (for ISAKMP, LAN and localhost). For each rule, click the e icon at the right, and use the toggle to change the Interface from “WAN” to SKISS (or whatever you’ve named it). Then hit the Apply Changes button.
If you’re using an older pfSense release, there will be six rules after changing outbound NAT from automatic to manual. In that case, just check (select) the three with WAN as interface, delete them using the x button at the lower right, and then apply changes. You don’t need to modify the rules with SKISS (or whatever you called it) as interface.
In Firewall: Rules: LAN, edit the existing rule Default allow LAN to any rule. Using the Gateway toggle in the lowerAdvanced features section, select SKISS as gateway. Rename the rule as Allow LAN to any rule via SKISS and save. In the rule list, it should look like * LAN net * * * SKISS_VPNV4 none. Also edit the existing rule for IPv6 traffic. At the top, toggle Action from Pass to Block. Then apply changes.
Back in the pfSense VM console window, reboot by entering 5 and then y to confirm. After bootup, there should be an IP address after ovpnc1. If it shows NONE, hit enter once or twice. If it still shows NONE, recheck the pfSense configuration using the WebGUI. Start by looking for errors in Status: System logs: OpenVPN. It’s also possible that the direct-connect VPN connection has gone MIA. Check for that, and reconnect if necessary.
At this point, all outbound traffic from LAN will use the VPN gateway (SKISS or whatever) rather than the WAN gateway. Browse http://whatismyipaddress.com or another such site. The IP address should match the iVPN exit server for the route that you’re using.
There are two straightforward tweaks that help prevent leaks. First, in System: Routing: Gateways, edit the VPN gateway. Check Default Gateway to set, save, and then apply changes. Second, in System: General Setup, set the gateway for all DNS servers listed there as WAN. This is necessary because the VPN is now the default gateway. You might think that this setup would prevent the VPN link from coming up, but it doesn’t.
By default in pfSense, all outbound traffic is allowed on WAN. However, it is more secure to specify the hosts that pfSense can connect to via WAN, and to block everything else. This is rather more complicated, because one must use aliases. Using aliases in restricting outbound traffic on WAN is necessary because there can be multiple values, and because hosts may be specified by hostname, rather than by IP address. If this is your first pfSense setup, it’s best to verify that pfSense is working properly before attempting these steps.
Aliases are needed for four types of outbound traffic: 1) the DNS server IPs specified in “System: General Setup”; 2) the pfSense NTP server hostname specified in “System: General Setup”; 3) the OpenVPN server hostname or IP specified in “OpenVPN: Client”; and 4) the pfSense servers needed for updating. In Firewall: Aliases: IP, create four aliases, using the +button to add the values:
Using these aliases, you then add rules for the WAN interface to pass necessary outbound traffic, and then a final rule to block everything else. In Firewall: Rules: WAN, create these rules, specifying “Single host or address” for the pass rules:
ACTION
TCP/IP VERSION
PROTOCOL
SOURCE
PORT
DESTINATION
PORT
GATEWAY
QUEUE
DESCRIPTION
pass
IPv4
TCP/UDP
WAN address
*
dnssvr
*
*
none
Allow to DNS server(s)
pass
IPv4
UDP
WAN address
*
ntpsvr
*
*
none
Allow to NTP server
pass
IPv4
TCP/UDP
WAN address
*
vpnsvr
*
*
none
Allow to OpenVPN server
pass
IPv4
TCP/UDP
WAN address
*
update
*
*
none
Allow to pfSense update server
block
IPv4
*
WAN address
*
*
*
*
none
Block all other IPv4
block
IPv6
*
WAN address
*
*
*
*
none
Block all IPv6
Then reboot from the console window, by entering 5 and then y to confirm.
Once the pfSense VPN-client VM is working properly, edit the settings for the workstation VM that will be using it. Attach its network adapter (“Adapter 1″) to the internal network that’s attached to the pfSense VM’s LAN adapter. Then start the workstation VM, and browse http://whatismyipaddress.com. The IP address should match the OpenVPN server that you’re using.
If the site doesn’t load, open a terminal and run ping 4.2.2.2. If you get no responses, recheck the VPN connection using the pfSense WebGUI. If Status: OpenVPN shows that it’s up, it’s probably DNS resolution that’s not working. Edit Services: DHCP server and specify reliable third-party DNS servers. But make sure not to use any of the DNS servers that you’re already using for the host machine, the direct-connect VPN, or pfSense itself (as specified in System: General Setup).
Next, check your DNS servers by running the standard DNS spoofability test at https://www.grc.com/dns/ in the workstation VM. It should report only the DNS server(s) that you have specified in pfSense under Services: DHCP server. If it reports others, there’s something wrong with the pfSense setup.
Leak Testing with Wireshark
After reviewing the section on installing and using Wireshark at the end of Basic Setup Using VMs, VPNs and Tor, install Wireshark and configure it on the workstation VM that you’re using. Then reboot the workstation VM. Also start the LiveCD VM. Both should be attached to the internal network that’s attached to the pfSense VM’s LAN adapter.
In testing for leaks, you’ll be capturing on the WAN interface in pfSense (using the WebGUI via the LiveCD VM), and also on eth0 in both the host machine and the workstation VM. If everything is working properly, you should see only traffic with the direct-connect VPN server on host eth0, and only traffic with the indirect-connect VPN server on pfSense WAN. On workstation eth0, you should see traffic with whatever websites that you use while testing.
In order to analyze the pfSense WAN capture with Wireshark, you’ll need to copy the capture file from the LiveCD VM to the host. And, in order to do that, you’ll need to (temporarily) install guest additions in the LiveCD VM, and create a temporary shared folder for the LiveCD VM, as explained in the Creating Diskless Linux LiveCD VM section of Installing VirtualBox and Creating Linux VMs. Alternatively, you can (temporarily) install and configure Wireshark in the LiveCD VM.
To begin the leak test, first go to Diagnostics: Packet Capture in the WebGUI for the pfSense VPN-client VM, which you’re accessing on the LiveCD VM. Accept the defaults for capturing on WAN, but specify 0 for Count (to set no limit). Then open Wireshark on both the host machine and workstation VM. You’ll be capturing on eth0 in both. Now start all three captures.
On the workstation VM, use Firefox to check http://whatismyipaddress.com, run the DNS test athttps://www.grc.com/dns/, and browse for a while. After 10-20 minutes, stop all three captures, and save the pfSense capture on the LiveCD VM to the temporary shared folder on the host (unless you’re also running Wireshark in the LiveCD VM).
Run Statistics/Endpoints on all three captures, using Wireshark in the host (or LiveCD VM) for the pfSense capture. You should see only local IPs and the direct-connect VPN server on host eth0, only local IPs and the indirect-connect VPN server on pfSense WAN, and both local IPs and remote IPs used in testing on workstation eth0.
Now go to Diagnostics: Command prompt in the pfSense WebGUI that you’re accessing on the LiveCD VM. In the box under Execute Shell command, enter killall openvpn and hit Execute. Then start all three captures as explained above. Verify that Firefox on the workstation VM can’t see anything, and that pinging the IP address of your VPN server etc fails. After 10-20 minutes, stop all three captures, and save the pfSense capture on the LiveCD VM to the shared folder as above.
Run Statistics/Endpoints on all three captures. You should see only local IPs and the direct-connect VPN server on host eth0. On pfSense WAN, you should only see traffic with local IPs, and perhaps reconnection attempts from the indirect-connect VPN server that you were connected to. On workstation eth0, you should see only local IPs and connection attempts for whatever sites that you use while testing.
Finally, go to the pfSense console window, and reboot by hitting 5 and y. On the workstation VM, checkhttp://whatismyipaddress.com to verify that it’s all working again.
That’s it.
Part 7 – Paying Anonymously with Cash and Bitcoins
By mirimir (gpg key 0x17C2E43E)
Introduction
In using nested chains of VPN services and Tor for anonymity, the weakest links are arguably the money trails to VPN services that are routed through other VPN services. That’s especially problematic for VPN services to be routed through Tor. Using free VPN services is an option, but they typically cap bandwidth and throughput. The best option for anonymously buying VPN services is sending cash by mail. Using Bitcoins that have been well anonymized through multiple accounts and mixing services is another option. This tutorial covers both.
Cash by Mail
Several VPN providers accept cash payments by mail. Check their payment options, or email support. It’s the most anonymous option, as long as you’re not under active surveillance. However, there are two disadvantages: 1) time (especially for international surface mail); and 2) risk of loss or theft in transit.
Take care to avoid attracting attention. Include a valid return address that’s not associated with you in any way. Use a computer printer, rather than printing by hand. However, do not use a color laser printer, because the printer serial number and a timestamp may be encoded in a pattern of faint yellow dots. Add enough postage, but not way too much. Use large denominations (no coins) and wrap the cash in a sheet of paper, with your account username printed on it. Also, use cash given anonymously as change, rather than from an ATM or bank withdrawal.
Use a public drop box located at least 200 Km away. Go in the evening, and avoid bright lighting. Before approaching, look for security cameras, and avoid looking directly at them. Look downward as much as possible, and wear something seasonably appropriate to conceal your face (such as a hooded shirt or jacket, or a wide-brimmed hat). If driving, park at a reasonable distance to avoid sharing your license tag, but not implausibly far.
Use disposable gloves to avoid fingerprints. Although it’s probably overkill, you can also take steps to confound DNA analysis. Accumulate dust from public places, containing the DNA of many people. Using toilet paper and wearing disposable gloves, lightly rub the dust into each component (cash, cover sheet and envelope).
Bitcoins
Many VPN providers now accept Bitcoin payments. However, contrary to what you might have read, Bitcoins are not at all anonymous, unless you use them prudently. First, to comply with laws against money laundering, mainstream exchanges and purchasing channels now typically require documented identification. Second, the Bitcoin network by design records every transaction in a public accounting log, called the blockchain.
Another risk in using Bitcoins is price volatility. While that has been profitable for some speculators, it discourages routine use. For now, it’s safest to limit Bitcoin holdings to current requirements.
Buying Bitcoins
In order to use Bitcoins, you’ll need a wallet. Although convenient, online wallets are not very safe, because they’re far too likely to disappear, get hacked, or be shut down. The Blockchain wallet is probably the safest online wallet. The Bitcoin Project now recommends the standalone MultiBit client for new users. The original Bitcoin client (Bitcoin-Qt) has become too resource intensive for casual use. It synchronizes the full blockchain, which is currently over 9 GB, and growing at ~630 MB per month. That’s especially problematic when running multiple clients via Tor for Bitcoin anonymization (as discussed below). Although MultiBit is a Java app, that’s secure as long as the Java browser plug-in is not installed.
There are many ways to buy Bitcoins. Although cash deposits are still possible in some places, transactions generally involve bank wires or commercial money-transfer services. Most services don’t accept credit and debit cards, and those that do charge very large transaction fees to cover chargeback risk.
The most anonymous option is buying with cash from private sellers by mail. One reputable option is Nanaimo Gold. Paying cash to private sellers in person is less anonymous. But it’s easy to find sellers using LocalBitcoins, and there’s an escrow service to reduce the risk of fraud. Other (riskier) options for finding private sellers include Bitcoin Forum /…/ Currency exchange and #bitcoin-otc.
Before buying your Bitcoins, set up an initial wallet. The best place for it depends on how anonymously you’re purchasing your Bitcoins. Anonymity levels should be comparable, so your Bitcoins don’t compromise the location, and vice versa. If you must identify yourself to buy Bitcoins, it’s OK to just use the Blockchain browser plug-in wallet, without any VPN. If you’re paying with cash in person, but without identifying yourself, it’s best to run a Multibit client through your direct-connect VPN, either on the host machine or on a workstation VM that’s dedicated to that VPN exit. If you’re paying with cash through the mail, it’s best to use a Multibit client in Whonix (a pair of Linux VMs that connects via Tor) as your initial wallet. Using Whonix is explained below.
Installing the Multibit client in Linux is easy. Download MultiBit for Linux. Then open a terminal window, and run these commands:
Complete the installation, and run MultiBit. It should report being Online (at bottom left). That’s it.
Anonymizing Bitcoins
Once you have your Bitcoins, it’s prudent to anonymize them appropriately before use. All Bitcoin transactions are recorded in the blockchain, and there’s no way to prevent that (without totally breaking the system). However, there are several Bitcoin mixing services. Deposits go into a pool, and payments come randomly from the pool. You transfer Bitcoins through a chain of anonymous Bitcoin wallets, using different mixing services for successive transfers. If the wallets aren’t otherwise associated, your Bitcoins become less and less associated with you as they move through the chain, and no meaningful association remains after a few mixing transfers.
Using multiple anonymous MultiBit clients via Tor is the best option. Multibit clients are fast, because they don’t download the Bitcoin blockchain. And they are secure, because they’re not hosted by a third party. For better anonymity, each Multibit client should have a wallet with several several sending and receiving addresses, or even several wallets. For each transfer from one client to another through a mixing service, you randomly spread the Bitcoins among several address combinations. That increases the anonymity that each transfer provides, by reducing correlation based on quantities transferred.
Using Multibit via Tor is easy using Whonix. Reputable mixing services include BitLaundry and Bitcoin Fog (a hidden service that’s reachable only via Tor). It’s no longer possible to send via shared wallets on Blockchain. Also, OnionBC has either broken, or become a scam. It accepts deposits, but won’t execute withdrawals.
After each mixing step, it’s crucial to check the receiving address for taint from the sending address. On the Blockchain explorer page, enter your receiving address in the “Search” field, and hit enter. Then click “Taint Analysis”, and search for your sending address in the results page. If it appears, you need to remix.
A Bitcoin mixing setup might look like this:
initial wallet
Blockchain wallet for Bitcoins purchased non-anonymously
MultiBit client via direct-connect VPN for Bitcoins purchased in-person with cash
MultiBit client in Whonix via Tor for Bitcoins purchased with cash by mail
first Whonix/MultiBit mixing client: don’t use for purchases
second Whonix/MultiBit mixing client: use for first indirect-connect VPN (e.g., to replace SecurityKISS)
third Whonix/MultiBit mixing client: use for second indirect-connect VPN
fourth Whonix/MultiBit mixing client: don’t use for purchases
fifth Whonix/MultiBit mixing client: use for VPN to route through Tor
You can spend Bitcoins from anywhere in the wallet chain. In doing so, it’s important to match the anonymity levels of Bitcoins and purchases. Your Bitcoins embody a money trail back to you, which becomes increasingly tenuous along the wallet chain. However, your purchases may independently create associations. That’s obvious for items that are shipped to you. But VPN services are also more or less associated with you, depending on their location in the nested chain. You don’t want your Bitcoins to compromise the anonymity of your purchases. And you don’t want your purchases to compromise the anonymity of your Bitcoin wallet, and in turn other purchases that you make from it.
MultiBit Clients in Whonix
Whonix comprises a pair of Debian VMs: a gateway VM that connects to the Tor network, and a workstation VM that connects through the gateway VM. Installing Whonix and setting up MultiBit wallets is easy. Start by downloading Whonix-Gateway and Whonix-Workstation to your host machine, via the direct-connect VPN service. It’s best to verify the downloads as instructed using the OpenPGP signatures and the Whonix signing key. If you can’t be bothered with that, at least download them using BitTorrent (which is more secure, as explained).
Each Whonix gateway and workstation VM must have a unique name (which determines the name of its folder). Also, the gateway and workstation VMs of each Whonix instance must share a uniquely named internal network. For example, import the first Whonix pair, using File / Import Appliance in VirtualBox (reinitializing MAC addresses). Then edit the names of both VMs, adding a unique suffix to distinguish that pair from the rest that you’ll be importing, and to facilitate keeping track of them.
You want these Whonix instances to connect through your terminal indirect-connect VPN service. Initially, that’s SecurityKISS. Change Adapter 1 of the gateway VM from NAT to, for example, the internal network pfS-SK. In both Adapter 2 of the gateway VM and Adapter 1 of the workstation VM, rename internal network Whonix to match the edited VM names.
Start the first Whonix gateway, and then the workstation. Download and install updates as instructed. After rebooting both VMs, download and install MultiBit as described above, and start MultiBit. It should report being Online (at bottom left). There’s no need for MultiBit clients to be running except when you’re actively using them, because they synchronize very quickly.
Then repeat the process – importing Whonix, renaming the VMs and their shared internal networks, and installing MultiBit – as needed for your mixing chain. However, start the first transfer (see below) before updating the rest of your Whonix instances and installing MultiBit. With the free option, SecurityKISS allows just 300 MB per day, and that’s barely enough for downloading updates on two Whonix instances.
Bitcoin Anonymization Specifics
The best place for setting up the first transfer depends on the location of the initial Bitcoin wallet. For the Blockchain browser plug-in wallet, it’s best use BitLaundry on a LiveCD VM connecting through your direct-connect VPN. That way, your ISP at least doesn’t see that you’re using BitLaundry, even though the wallet itself is funded non-anonymously and therefore always accessed without any VPN. Otherwise, and for subsequent transfers in the mixing chain, use the workstation VM (or Whonix instance) that’s running the Multibit client which is sending the Bitcoins.
As noted above, it’s best to use multiple sending and receiving addresses (or even multiple wallets) for transfers via mixing services. For each transfer from one client to another through a mixing service, you randomly spread the Bitcoins among several address combinations. That increases the anonymity that each transfer provides, by reducing correlation based on quantities transferred.
There’s no need to create a wallet at BitLaundry. Create a separate mixing scheme for Bitcoins from each of the appropriate Send addresses in your wallet(s). For destination addresses, use the Request (receiving) addresses of the next wallet(s) in your mixing chain. Specify the desired number of days, and transactions per recipient per day. After reviewing and confirming the scheme, send your Bitcoins to the funding address provided by BitLaundry. Repeat for each sending address.
Bitcoin Fog requires an account, but not an email address. Blockchain requires both. You send your Bitcoins from MultiBit to the deposit address for your mixing-service account. After (at least) several hours, send your Bitcoins to the Request (receiving) addresses for the next client in your mixing chain. With Bitcoin Fog, transfers are split over time (by at least six hours) and you can delay them. For increased anonymity, you can use multiple Bitcoin Fog accounts, one for each of your sending addresses.
To avoid associating Bitcoin wallets with purchases, you can pay through BitLaundry or Blockchain, rather than directly from the wallet. However, a recipient might blacklist mixing services, so there’s some risk of payments being lost. With BitLaundry, don’t split transfers over time, because receiving addresses are sometimes deleted after receiving just one payment. And don not use Bitcoin Fog, because all transfers are split over time by at least six hours.
As you extend your nested VPN chain, it’s arguably best to reconfigure your Whonix instances to connect through the new terminal indirect-connect VPN service. However, if you’re using 3-4 VPN services in your nested chain, especially if it’s a branched chain, having your Whonix instances connect at different nodes would isolate them better from each other. But I don’t recommend using Whonix with less than a two-VPN nested chain.
In any case, there is a risk (albeit small) in moving Whonix instances to longer nested VPN chains. To help protect against attacks involving evil relays, Tor uses persistent entry guards. And so a client’s entry-guard selection might serve as a fingerprint for correlating activity from multiple VPN-exit IP addresses.
On the other hand, changing entry guards more frequently increases vulnerability to adversaries that run relays (in particular, entry guard relays). In light of a recent paper from the Tor research community, Johnson et al (2013) Users Get Routed: Traffic Correlation on Tor by Realistic Adversaries, there’s been talk of rotating entry guards even less frequently.
If you decide to force Tor to choose new entry guards, it’s easily accomplished. Before switching one of your Whonix gateway VMs to a different VPN exit, run these commands:
sudo su
cd /var/lib/tor
cat state | more
Note the names of the entry guards (typically three). Then run these commands:
service tor stop
rm *
It’s important to stop Tor before clearing /var/lib/tor. Otherwise, it may all get rebuilt during normal shutdown. After rebooting the gateway, give it a few minutes to connect to the Tor network and fix itself, and then run these commands:
sudo su
cd /var/lib/tor
cat state | more
You should now see a different set of entry guards.
Part 8 – Creating Nested Chains of VPNs and Tor
By mirimir (gpg key 0x17C2E43E)
Introduction
This tutorial covers using multiple pfSense VPN-client VMs and Tor-client VMs to create arbitrarily complex nested and branched chains of VPNs and Tor, such as the setup (reproduced above) suggested in the Planning Initial Setup section ofPlanning Advanced VM and VPN Setup. Doing that is relatively easy, once you have planned your setup, set up a secure host machine, and created pfSense VMs as clients for multiple anonymously-purchased VPN services, Tor-client VMs (more on that below) and Linux workstation VMs that access the Internet through them. The various VirtualBox VMs that you create are relatively-independent modules. Setting up nested and branched chains of nested VPN tunnels and Tor connections, and workstation VMs that use them, requires little more than changing how these VMs are networked in VirtualBox.
Basic Nested VPN Chains
This section is written for the case where you’re using your direct-connect VPN service in the first pfSense VPN-client VM, and no VPN service on the VM host machine. If you continue using your direct-connect VPN service on the VM host, and use another anonymously-purchased, indirect-connect VPN service in the first pfSense VPN-client VM, you will have a nested chain of two VPNs.
In that case, you can just apply the above difference (one VPN vs two VPNs) to the other diagrams and discussion that follow.
The first pfSense VPN-client VM typically has its WAN adapter NATed to the host via the VirtualBox router, and its LAN adapter attached to a VirtualBox internal network. The pfSense VM runs a DHCP server for that internal network, just as gateway routers typically do for physical LANs. When the OpenVPN client in pfSense establishes a VPN connection, it creates a virtual network adapter (aka tun for tunnel). There are routing and firewall rules that restrict all LAN (and attached VirtualBox internal network) traffic to this VPN tun adapter (instead of WAN) for Internet access, and also block incoming connections, just as gateway routers typically do for physical LANs.
Anything running in workstation VMs attached to this VirtualBox internal network can only access the Internet through the pfSense VM and its VPN tunnel. Applications and VPN networking are isolated in separate VMs (workstation and pfSense VMs, respectively). Exploits that manage to compromise workstation VMs can’t get at VPN networking unless they break out to the host or compromise pfSense. While either is possible, neither is arguably likely, unless you’ve attracted a highly-skilled adversary.
To add another VPN tunnel (VPN2) to the nested chain, you just create another pfSense VPN-client VM, which connects to another anonymously-purchased VPN service. You attach its WAN adapter to the internal network attached to the LAN adapter of the first pfSense VPN-client VM (VPN1). The VPN tunnel from the second pfSense VPN-client VM (VPN2) reaches the Internet through the first pfSense VPN-client VM and its VPN tunnel (VPN1). You attach the LAN adapter of the second pfSense VPN-client VM (VPN2) to another VirtualBox internal network, for which it is the DHCP server. Its VPN tunnel (VPN2) is routed through its LAN adapter to its internal network (and firewalled). Workstation VMs attached to this second VirtualBox internal network access the Internet through the nested VPN chain, as shown above (VPN2 routed through VPN1).
You can add additional VPN tunnels to your nested chain in the same way, either at the end, or further in to create branches. In choosing additional VPN services, there are two key and potentially-conflicting criteria. First, as discussed in the sectionUsing Nested Chains of VPNs and Tor to Distribute Trust of Part 3. Planning Advanced VM and VPN Setup, choosing providers in poorly-cooperating spheres of influence arguably mitigates the risk of joint compromise or subversion.
Second, network latency increases as you add VPNs to the nested chain. As long as you have a broadband Internet connection, and are using VPN services that have fast Internet connections, network latency will be the limiting factor for overall throughput. Even with careful design, latency for nested chains with more than four VPNs will likely make them unusable. Conversely, terminal nodes in branched VPN chains don’t compete very much with each other for bandwidth, unless you push it too far and saturate the shared proximal VPN tunnel.
Also, in chaining multiple pfSense VPN-client VMs, it’s crucial that adjacent pfSense VMs have different LAN IP address ranges. Otherwise, no traffic will flow, because pfSense is a NAT router, not a switch. The simplest approach is using 192.168.1.0/24 for the first pfSense VPN-client VM, 192.168.2.0/24 for the second, 192.168.3.0/24 for the third, and so on. It’s true that routing local resources through VirtualBox internal networks with distinct IP ranges would be difficult, but that’s less important than ensuring security through full isolation.
First review the Creating pfSense VM and Configuring VPN Client section of Part 6. Creating pfSense VMs as VPN Clients. As described, you start by creating the new pfSense VM, installing pfSense, and configuring em0 as the WAN interface andem1 as the LAN interface. However, after pfSense finishes rebooting, and before configuring and setting up a VPN client, you need to change pfSense’s LAN IP address range.
In the pfSense console window (not the webGUI), start by typing 2 in order to Set interface(s) IP address and hit enter. Then type 2 for LAN, and hit enter. Now type the new LAN IPv4 address (e.g., 192.168.2.1) and hit enter. Type 24 as the subnet bit count, and hit enter. Answer y for Do you want to enable the DHCP server on LAN?, and hit enter. Type the start address (e.g., 192.168.2.100) and hit enter. Then type the end address (e.g., 192.168.2.199) and hit enter. Answer n for Do you want to revert to HTTP as the webConfigurator protocol? and hit enter. Finally, reboot pfSense by typing 5, hitting enter, typing y, and hitting enter. Finally, configure a LiveCD VM to access the new pfSense’s webGUI, and use it to finish configuring the new pfSense VM with a client for your new VPN service, as described in Part 6.
In bringing up a nested VPN chain, you must start with the direct-connect VPN client, because it provides Internet connectivity for the rest of the VPN clients. After the direct-connect VPN has connected, start the pfSense client for the VPN that connects through it, and wait for it to finish booting. For pfSense VPN clients, you’ll see an IP address to the right ofovpnc1 if the VPN connection has been established. If you don’t see that, you can hit return once or twice to refresh the display. Once each pfSense VPN-client VM has connected, start the next one, and so on.
Once all of the pfSense VPN-client VMs are up, you can start whatever workstation VMs that will connect through them. If any of the pfSense VPN-client VMs are not connecting properly, you can use your Linux LiveCD VM to login to its webGUI and figure out what’s broken, as described in Part 6. Generally, you can leave all of the pfSense VMs running while you’re working/playing, and even whatever associated workstation VMs you’ll be using. However, it may be prudent (depending on your risk model) to shut down all VMs and the host machine when you’re done (and thereby deny access by adversaries to unencrypted data).
Nested VPN chains occasionally stop working, especially on weekends (when maintenance is typically scheduled). First try restarting each of the VPN clients in order, from direct to increasingly indirect. If you find that one of the VPNs isn’t connecting, review its connection log for errors. There may be interactions among VPN connections. For example, if the DNS server used by a VPN client dies or gets overloaded, VPN(s) tunneled through that VPN won’t connect if you’ve specified servers by hostname, rather than by IP address (because DNS lookups will fail ). You may need to switch servers and/or ports for one of your VPNs.
Tor Gateway VMs
There are two easy ways to add Tor connections to nested chains. One is ra’s Tor gateway VM. It’s an OpenWRT-based router VM that provides Tor connections using transproxy, and it’s very easy to network with pfSense VPN-client VMs. The other is Whonix. It’s an integrated pair of Debian-based VMs, comprising a gateway and a workstation. The Whonix gateway VM isn’t a router, however, so networking with pfSense VPN-client VMs is nontrivial. But it’s easy to run VPN clients in the Whonix workstation. And by the way, in case you’re wondering, it’s probably unworkable to route Tor through a VPN that’s routed through Tor.
Whonix
Using Whonix is covered in the MultiBit Clients in Whonix section of Part 7. Paying Anonymously with Cash and Bitcoins. Start by downloading Whonix-Gateway and Whonix-Workstation to your host machine, via your current best VPN chain. It’s best to verify the downloads as instructed using the OpenPGP signatures and the Whonix signing key. If you can’t be bothered with that, at least download them using BitTorrent (which is more secure, as explained).
Then import both of the Whonix VMs, using File / Import Appliance in VirtualBox (reinitializing MAC addresses). If you’ll be using multiple Whonix instances, each Whonix gateway and workstation VM must have a unique name (which determines the name of its folder). It’s good practice to edit the names of both Whonix VMs right after importing them, adding a unique suffix (or whatever) to distinguish them from others that you may import later.
Before running a Whonix gateway VM, it’s crucial to change its first (WAN) adapter from NAT to a VirtualBox internal network sourced by one of your pfSense VPN-gateway VMs, using the Network tab in the VirtualBox GUI. Otherwise, the Whonix gateway would reveal to your ISP that you’re using Tor. It would also provide your ISP-assigned IP address to Tor’s directory authorities, and as well to the entry guards that it chooses. Also, each Whonix gateway VM must have a uniquely-named internal network attached to its second (LAN) adapter. In order for the workstation VM to connect via the gateway VM, the workstation VM’s network adapter and the gateway VM’s second (LAN) adapter must share a uniquely named internal network. It’s helpful to name the gateway VM, workstation VM and internal network for each Whonix instance in a logical and memorable way, to avoid confusion and mistakes.
Adding Whonix instances to VPN chains is trivial. Using the VirtualBox GUI, edit the first (WAN) adapter in the Whonix gateway VM, and specify the internal network sourced by the desired pfSense VPN-gateway VM. In order to further isolate multiple Whonix instances from each other, you may want the gateway VMs to connect at different points in your nested VPN chain. That reduces the chance that adversaries controlling parts of the Tor network will associate the two Whonix instances.
Installing VPN clients in Whonix workstation VMs is also trivial, as described in the Setting Up VPN on Linux Workstation VM section of Part 2. Basic Setup Using VMs, VPNs and Tor. Whonix workstations are based on Debian, customized to securely use Tor. However, given that Tor only routes TCP traffic, the Network Manager settings are different. In theGeneral tab of the Advanced window, check Use a TCP connection and Use custom gateway port, and specify the appropriate TCP port number from your VPN provider. It’s crucial to use a VPN service that’s not associated with you. SeePart 7. Paying Anonymously with Cash and Bitcoins.
As everything else does, VPN connections will probably take longer to establish through Tor. Also, given that all applications in the Whonix workstation VM are configured to use Tor through the gateway VM, you’ll need to modify their preferences in order to connect through the VPN tunnel. In Firefox, for example, you navigate Edit / Properties / Advanced / Network / Connection..Settings, and select No proxy. And you’ll need to reverse the change if you later want to browse through Tor without the VPN connected.
OpenWRT Tor gateway
To use ra’s OpenWRT Tor gateway VM, first download the latest version, currently Tor gateway 0.5.4.ova. Import it usingFile / Import Appliance in VirtualBox (reinitializing MAC addresses). As with the Whonix gateway VM, edit its first (WAN) adapter from NAT to a internal network sourced by one of your pfSense VPN-gateway VMs, and uniquely rename the internal network attached to its second (LAN) adapter. That’s it.
Because ra’s Tor gateway VM is (like pfSense) a router running a DHCP server, you can attach any workstation VM to the internal network attached to its second (LAN) adapter, and so reach the Internet through Tor. As with the Whonix workstation, workstation VMs can only reach the Internet through the Tor gateway, so there’s negligible risk that improperly configured applications will bypass Tor. However, given that Tor only routes TCP traffic, applications that depend on UDP traffic will not work properly. Also, browsing with stock Firefox is far less anonymous than with the Tor-optimized version in the Tor Browser Bundle, Tails and Whonix.
You can also attach a pfSense VPN-gateway VM to the internal network attached to the Tor gateway’s second (LAN) adapter. As with the OpenVPN client in the Whonix workstation VM, you’ll need to configure the pfSense OpenVPN client with the proper server address and port number for connecting in TCP mode. See Part 6. Creating pfSense VMs as VPN Clients. As with the OpenVPN client in the Whonix workstation VM, the OpenVPN client in pfSense will probably take longer to connect through Tor. As noted above, it’s crucial to use a VPN service that’s not associated with you.
When routed through Tor, pfSense VMs can’t resolve hostnames to IP addresses. That prevents pfSense from getting the correct time from <0.pfsense.pool.ntp.org>. However, given that the Tor exit IP address changes frequently, it is unwise to specify specific NTP servers by their IP addresses, because that would reduce anonymity.
Testing and Optimization
The various VirtualBox VMs that you create – pfSense VPN-client, OpenWRT Tor gateway, Linux workstation and LiveCD, and Whonix VMs – are relatively-independent modules. Setting up arbitrarily complex nested and branched chains of nested VPN tunnels and Tor connections, and workspaces that access the Internet through them, requires little more than changing how they’re networked in VirtualBox. However, creating setups that are usable and reliable requires testing and optimization. With complex setups, that can be quite challenging, because there are so many different ways to fail.
It’s best to start with a simple setup. Once it’s usable and reliable, you’ll have a reliable core that you can build on, and you will also have acquired requisite experience and skills. For the setup suggested in the section Planning Initial Setup ofPlanning Advanced VM and VPN Setup, which is pictured at the top of this page, it’s best to start with just two VPNs: VPN1and VPN2. If you’re running the direct-connect VPN (VPN1) in the host machine, start with just one pfSense VPN-client VM (VPN2).
To provide context for testing your nested VPN chain(s), periodically check the latency (ping) and speed of your native ISP connection at Speedtest. If at all possible, don’t use your VM host machine for that. Also, avoid checking your ISP connection while actively testing nested VPN chain(s), because that would associate their IP addresses in Speedtest’s logs. For the same reason, don’t check multiple VPN-chain nodes simultaneously. Wait at least several minutes between tests from different IP addresses.
If you’re running the direct-connect VPN in the host machine, and have gotten this far, it’s probably working well enough. If there are connection problems, review the Network Manager connection log, as described in the section Viewing Network Manager OpenVPN Logs of Part 4. Setting Up Secure Host Machines. You’ll need a Linux LiveCD VM for testing each VPN that you’re running in a pfSense VM, which you attach to that pfSense VM’s internal network. I recommend using multiple LiveCD VMs here for two reasons: 1) to avoid leaking VPN account information from pfSense to workspace VMs; and 2) to limit access to pfSense from potentially-compromised workspace VMs. If you have added verb 5 in the Advanced box in OpenVPN client setup at VPN: OpenVPN: Client, a detailed connection log is available at Status: System logs: OpenVPN.
To optimize your nested VPN chain, start with the direct-connect VPN, and work methodically through the rest of the VPNs. For each VPN connection in the chain, check latency (ping) and speed at Speedtest. If you can’t connect, review the connection log at Status: System logs: OpenVPN in the pfSense webGUI (or Network Manager OpenVPN Logs, on the host machine) for errors. It’s normal for latency (ping) to increase as you add more VPNs to the nested chain. That primarily reflects additional processing delay in networking hardware, and not simply longer path length. Although speed typically decreases as you add more VPNs, due to both increased latency and network throttling, you may occasionally see it increase. As noted, wait at least several minutes between tests from different IP addresses. Once you’re satisfied with each VPN connection, repeat the process with the next one in the nested chain.
If you have a typical broadband Internet connection, reasonable targets for VPN1, VPN2 and VPN3 are as follows:
VPN LEVEL
LATENCY (MSEC)
SPEED (MBPS)
VPN1
150-200
5-10
VPN2
200-250
2-5
VPN3
250-350
1-3
If you’re seeing lower speeds, especially for downloading, try using different VPN servers, different port numbers, TCP mode vs UDP mode, etc. Some ISPs throttle traffic on nonstandard ports. Also, in order to meet your design goals, as discussed in section Using Nested Chains of VPNs and Tor to Distribute Trust of Part 3: Planning Advanced VM and VPN Setup, it may be necessary to accept slower connections.
If nothing seems to help, get support as anonymously as possible. Anonymity is especially important for your indirect-connect VPNs. Seek support while connecting through the VPN that the problematic VPN connects through. It’s best to use online forums that support HTTPS. Start with your provider’s support forum. You can also post in the privacy problems section of Wilders Security Forums. If you must submit a support ticket to the VPN provider, be sure to use an anonymous email address. And keep in mind that support tickets typically generate unencrypted replies, which may quote the support request.
Leak Testing with Wireshark
The section Installing and Checking VPN-Firewall in Part 4. Setting Up Secure Host Machines explains how to test the host machine’s VPN connection and firewall setup using Wireshark. The section Leak Testing with Wireshark in Part 6. Creating pfSense VMs as VPN Clients does the same for the first pfSense VPN-client VM (in that case, running an indirect-connect VPN). It’s crucial to verify that no traffic bypasses the VPN tunnel, even after the VPN connection is killed.
You can apply the same approach to each of the gateway VMs (pfSense VPN-client, Whonix Tor-gateway or OpenWRT Tor-gateway) in a nested chain. Using Wireshark instances, you capture traffic at three points:
eth0 adapter of a workstation VM that accesses the Internet through the gateway VM being tested
WAN adapter of the gateway VM being tested
LAN adapter of the gateway VM through which the gateway VM being tested connects
The first capture shows you what Internet sites the workstation is accessing (or trying to access). The second and third captures show you what traffic is leaving the gateway VM for the Internet. They should be identical, and it’s only necessary to use one of them, if the other is hard to get at (e.g., the WAN adapter on an OpenWRT Tor-gateway VM). When the gateway VM is working properly, the second and third captures should show only local IPs and the servers (OpenVPN or Tor) that the gateway is using, and they should not show any of the remote IPs seen in the first capture.
When the gateway VM is broken, the second and third captures should show only local IPs and reconnection attempts from servers that the gateway was using. They should definitely not show any of the remote IPs seen in the first capture. If the second or third captures show any of the remote IPs seen in the first capture, whether the gateway VM is functional or not, there are leaks that must be fixed.
There are instructions for killing the openvpn process in the sections of Part 4 (for the host machine) and Part 6 (for pfSense) cited above. Basically, you run killall openvpn at a command prompt. To re-establish the VPN, use Network Manager in the host machine, and just restart the pfSense VM. To kill the tor process in the OpenWRT Tor-gateway VM, you run killall torat the command prompt. For the Whonix Tor-gateway VM, it’s sudo killall tor. To restart Tor, it’s best to just reboot the gateway VM.
This tutorial shows you how to set up your own federated chat network using ejabberd. It covers a basic single node ejabberd server and also the setup of an ejabberd cluster, including errors and DNS SRV record examples. Last but not least federation is also covered. You can use (almost) any VPS.
Why set up your own XMPP server
There are a few reasons to set up your own XMPP server.
You might use Google Talk or as it now is named Hangouts. Google’s service recently changed and it is going to drop XMPP compatibility. If you have non-gmail chat contacts you can keep chatting to them. And still use an open protocol which is widely supported, not being locked in to google specific software and hardware.
Or you might want to have more control over the logging of your data. Turn of ejabberd logging and use Off The Record which gives you full privacy (and perfect forward secrecy).
You might want to use awesome multi-account chatting applications like Pidgin, Psi+, Empathy, Adium, iChat/Messages or Miranda IM. And on Android you can use Xabber, Beem or OneTeam. Did you know that big players like Facebook, WhatsApp and Google (used) to use XMPP as their primary chat protocol?
Or you might be a sysadmin in need of an internal chat solution. I’ve got a ejabberd cluster running for a client consisting of 4 Debian 7 VM’s (2GB RAM each) spread over 3 sites and 1 datacenter, serving 12000 total users and most of the time 6000 concurrently.
This setup is tested on Debian 7, Ubuntu 12.04 and 10.04 and OS X 10.8 Server, all running ejabberd installed via the package manager, either apt or ports. It also works on Windows Server 2012 with the ejabberd compiled from the erlang source but that is not covered in this tutorial.
This tutorial uses the example.org domain as the chat domain, and the server chat.example.org as the xmpp server domain. For the clustering part the servers srv1.example.org and srv2.example.org are used. Replace these values for your setup.
Single node / master node ejabberd installation
If you want to set up a single node installation of ejabberd, e.g. no clustering, then follow only this part and the DNS part of the tutorial. If you want to set up a cluster, then also follow this part and continue with the next part.
Installing Ejabberd
This is simple, use your package manager to install ejabberd:
apt-get install ejabberd
You will also install a few dependencies for the erlang runtime.
Configuring ejabberd
We are going to configure the ejabberd service. First stop it:
/etc/init.d/ejabberd stop
Now use your favorite text editor to edit the config files. The ejabberd config is erlang config, so comments are not # but %%. Also, every config option ends with a dot (.).
vim /etc/ejabberd/ejabberd.cfg
First we are going to add our chat domain name:
{hosts, ["example.org"]}.
If you want more domains then you add them as shown below:
This domain name is not the name of the servers you are adding.
Next we define an admin user:
{acl, admin, {user, "remy", "example.org"}}.
remy corresponds with the part before the @ in the XMPP ID, and example.org with the part after. If you need more admin users, add another ACL line.
Now if you want people to be able to register via their XMPP client enable in band registration:
{access, register, [{allow, all}]}.
If you are using MySQL or LDAP authentication then you wouldn’t enable this.
I like to have a shared roster with roster groups, and some clients of mine use a shared roster with everybody so that nobody has to add contacts but they see all online users, enable the modsharedroster:
%% Do this in the modules block
  {mod_shared_roster,[]},
If you are pleased with the config file, save it and restart ejabberd:
/etc/init.d/ejabberd restart
We now need to register a user to test our setup. If you’ve enabled in-band registration you can use your XMPP client, and if you did not enable in-band registration you can use the ejabberdctl command:
ejabberdctl register remy example.org 'passw0rd'
Now test it using an XMPP client like Pidgin, Psi+ or Empathy. If you can connect, then you can continue with the tutorial. If you cannot connect, check your ejabberd logs, firewall setting and such to troubleshoot it.
Clustering ejabberd
Note that you have to have a correctly working master node to continue with the ejabberd clustering. If your master node is not working then fix that first.
Important: the modules you use should be the same on every cluster node. If you use LDAP/MySQL authentication, or a shared_roster, or special MUC settings, or offline messaging, for the clustering this does not matter as long as it is on all nodes.
So lets get started. We are first going to configure the master node, and then the slave nodes.
Prepare the master node
Stop the ejabberd server on the master and edit the /etc/default/ejabberd file:
vim /etc/default/ejabberd
Uncomment the hostname option and change it to a FQDN hostname:
ERLANG_NODE=ejabberd@srv1.example.org
And add the external (public) IP addres as a tuple (no dots but comma’s):
INET_DIST_INTERFACE={20,30,10,5}
If you use ejabberd internally then use the primary NIC address.
We are going to remove all the mnesia tables. They will be rebuilt with an ejabberd restart. This is way easier then changing the mnesia data itself. Don’t do this on a already configured node without backing up the erlang cookie.
To make sure all erlang processes are stopped kill all processes from the ejabberd user. This is not needed but the epmd supervisor process might still be running:
killall -u ejabberd
And start ejabberd again:
/etc/init.d/ejabberd start
If you can still connect and chat, then continue with the next part, configuring the slave nodes.
Prepare the slave nodes
*A slave node should first be configured and working as described in the first part of this tutorial. You can copy the config files from the master node. *
Stop the ejabberd server:
/etc/init.d/ejabberd stop
Stop the ejabberd server on the master and edit the /etc/default/ejabberd file:
vim /etc/default/ejabberd
Uncomment the hostname option and change it to a FQDN hostname:
ERLANG_NODE=ejabberd@srv2.example.org
And add the external (public) IP addres as a tuple (no dots but comma’s):
INET_DIST_INTERFACE={30,40,20,6}
If you use ejabberd internally then use the primary NIC address.
Now remove all the mnesia tables:
rm /var/lib/ejabberd/*
Copy the cookie from the ejabberd master node, either by cat and vim or via scp:
# On the master node
cat /var/lib/ejabberd/.erlang.cookie
HFHHGYYEHF362GG1GF

# On the slave node
echo "HFHHGYYEHF362GG1GF" > /var/lib/ejabberd/.erlang.cookie
chown ejabberd:ejabberd /var/lib/ejabberd/.erlang.cookie
We are now going to add and compile an erlang module, the easy_cluster module. This is a very small module which adds an erlang shell command to make the cluster addition easier. You can also execute the commands in the erlang functions itself on an erlang debug shell, but I find this easier and it gives less errors:
vim /usr/lib/ejabberd/ebin/easy_cluster.erl
Add the following contents:
-module(easy_cluster).

-export([test_node/1,join/1]).

test_node(MasterNode) ->
    case net_adm:ping(MasterNode) of 'pong' ->
        io:format("server is reachable.~n");
    _ ->
        io:format("server could NOT be reached.~n")
    end.

join(MasterNode) ->
    application:stop(ejabberd),
    mnesia:stop(),
    mnesia:delete_schema([node()]),
    mnesia:start(),
    mnesia:change_config(extra_db_nodes, [MasterNode]),
    mnesia:change_table_copy_type(schema, node(), disc_copies),
    application:start(ejabberd).
Save it and compile it into a working erlang module:
We are now going to join the cluster node to the master node. Make sure the master is working and running. Also make sure the erlang cookies are synchronized.
On the slave node, start an ejabberd live shell:
/etc/init.d/ejabberd live
This will start an erlang shell and it will give some output. If it stops outputting then you can press ENTER to get a prompt. Enter the following command to test if the master node can be reached:
You should get the following response: server is reachable. If so, continue.
Enter the following command to actually join the node:
easy_cluster:join('ejabberd@srv1.example.org').
Here’s example output from a successful test and join join:
/etc/init.d/ejabberd live
*******************************************************
* To quit, press Ctrl-g then enter q and press Return *
*******************************************************

Erlang R15B01 (erts-5.9.1)  [async-threads:0] [kernel-poll:false]

Eshell V5.9.1  (abort with ^G)

=INFO REPORT==== 10-Jun-2013::20:38:15 ===
I(<0.39.0>:cyrsasl_digest:44) : FQDN used to check DIGEST-MD5 SASL authentication: "srv2.example.org"

=INFO REPORT==== 10-Jun-2013::20:38:15 ===
I(<0.576.0>:ejabberd_listener:166) : Reusing listening port for 5222

=INFO REPORT==== 10-Jun-2013::20:38:15 ===
I(<0.577.0>:ejabberd_listener:166) : Reusing listening port for 5269

=INFO REPORT==== 10-Jun-2013::20:38:15 ===
I(<0.578.0>:ejabberd_listener:166) : Reusing listening port for 5280

=INFO REPORT==== 10-Jun-2013::20:38:15 ===
I(<0.39.0>:ejabberd_app:72) : ejabberd 2.1.10 is started in the node 'ejabberd@srv2.example.org'
easy_cluster:test_node('ejabberd@srv1.example.org').
server is reachable.
ok
(ejabberd@srv2.example.org)2> easy_cluster:join('ejabberd@srv1.example.org').

=INFO REPORT==== 10-Jun-2013::20:38:51 ===
I(<0.39.0>:ejabberd_app:89) : ejabberd 2.1.10 is stopped in the node 'ejabberd@srv2.example.org'

=INFO REPORT==== 10-Jun-2013::20:38:51 ===
    application: ejabberd
    exited: stopped
    type: temporary

=INFO REPORT==== 10-Jun-2013::20:38:51 ===
    application: mnesia
    exited: stopped
    type: permanent

=INFO REPORT==== 10-Jun-2013::20:38:52 ===
I(<0.628.0>:cyrsasl_digest:44) : FQDN used to check DIGEST-MD5 SASL authentication: "srv2.example.org"

=INFO REPORT==== 10-Jun-2013::20:38:53 ===
I(<0.1026.0>:ejabberd_listener:166) : Reusing listening port for 5222

=INFO REPORT==== 10-Jun-2013::20:38:53 ===
I(<0.1027.0>:ejabberd_listener:166) : Reusing listening port for 5269

=INFO REPORT==== 10-Jun-2013::20:38:53 ===
I(<0.1028.0>:ejabberd_listener:166) : Reusing listening port for 5280
ok
(ejabberd@srv2.example.org)3>
=INFO REPORT==== 10-Jun-2013::20:38:53 ===
I(<0.628.0>:ejabberd_app:72) : ejabberd 2.1.10 is started in the node 'ejabberd@srv2.example.org'
Exit your erlang shell by pressing CTRL+C twice. Now stop ejabberd and start it again:
/etc/init.d/ejabberd restart
You can now check in the admin webinterface if the cluster join succeeded:
http://srv1.example.org:5280/admin/nodes/
If it shows the other node you are finished. If not, see if the steps worked and check the below section on troubleshooting.
Repeat the above steps for every node you want to add. You can add as many nodes as you want.
Errors when clustering
When setting up your cluster you might run into errors. Below are my notes for the errors I found.
ejabberd restart does not restart epmd (erlang daemon)
overkill solution: killall -u ejabberd
ejabberd gives hostname errors
make sure the hostname is set correctly (hostname srv1.example.com)
ejabberd gives inconsistent database errors
backup the erlang cookie (/var/lib/ejabberd/.erlang.cookie) and then remove the contents of the /var/lib/ejabberd folder so that mnesia rebuilds its tables.
ejabberd reports “Connection attempt from disallowed node”
make sure the erlang cookie is correct (/var/lib/ejabberd/.erlang.cookie). Set vim in insert mode before pasting…
DNS SRV Records and Federation
The DNS SRV Record is used both by chat clients to find the right server address as well as by other XMPP servers for federation. Example: Alice configures her XMPP clients with the email address alice@example.org. Her chat client looks up the SRV record and knows the chat server to connect to is chat.example.org. Bob sets up his client with the address bob@bobsbussiness.com, and adds Alice as a contact. The XMPP server at bobsbussiness.com looks up the SRV record and knows that it should initiate a server2server connection tochat.example.org to federate and let Bob connect with Alice.
The BIND 9 config looks like this:
; XMPP
_xmpp-client._tcp                       IN SRV 5 0 5222 chat.example.org.
_xmpp-server._tcp                       IN SRV 5 0 5269 chat.example.org.
_jabber._tcp                            IN SRV 5 0 5269 chat.example.org.
It is your basic SRV record, both the client port and the server2server port, and legacy Jabber. If you have hosted DNS then either enter it in your panel or consult your service provider.
You can use the following dig query to verify your SRV records:
If you get a result like this then you are set up correctly:
;; QUESTION SECTION:
;_xmpp-client._tcp.raymii.org.  IN      SRV

;; ANSWER SECTION:
_xmpp-client._tcp.raymii.org. 3600 IN   SRV     5 0 5222 chat.raymii.org.
The actual record for chat.raymii.org in my case are multiple A records:
;; ADDITIONAL SECTION:
chat.raymii.org.        3600    IN      A       84.200.77.167
chat.raymii.org.        3600    IN      A       205.185.117.74
chat.raymii.org.        3600    IN      A       205.185.124.11
But if you run a single node this can also be a CNAME or just one A/AAAA record.
Final testing
To test if it all worked you can add the Duck Duck Go XMPP bot. If this works flawlessly and you can add it and chat to it, then you have done everything correctly. The email address to add is im@ddg.gg.
Ejabberd SSL Certificate
This tutorial shows you how to set up an SSL Certificate for use with Ejabberd. It covers both the creation of the Certificate Signing Request, the preparing of the certificate for use with Ejabberd and the installation of the certificate.
This tutorial assumes a working ejabberd installation. It is tested on Debian and Ubuntu, but should work on any ejabberd installation.
Steps and Explanation
To get an SSL certificate working on ejabberd we need to do a few things:
Create an Certificate Signing Request (CSR) and a Private Key
Submit the CSR to a Certificate Authority, let them sign it and give you a Certificate
Combine the certificate, private key (and chain) into a ejabberd compatible PEM file
Install the certificate in ejabberd
With a certificate we can secure our XMPP connection and conversations. This way it is much harder for others to spy on your conversations. Combined with OTR this enabled a super secure channel for conversation.
Creating the Certificate Signing Request
Create a folder to store all the files and cd to that:
mkdir -p ~/Certificates/xmpp cd ~/Certificates/xmpp
Now use OpenSSL to create both a Private Key and a CSR. The first command will do it interactively, the second command will do it non-interactive. Make sure to set the correct values, your Common Name (CN) should be your XMPP server URL:
This will result in two files, CSR.csr and private.key. You now have to submit the CSR to a Certificate Authority. This can be any CA, I myself have good experiences with Xolphin, but there are others like Digicert and Verisign.
Once you have submitted your CSR and have gotten a Certificate you can continue.
Creating the ejabberd certificate
Once you have all the files (private key, certificate and certificate chain), put them all in a folder and continue. We are going to cat all the required files into a ejabberd.pem file.
This needs to happen in a specific order:
private key
certificate
chains
So adapt the following commands to your filenames and create the pem file:
This is a guide on setting up a self hosted secure multiuser webchat service with CryptoCat. It covers the set up of ejabberd, nginx and the web interface for CryptoCat. It supports secure encrypted group chat, secure encrypted private chat and file and photo sharing.
Make sure you set up two DNS A records to your chat server. One should be for example chat.sparklingclouds.nl and the other is for the conferencing: conference.chat.sparklingclouds.nl. You should contact your provider if you need help with this.
In the configuration files, you should replace chat.sparklingclouds.nl with your own domain name.
Install required packages
First we install the required packages:
apt-get install ejabberd nginx vim git
ejabberd configuration
Edit the ejabberd configuratio file located:
/etc/ejabberd/ejabberd.cfg
And place the following contents in it, replacing chat.sparklingclouds.nl with your own domain:
This is important, it cleans up unused ejabberd accounts. Create a new crontab like so:
crontab -e
And place the following in it:
1 1 * * * ejabberdctl delete-old-users 1
That way once every 24 hours the ejabberd server gets cleaned up.
Web Frontend
Note that you now already can use your own server with the CryptoCat frontend via: https://crypto.cat. We are going to set up our own frontend on our webserver so we don’t need Crypto.Cat.
When you host Cryptocat as a website, this means that every time someone wants to use it, they technically will need to re-download the entire code by visiting the website. This means that every use needs a full re-download of the Cryptocat code. By centralizing the code redistribution in a "web front-end" and making it necessary for everyone to redownload the code every time, you create an opportunity for malicious code poisoning by the host, or code injection by a third party. This is why the only recommended Cryptocat download is the browser extension from the official website, which downloads only once as opposed to every time (just like a regular desktop application), and is authenticated by Cryptocat's development team as genuine.
Kaepora - 12-11-2013 on Reddit
Take that into consideration when setting up the frontend. A use case could be an internal cryptocat chat service where people don’t need to change the default server address and such.
First get the source code:
cd /tmp
git clone https://github.com/cryptocat/cryptocat.git
Then place it in the right folder;
cp -r cryptocat/src/core /var/www/
Edit the config file to use your own server:
cd /var/www
vim js/cryptocat.js
And place the following contents in it, replacing chat.sparklingclouds.nl with your own domain:
/* Configuration */
// Domain name to connect to for XMPP.
var defaultDomain = 'chat.sparklingclouds.nl'
// Address of the XMPP MUC server.
var defaultConferenceServer = 'conference.chat.sparklingclouds.nl'
// BOSH is served over an HTTPS proxy for better security and availability.
var defaultBOSH = 'https://chat.sparklingclouds.nl/http-bind/'
Now save the file.
You are finished now. Go to your website and test the chat out.
Ejabberd SSL Certificate
This tutorial shows you how to set up an SSL Certificate for use with Ejabberd. It covers both the creation of the Certificate Signing Request, the preparing of the certificate for use with Ejabberd and the installation of the certificate.
This tutorial assumes a working ejabberd installation. It is tested on Debian and Ubuntu, but should work on any ejabberd installation.
Steps and Explanation
To get an SSL certificate working on ejabberd we need to do a few things:
Create an Certificate Signing Request (CSR) and a Private Key
Submit the CSR to a Certificate Authority, let them sign it and give you a Certificate
Combine the certificate, private key (and chain) into a ejabberd compatible PEM file
Install the certificate in ejabberd
With a certificate we can secure our XMPP connection and conversations. This way it is much harder for others to spy on your conversations. Combined with OTR this enabled a super secure channel for conversation.
Creating the Certificate Signing Request
Create a folder to store all the files and cd to that:
mkdir -p ~/Certificates/xmpp cd ~/Certificates/xmpp
Now use OpenSSL to create both a Private Key and a CSR. The first command will do it interactively, the second command will do it non-interactive. Make sure to set the correct values, your Common Name (CN) should be your XMPP server URL:
This will result in two files, CSR.csr and private.key. You now have to submit the CSR to a Certificate Authority. This can be any CA, I myself have good experiences with Xolphin, but there are others like Digicert and Verisign.
Once you have submitted your CSR and have gotten a Certificate you can continue.
Creating the ejabberd certificate
Once you have all the files (private key, certificate and certificate chain), put them all in a folder and continue. We are going to cat all the required files into a ejabberd.pem file.
This needs to happen in a specific order:
private key
certificate
chains
So adapt the following commands to your filenames and create the pem file:
Proving You Wrote Something but Remaining Temporarily Anonymous
Updating Keys
Listing your Keys
Who Signed My Key?
Building a Web of Trust
Good Encryption Practices
Symmetric Encryption/Decryption
Why Public-Key Encryption is Cool
Tips and Tricks
Verbose Information
Requiring Multiple Decrypts
Hidden Recipients
Encrypting Messages You Can’t Decrypt
In GPG
Migrating to a New Key
Creating Your Own New Key
Using Someone Else’s New Public Key
Keysigning Party
Technical Notes
Short Key IDs Are Bad News
Finding Your Longer Key ID
Key IDs and Hash Algorithms
Enigmail, gpg-agent, and Gnome keyring bugs
Automating GPG
Making a Sandbox / Multiple keyrings
Forcing Different Algorithms
Protecting your Secret Keys
Backing Up Your Secret Key
“Creating the perfect GPG keypair”
OpenPGP Specification
Public Key for Alan Eliasen
Below is the public encryption key for Alan Eliasen, (eliasen@mindspring.com) in armored OpenPGP format. This lets you write encrypted messages that only I can read!
Note: I have recently upgraded to a stronger 4096-bit RSA key.
(Did you notice that the long and short key IDs (of any key) are just the last 16 or 8 digits of its fingerprint respectively? I didn’t know that for a long time, but it’s obvious when displayed this way.)
What is Public-Key Cryptography?
In short, public-key cryptography solves the age-old problem “how do I communicate with someone securely without somehow exchanging a secret password first?” Exchanging a shared password securely is a hard problem. You may have no way to do so if your communications are monitored.
With public-key encryption, instead of sharing a password, each party generates a “keypair” consisting of a “public” key and a “secret/private” key. Each party can then publish their “public” key to the world or send it directly to the other party, while keeping their secret key private and safe.
If you have Person B’s public key, you can do a few things with it:
Encrypt a message that only that Person B can decrypt. (They need their secret key to decrypt it.)
Validate that Person B signed a message with their secret key. This also lets you verify strongly that the message was not corrupted nor modified in transmission.
With your secret key, you can do a few things:
Decrypt messages encrypted with your public key.
Sign messages that others can verify came from you (they need your public key to verify the signature.)
What I Use
I accept and transmit all messages using the OpenPGP format, which is an open standard, (RFC 4880) and the most widely used standard for public encryption, so communication should work with any OpenPGP-compatible program.
For encryption and signing of e-mail (on Windows, Linux, and Mac) you can use a combination of:
The Gnu Privacy Guard FAQ lists some of the other e-mail programs compatible with GPG. Note that you can use any e-mail program (that doesn’t corrupt messages) along with the gpg executable on the command-line.
For Macintosh, you can obtain GPG from the GPGTools website. (I haven’t personally used these, but others have recommended them.)
Alternately, I sometimes use the pgg package in Emacs/XEmacs which is a wrapper around the gpg executable’s functions. You can do something like highlight a region and do: M-x pgg-encrypt-region and encrypt directly within your documents.
For encrypting files, or doing anything more interesting, I just use the gpg program on the command-line. If you’re security-paranoid, the fewer executables, the better. Most of this document teaches you the fun and important things you can do with the gpg program to be secure.
On Android
On Android, you may want to experiment with R2Mail2. I haven’t used it and can’t vouch for it. There is also Android Privacy Guard (APG), which integrates with theK-9 Mail program, but I do not vouch for it. APG was not updated for a few years, but has seen activity more recently.
gpg or gpg2 ?
GPG version 2 may be on your system with the executable name gpg2 . Either executable can be used for these demonstrations. Both are very compatible with each other. (If you want to know a million different opinions on which you should be using, do a web search.) Version 1 is more tested, and is usually a single monolithic executable. Version 2 is compiled with crypto libraries like libgcrypt externally linked, and is designed to work better with external password entry tools. That is, gpg2 is designed for graphical environments, while gpg works better for automated and command-line use. From the command-line, I use version 1.
Importing A Key
Importing From GPG
If your e-mail client doesn’t allow automatic import of keys from an e-mail message, you will need to save the plaintext file listed above key to a file, then import the key manually. From GNU Privacy Guard, this is:
gpg --import [filename]
My key is available from pgp.mit.edu (all the major keyservers mirror each other, so you could probably get it from the keyserver of your choice, but this one seems to be pretty reliable.)
You can browse the keys available on keyservers at pgp.mit.edu or the often-slow sks-keyservers.net. Who do you know who has a posted public key?
From GNU Privacy Guard, you could import my key using the following (but read on to be more secure.)
Note that in all of these examples, whenever you see an e-mail address, you can usually substitute part of a name or part of an e-mail address, or a key ID. Most of these commands perform a substring search.
Or, even more directly, my full key fingerprint is EC2392F2EDE74488680DA3CF5F2B4756ED873D23, (it’s more common but less secure to use the last 16 or 8 characters of a key, so ED873D23 will work too. (Note that the shorter key IDs are just the last 16 or 8 characters of the fingerprint!) Read the technical note on Short Key IDs below for interesting attack ideas using short keys.) The following gpg command will import my key from a keyserver, using my full fingerprint (you can also use the last 8 or 16 hexadecimal digits of the fingerprint as the short or long key IDs.)
Read on, though, and see why just importing some key off a keyserver isn’t enough to be sure that you’re talking with me.
You may not have to specify a keyserver in the lines above. Later versions of GPG have a more reliable keyserver list built in.
sks-keyservers.net monitors the status of keyservers in real-time. (But it’s often down.) If you’re having trouble importing signatures from a specific keyserver, or want a list of available keyservers, you might want to look there.
Getting Help
gpg --help
is your friend. It will list the most common options to GPG (but not all of them.) Other complete documents are available:
I long resisted the temptation to give an overly-simplified “Getting Started” section here because that may falsely lead you to believe that you’re being secure. As this document has expanded greatly, it’s becoming a better guide. However, the best way to get started with encryption is to go to the home site for GNU Privacy Guard and read the “GNU Privacy Handbook” (available in lots of formats and languages) under the “Guides” section. This will walk you through setting up GPG on your system, including creating your secret keys.
Creating your secret key will start with:
gpg --gen-key
You should probably use the default settings, except it doesn’t hurt to make the key size as large as allowed (4096 bits currently.) The larger the key size, the longer it will take to initially generate your key (and encryption/decryption will be slightly slower. That is a Good Thing, as anyone attempting to break your encryption will also need to spend more time too.)
Generating a Revocation Key
After generating your key, one of the first things you should do is create a revocation certificate:
This certificate can be used to revoke your key if it is ever lost or compromised. Do not neglect this step! Print it out, save it on a disk, and store it safely. It will be short enough that you can type it back in by hand without much effort if you just print it out.
If you lose your secret key or it is compromised, you will want to revoke your key by uploading the revocation certificate to a public keyserver (assuming you uploaded your public key to a public keyserver in the first place. See below.)
If you have multiple unrevoked public keys and you have messages that say something like “I lost that one, this new key supersedes the other ones,” (and I’ve seen this from people who like to claim crypto experience) then I know instantly that I can’t trust you to follow good practice and maintain your secret information, and that I shouldn’t trust you with my secrets. So protect your revocation key like you protect your secret keys. Read on to see why the “this key is my new key, ignore the others” excuse is an immediate “red flag” that should make you suspect either cryptographical incompetence or warn you that the person’s being impersonated.
Using Stronger Algorithms
By default, gpg uses weaker encryption algorithms than it could (especially if you generated your keys using an older version of the software.) This is to ensure compatibility with older versions.
Part of your public key specifies your preferences for the encryption algorithms that you want people to use when communicating with you. These are, by default, somewhat weak. You can view and modify these preferences to make your communications stronger.
To view all of the algorithms supported by your version of gpg, type:
gpg --version
This will give an output that looks something like this:
gpg (GnuPG) 1.4.14

Copyright (C) 2013 Free Software Foundation, Inc.

License GPLv3+: GNU GPL version 3 or later <http://gnu.org/licenses/gpl.html>

This is free software: you are free to change and redistribute it.

There is NO WARRANTY, to the extent permitted by law.
The protocols listed first will be used first. Note that the preferences listed are probably not as strong as your copy of GPG supports, and often the stronger algorithms are not requested at all! You can change these preferences by calling the setpref command. I recommend something like:
You may want to add other algorithms that your software supports, or you may want to disallow algorithms that you think are too weak.
You can see that it worked by typing:
showpref
Check this very carefully. If everything worked right, you can save, (in some versions there’s just quit) and you will be prompted if you want to save your changes:
save
Note: You should then re-upload your key to a public key server and send it to the people you communicate with. Until people have imported your new key, they will still be using the old algorithms when encrypting to your public key!
“When setting preferences, you should list the algorithms in the order which you’d like to see them used by someone else when encrypting a message to your key. If you don’t include 3DES, it will be automatically added at the end. Note that there are many factors that go into choosing an algorithm (for example, your key may not be the only recipient), and so the remote OpenPGP application being used to send to you may or may not follow your exact chosen order for a given message. It will, however, only choose an algorithm that is present on the preference list of every recipient key.”
This means that if you’re encrypting to several people at the same time, you can only use the strongest algorithm that the weakest person uses.
Corollary: Don’t be the weakest link in your group! If you are still using weak encryption preferences, you are bringing down the security of the entire group you’re communicating with. You are not weakening the security of your own communications, but those of everyone you communicate with!
Corollary: Inform the weakest links in your group that they could be using stronger ciphers. Point them to this section (Stronger Algorithms) of the documentation and help them fix it. Get their updated public key and help them test their preferences using showpref as described above.
Corollary: Update your keys often, so if someone on your keyring chooses to use stronger algorithms, you respect their preferences.
Technical Note: You may be wondering how these encryption algorithms like AES are even relevant to you if you chose to, say, generate an RSA or DSA public key. RSA and DSA are public-key encryption algorithms, after all, and AES is a symmetric encryption algorithm! I thought we were using public-key encryption here! The answer is that decrypting an encrypted communication in GPG is done in two stages, with both public-key and symmetric algorithms being used:
Public-key decryption: GPG uses your secret encryption key to decrypt a session-only secret key that was encrypted with your public (RSA or DSA) key.
Symmetric decryption: GPG uses this session-only secret key to decrypt the “body” of the message which was encrypted using a symmetric algorithm like AES.
Your public key (RSA or DSA) is only used for the first step. The actual body of the message is encrypted with a (faster) symmetric encryption algorithm, so it’s important to make sure that you’re using strong algorithms for both phases.
Procedure for Verification
Now, since you have my public key, are we secure? Well, no, not at all. Lots of people just getting started with cryptography don’t realize that they have to somehowverify that this key belongs to me. To me, Alan Eliasen. The one who wrote this message. How do you know that the public key posted above is the one I posted? After all, the bad guys could have replaced it somehow.
Listen carefully. This is important. Anyone can generate a public key for any e-mail address. Anyone can post that key to any key server. Only by verifying that the key really belongs to the person you think it does does it give you any security. Without this crucial verification, all that your cryptographic software does is ensures that bits weren’t corrupted during transmission, and prevents casual observers from reading the message. It does not mean that you’re talking to who you think you are. You could be talking to someone else entirely (a bad guy,) or you could be subject to a man-in-the-middle attack.
Update: As proof of the above paragraph, after I posted this document widely, on 2013-07-12, somebody generated a fake public key with my e-mail address and uploaded it to a key server! This is why you need to validate the key directly with the person to make sure you have the right key and the right person! That is, however, an unavoidable problem with public key servers. I thus can’t be mad about it, but I can try to educate people to recognize this possibility and do the right thing by validating my public key with me personally! Note that picking a key from multiple options on a keyserver based on which is newest or largest or by comments about “this is my newest key” is dangerous and wrong.
Still, if you want to send me encrypted e-mail, that may prevent other people from reading it. That’s good, and sometimes that’s all you need. Just understand why I don’t have any reason to trust that you’re who you say you are, and you don’t have any reason to trust that you’re really talking to me unless you’ve verified my key with me. Before I trust you with any secrets, I’ll validate your identity.
Fingerprint
A key could be verified in many ways (such as, I could read you my whole public key, which is really time-consuming and error-prone. It’s also bad because the key you see above can get longer and longer as other people sign it.) The usual alternative is to compare the fingerprint of what you think my public key is with the fingerprint of what I know my public key is.
A fingerprint is a shorter number (usually expressed as a 40-hexadecimal-digit number) that contains a cryptographically strong hash of my public key. It’s shorter than my full key, so it’s not an unfoolable test, but the probability of finding another key with this fingerprint is very small indeed. Infinitesimally small. So small you don’t have to worry about it. If someone else can find a matching fingerprint, they have enough power and money that they could make you vanish from the face of the earth. So, after you’ve imported my key, type:
gpg --fingerprint eliasen@mindspring.com
This will produce output that looks something like below (I have put the fingerprint in bold.)
Then, you need to verify this fingerprint with me. It’s best to do it face-to-face, but if it’s someone you know by voice, you can do it on the phone. If you don’t know the person, check their driver’s license. Ask other people (that you trust) who know them. Even if you don’t know them, at least you’re verifying that the key belongs to the person you’re talking to.
The other person will need to verify that their (unverified) copy of your public key matches what you know your public key to be. So bring a copy of your own fingerprint to the exchange:
gpg --fingerprint your@email.address
Of course, change the e-mail address above to the e-mail address you’re confirming.
Corollary: If someone puts the fingerprint of their key in their e-mail signature, or in a web page, they really aren’t proving their identity. Think about it. If someone’s pretending to be you, and forging your e-mail or your web site, they’d certainly replace the fingerprint too. It’s not enough to rely on. If you see someone with their key fingerprint in their e-mail signature, it’s not a reliable sign that the key with that fingerprint truly belongs to them.
My Key Verification Protocol
If you wish to verify this key, please contact me and I will verify its fingerprint in a public meeting-place. I will be wearing a trenchcoat and a navy blue ascot. You must wear or carry a yellow tulip. Any other flower signifies that contact should be aborted, even if the exchange below is executed correctly. I must not underestimate the necessity of having an adequate stock of proper yellow tulips on hand for this purpose.
I will say “The adobe is filled with an excess of straw this season.”
You must reply “The straw is for the young lambs which roam the heaths near Glasgow in the green, green spring.”
If I am satisfied with your response, I will reply “The greens at Saint Andrew’s are boiled with ham and contain an excess of bitter kale.”
Do not make eye contact or show signs of recognition. If necessary, I will read the hexadecimal digits of the fingerprint while feigning a book order on my cell phone.
Okay, I’m sort of kidding about this section. But you must verify keys with the other person to be truly secure.
If you have verified my key, and trust me (and trust your own verification,) be sure to sign it.
Signing a Key
Now that you’ve verified my identity, and my public key, you need to tell your cryptographical software that you trust my key. Otherwise, your cryptographical software should do the right thing and warn you that you’re communicating with someone that you haven’t verified. It’s telling you that it has no reason to believe that the key you’re using is the one that actually belongs to that person.
Signing keys in GPG
To sign my key from gpg, you’ll do something like:
gpg --sign-key eliasen@mindspring.com
(but see below for a better option.)
This will give you some options for signing the key. Even better would be to edit your signature and trust settings for this user using the interactive menu:
Hint: Type help for the interactive commands. The commands sign and trust are the ones you’re looking for. These allow you to both sign a key and indicate how much you trust me to verify other peoples’ keys. If you think I’m stupid and lax when verifying and signing other peoples’ keys, you’d assign me a low trust rating.
After you’ve signed someone’s key, you should send it back to them so they can show other people that you’ve signed it. You can export their key using:
gpg --export --armor their@email.address
and then sending that output to them. They can then import the changes using
gpg --import
You can also upload that signature to a keyserver, which makes that signature available to the world. See the Publishing your Public Key section below for how to do this.
If you’re really not sure about my identity, and don’t want to vouch for me publicly, you can locally sign my key, which means that you trust it for your own use only:
gpg --lsign-key eliasen@mindspring.com
Hint: If you publicly sign my key without actually verifying it with me, I’m going to assign you a very low trust rating.
Publishing your Public Key
Sure, you can manually send your public key to people you want to communicate with, but what if someone needs to communicate with you securely and you haven’t sent them your public key? The usual way is that you publish your public key to a keyserver so that anyone can import your key. Most of the keyservers in the world mirror each other, so a short time after you have posted your key to one server, it will be propagated to the others. As I have said above, I’ve had good luck for the past decade with pgp.mit.edu.
You have some responsibilities before publishing your public key (or someone else’s) to a keyserver, though. As mentioned above in the Getting Started and Procedure for Verification sections, you better have generated a revocation certificate for your key and put it somewhere very safe. Otherwise, if you lose your secret key, or it becomes compromised, the corresponding public key will sit forever on public keyservers, mocking you and demonstrating that you don’t know how to protect your secrets properly. If you think you can delete a key from a keyserver, rather than revoking it, read the FAQ at MIT’s keyserver. (I think it’s funny and awesome that they have a fake “delete a key” field on their website that just redirects to that FAQ no matter what key you enter.)
If someone has your public key, they can basically do a few things with it:
Encrypt messages that only you can decrypt.
Validate that messages were signed by your secret key with a strong guarantee of certainty, and ensure that those messages were not tampered with or corrupted in transmission.
These are good things. You want people to have your public key. So below are a few methods of publishing your public key to a keyserver. All achieve the same results.
Manual Exporting and Uploading
Now that you have generated a secret key and a public key, how do people find your public key so that can send encrypted mail to you? You can send someone your public key directly by, say, putting it in an email. To generate a copy of your public key that is easily e-mailed, you can do:
gpg --armor --export your@email.address
This will generate a nicely-formatted “ASCII armored” version of your public key which is suitable for e-mailing. “ASCII armor” is just a way of turning raw binary data (which will probably get corrupted if you try to send it through most e-mail programs) into a format using only limited ASCII characters, line-wrapped, with appropriate headers, and suitable for e-mailing. (Hint: It’ll look something like my public key at the top of the page.)
Note that the lines that begin
-----BEGIN PGP PUBLIC KEY BLOCK----
and end with
-----END PGP PUBLIC KEY BLOCK----
are a necessary part of the message. Don’t forget to include them!
Once you have this ASCII-armored public key, you can manually paste it into a form at a public key server like pgp.mit.edu
Again, just because someone seems to have sent you their public key, there’s no reason to trust that it’s from that person unless you have validated it with them using the instructions in the Procedure for Verification section above. Make sure you verify any keys before trusting them!
Uploading a Public Key via GPG
One way to publish your key to a keyserver is the manual approach from the previous section: export an ASCII-armored key and manually paste it in to a form like the one at pgp.mit.edu.
The other way is to let your gpg program upload the key. You can’t do this by specifying the e-mail address; you need to specify the public key’s hexadecimal ID number. So how do you find this for the key you want to upload?
gpg --list-keys your@email.address
pub 4096R/ED873D23 2014-07-22

uid Alan Eliasen <eliasen@mindspring.com<

sub 4096R/5314E70B 2014-07-22
In the above, my public key id is displayed on a line that says pub and contains an 8-character hexadecimal code (ED873D23 in the sample above.) You will need to know this code to upload to the server.
gpg --send-keys keyID gpg: sending key ED873D23 to hkp server subkeys.pgp.net
You may want/need to insert --keyserver pgp.mit.edu as options to the above if you want a specific keyserver. (These options have to go before commands like --send-keys. Again, most keyservers mirror each other, but it will take time for keys to propagate across all servers.
Note that after you’ve signed someone else’s public key, indicating that you’ve verified their key and identity and vouch that the key is theirs, you can use this same procedure to upload your signed version of their public key to a keyserver, so people can see you’ve vouched for them. See the Web of Trust section below for more information about this.
Manually Decrypting
So you’ve received a file or message encrypted with GPG, but you don’t have a fancy e-mail plugin to help you decode it. So how do you decode manually? Simple. From the command-line, if you just run gpg it will prompt you for input:
gpg gpg: Go ahead and type your message ...
From there, you can just cut-and-paste your message directly into gpg, and it will decrypt it, or import keys, or whatever is appropriate to the message. When you’re done pasting, you may need to send your operating system’s “end-of-file” character. This is Ctrl-D in most Unixlike systems and Ctrl-Z in Windows-like systems.
If the encrypted data is in a file, you can automatically process it by just passing the filename to gpg on the command-line.
gpg myfilename
The gpg executable will generally just do the right thing with it, prompting you for passwords when necessary, saving output files, etc.
Warning: When gpg encrypts or decrypts a file, it usually leaves the original file intact!. You must remember to delete the original file yourself, securely if possible. In Linux, you can use shred -u (shred just overwrites by default; the -u is necessary to delete the file afterward) or wipe commands to delete securely. On Windows, sdelete works well. (Although secure deleting isn’t guaranteed to work on solid state drives or flash drives due to wear-leveling algorithms. If you’re using one of these, and want to securely delete, you have to write over all your free space with a tool like wipe or sdelete) However, don’t believe the hype that you need to do dozens of overwrite steps. This is very likely urban legend, or marketing lies. One overwrite is probably plenty.
Manually Encrypting
Encrypting for E-mail
If you don’t have a fancy e-mail plugin that helps you encrypt your messages, it’s easy enough to do from the command line. You’ll need to save your message to a file.
There are several important things in this command.
--encrypt tells gpg to encrypt the message using public-key encryption.
--sign adds a digital signature that lets you guarantee that the message was generated by you and was not corrupted nor modified in transmission. This is theoretically optional, but see the Signing Messages section below for why this is very important.
--armor wraps your output in plaintext “ASCII armor”. “ASCII armor” is just a way of turning raw binary data (which will probably get corrupted if you try to send it through most e-mail programs) into a format using only limited ASCII characters, line-wrapped, with appropriate headers, and suitable for e-mailing. This is necessary if you’re pasting this into the body of an e-mail, or usenet posting, or forum posting, etc.
-r recipient Specifies recipients of the message. You must already have imported the public keys of the recipients. You can specify multiple recipients. If you don’t specify recipients on the command-line, gpg will prompt you to enter them interactively. These recipients can also be key IDs.Warning! This is important and interesting! Note that in the example above, your email address is specified as one of the recipients. If you do not explicitly add your own address to the list of recipients, you will not be able to decrypt the message! That is interesting and important and awesome. You may want to write something and send it to someone that you cannot ever possibly be compelled to decrypt! It will be impossible for you to decrypt, even though you wrote it and encrypted it! That is cool. Read the Why Public-Key Encryption is Cool section below for more about why public-key encryption is cool.
filename is the filename of the file you’re encrypting. This is not strictly required. If you don’t specify a filename, GPG will listen for input, and you can type a message directly or cut and paste it in. This is awkward, though. When you’re done pasting, you may need to send your operating system’s “end-of-file” character. This is Ctrl-D in most Unixlike systems and Ctrl-Z in Windows-like systems.Warning: (I’m repeating this again.) When gpg encrypts or decrypts a file, it usually leaves the original file intact!. You must remember to delete the original file yourself, securely if possible. See the warning above for more details on how to do this.
Encrypting Files
GPG is not just for e-mail! You may want to use it to protect your sensitive files also. Encrypting your files is just about like encrypting an e-mail. The simplest command line is:
gpg --encrypt filename
This will prompt you for the recipients (which should include your own e-mail address so you can decrypt it!)
A more complete command-line might look like:
gpg --encrypt --sign -r your@email.comfilename
Some interesting things to note and optional arguments:
--encrypt tells gpg to encrypt the message using public-key encryption. (See the Symmetric Encryption/Decryption section below for alternate ways to encrypt a file with a simple password and no public keys.)
--sign adds a digital signature that lets you guarantee that the message was generated by you and was not corrupted nor modified in transmission. This is theoretically optional, but very important.Think about it: how do you know that someone didn’t replace your encrypted file with a different one? By digitally signing the message, you can get a strong guarantee that you’re the one who encrypted the message and that it hasn’t been tampered with or corrupted. See Signing Messages section below for more on digital signatures.
--armor (optional, probably unnecessary) wraps your output in plaintext “ASCII armor”. “ASCII armor” is just a way of turning raw binary data (which will probably get corrupted if you try to send it through most e-mail programs) into a format using only limited ASCII characters, line-wrapped, with appropriate headers, and suitable for e-mailing. This is necessary if you’re pasting this into the body of an e-mail, or usenet posting, or forum posting, etc. Note that this will increase the size of your message on disk.
--output filename (optional) specify the output file.
-r recipient Specifies recipients of the message. Can also be written --recipient. You must already have imported the public keys of the recipients. You can specify multiple recipients with multiple -r arguments. If you don’t specify recipients on the command-line, gpg will prompt you to enter them interactively. These recipients can also be key IDs.Warning! This is important and interesting! Note that in the example above, your email address is specified as one of the recipients. If you do not explicitly add your own address to the list of recipients, you will not be able to decrypt the file! That is interesting and important and awesome. You may want to create a file for another person that you cannot ever possibly be compelled to decrypt! It will be impossible for you to decrypt, even though you wrote it and encrypted it! That is cool. Read the Why Public-Key Encryption is Cool section below for more about why public-key encryption is cool.
filename is the filename of the file you’re encrypting. This is not strictly required. If you don’t specify a filename, GPG will listen for input, and you can type a message directly or cut and paste it in. This is awkward, though. When you’re done pasting, you may need to send your operating system’s “end-of-file” character. This is Ctrl-D in most Unixlike systems and Ctrl-Z in Windows-like systems.Warning: (I’m repeating this again.) When gpg encrypts or decrypts a file, it usually leaves the original file intact!. You must remember to delete the original file yourself, securely if possible. See the warning above for more details on how to do this.
Attachments and PGP/MIME
What do you do if you want to send an encrypted file attachment in an e-mail?
There is a standard called PGP/MIME that try to standardize the handling of encrypted attchments. You cannot be sure that your recipient’s e-mail client will be able to handle them, so I strongly recommend never using them. Enigmail doesn’t even handle its own attachments that it creates well.
Examples of situations that will cause PGP/MIME or S/MIME attachments to fail or be lost:
Most web-based email services.
Most phone- and tablet-based email software.
List servers or remailers that strip attachments.
List servers that just don’t handle all attachments perfectly.
Corporate firewalls that remove attachments.
Overeager malware scanners.
Simple, secure e-mail clients that can only display plaintext.
Not-yet-ready-for-attachments e-mail tools like Enigmail itself.
I strongly recommend always sending encrypted messages or encrypted attachments as ASCII-armored OpenPGP blocks directly in the body of an e-mail. This will ensure that any e-mail program will still be able to handle them.
as outlined in the Encrypting Files section above. Then just paste the results into the body of your e-mail. You can paste in multiple attachments this way, too.
Signing Messages
In addition to encryption, gpg allows you to digitally “sign” messages, which has multiple benefits:
It lets you ensure that a message has not been corrupted nor modified in transmission.
It allows someone to verify that you signed it. (To be more precise, to verify that the signer of the message used your secret key, given that they’ve verified your public key with you, and that your secret key hasn’t been compromised.)
You should always sign your encrypted messages. Think about it. Everyone potentially has your public key. That’s expected. Anyone can encrypt a message to you using your public key, and pretend that it’s from someone you know. (It’s easy to spoof e-mails, but that’s another discussion.) Only if you verify (via the digital signature) that the message was signed by someone whose key you have verified, can you trust the communication.
Corollary: You should actively distrust unsigned encrypted communications. If someone’s trying to impersonate your friends, they’ll just conveniently “forget” to sign their messages.
A signed message gives a mathematically very strong certainty that the message was signed by you.
In your e-mail client, always choose to sign and encrypt a message. Below are some ways to sign messages manually.
Signing a Plaintext Message
Sometimes you just want to sign an unencrypted message to make it clear that you produced it and that it hasn’t been tampered with nor corrupted in transmission. For example:
Sending an important vote.
Important business communications.
Maybe you’re mailing a URL that looks suspicious and spammy, and your recipient wants to validate that it’s actually from you and not from a spammer or a virus. (Saying “this is really from me” in the e-mail is not good enough!)
Being very certain that the message is not corrupted in transmission.
Allowing recipients to verify that data comes from you and is valid. For example, a school could prove that test scores came from them and were not tampered with. (Institutions should use this more!)
The --clearsign option will wrap the message in an ASCII-armored signature but will not otherwise modify its contents. This allows even the losers who don’t use gpg to read the body of the message, but allows gpg users to verify that you wrote it and that the message wasn’t changed.
gpg --clearsign filename
-----BEGIN PGP SIGNED MESSAGE-----
Hash: SHA256

I vote YES on this important measure.

-----BEGIN PGP SIGNATURE-----
Version: GnuPG v1
Comment: See Alan's GPG guide at https://futureboy.us/pgp.html

iQIcBAEBCAAGBQJT3MFeAAoJEF8rR1bthz0jslMP/RMRODVKLmLwZ3sMR62COGc/
0yQSh3c37qkkVjD0RvgdziHuCSSYelhNl7UMQofpdLonnJgPW3svlftE3Gn11JLp
ZYv2iMwCzwyM2eLYpSQoJBNnGZzQDGnZRBkFOwdkkohUSBjhPjiszYw3KwnpsuxG
I+m81IMJATR0wOylLumVdjbvS1/f9bOzBRvhgu2HS54lfPnl162RRZpycrrb5IOi
07QWIlUGVUdAxFUq4Jlm99KB17lQhri3zm6m7O5k0faD3IKFRTQGKseq7j88pRs6
j85v/cc35CHW9+66jcz7Y3UtOIj3gqDQd/Wj05YP01QSwSCuuVAezvXngljF8fLP
OKQhFpLoLnWvDPgX3nKwGbX52qZwLGN0bZduhOmMPYwKAEFAYDOOW7q+i/dyz5xT
od54j32QiNkSqDCVkvOT6dKiCdCa8GvtwwXPKa9X7+VZB2xYeJorJiaIesD7wyVN
CQDx11uMGMkpZ/BmCIA5mDIkDnUTIxHxNFpn2kS6nHJqmJ/LleTpAKLhPWuY1U28
YVraBzmAZ/Wj2Frq0utPi4cFf5r3x9jXIzie4fYrUjMKCN+CNfLL15Py/z9OY1ux
vvYdMiLAzL1Ujvjpyw7sCdc2KnbXaM9jmbBGjmVCMX/wGcGKT6cIxYnkR4NOW62L
jaBgelaHIL5kZ+E/kpS6
=wh+e
-----END PGP SIGNATURE-----
Verifying Signatures
People who have verified your public key can verify messages that you’ve signed by passing the output back into gpg:
gpg --verify vote.txt.asc
gpg: Signature made Sat 02 Aug 2014 04:45:50 AM MDT using RSA key ID ED873D23

gpg: Good signature from "Alan Eliasen <eliasen@mindspring.com>"
If they haven’t verified and signed your public key, then they will be warned that the key is untrusted. This means that all that they can tell for certain is that the message wasn’t corrupted in transmission, but it really could have been written by anyone! Beware “Untrusted good signature!” It means that the signature is by someone whose fingerprint you haven’t verified.
Detached Signature
Sometimes you want to sign a file, but without modifying it like the --clearsign option above does, because people would need to edit the file or use gpg to get at the contents.
Say, you’re sending an executable file to someone. You don’t want to tamper with the executable file, but executable files are scary and potentially very dangerous. So how can you guarantee to the recipient that nobody has tampered with the file and that it actually came from you? By creating a “detached signature” which is a separate file that contains a signature for the specified file. This is achieved through the --detach-sign command:
gpg --detach-sign filename
Then you ship the signature file along with the original file. The recipient can verify that you signed the file and that it has not been modified with the --verifycommand:
gpg --verify filename.sig
gpg: Signature made Sat 02 Aug 2014 04:45:50 AM MDT using RSA key ID ED873D23

gpg: Good signature from "Alan Eliasen <eliasen@mindspring.com>"
Proving You Wrote Something but Remaining Temporarily Anonymous
Let’s say you found out that a huge company (we’ll call them Mapple) wrote a really crappy incompetent insecure website that leaked a lot of their customers’ information that anyone could access trivially by adding 1 to a number.
Now, you’re not sure if the company is awesome and honest and will pay you a handsome bug bounty for pointing out their incompetent security hole and helping them protect their customers’ information, or if they are psychotic morons who will claim post-facto that your access of information they intentionally published on a public webserver without any access control was “unauthorized” and have you charged under the insanely incompetently-written and outdated Computer Fraud and Abuse Act (CFAA).
So, how do you report this anonymously? Well, one very strong way would be to generate a new keypair without your name on it, publish that public key, and sign all your messages with the corresponding secret key. This lets you do a few things:
You can prove that all subsequent messages signed with the same key are from the same person, even if you jump to different e-mail addresses or communication channels.
If they decide to be honest and offer you a bounty for your services to them and their customers, you can prove in the future that you’re the person in possession of the corresponding secret key that signed the messages, for example, by decrypting something sent to you encrypted with your public key. Nobody else would be able to falsely claim that they’re the submitter without verifying that they have the corresponding secret key.
If they are evil about it, you can remain anonymous to them. If you want to prove to others that you made the disclosure, you can, by signing a message with the same secret key or decrypting information sent to you that was encrypted with your public key (by using your secret key.)
(This is a mathematically super-strong version of the old trick of ripping a dollar bill in half, and sending half of it to someone. If they want to verify your identity, only you will have the other half of the bill. A dollar bill, with distinctive tearing pattern and matching serial numbers, is hard to forge.)
Updating Keys
People are constantly updating their keys for various reasons:
Keys get compromised or lost and they are revoked.
Keys are signed by more people, building a Web of Trust.
Users change the encryption algorithms they prefer. (See the Using Stronger Algorithms section for more about this.)
Updates to keys can be published to public key servers, including new signatures. You can periodically update your keys by using
gpg --refresh-keys
This lets you ensure that the keys you’re using haven’t been revoked. You might even find that more people have signed your public key. (And they better have validated your key fingerprint and your identity using the verification procedure outlined above, or they can’t be trusted to sign keys properly and you should assign them a low trust rating!)
Note that other people can sign your public key and upload the signed key to a public webserver! So you might even find that your own key has been updated!
Listing Your Keys
You can get a list of the keys on your keyring and their corresponding key IDs with:
gpg --list-keys
If you enter part of the name or e-mail address or key ID as the last argument on the command-line, then only keys that match that pattern will be listed.
gpg --list-keys Alan
Who Signed My Key?
Now that you’ve updated keys from a keyserver, you might want to see who has signed your key. After all, anyone can sign any key and re-upload that key to a key server. You can see the signatures with the --list-sigs command to gpg:
gpg --list-sigs your@email.address
Or you can browse your key on a public keyserver, like pgp.mit.edu. This is advantageous because if you haven’t imported someone’s key yet, they will just show up as a key ID number.
Again, if someone signed your key without validating the fingerprint with you, they are actively damaging the web of trust. You should import their public key just so you can tell your software to actively distrust it as outlined in the Signing a Key section.
(After I published this document, an out-of-control signer whom I’ve never met signed my key and published the changes to a public website. I had to download his public key so I could tell gpg to actively distrust his signatures!)
Building a Web of Trust
In the examples above, I stress the importance of verifying people’s public keys with them. But sometimes you can’t do that directly. So how can you verify someone else’s public key?
Let’s say I want to talk to Bob. I’ve downloaded a public key with his name from a keyserver, but I can’t be sure that key belongs to him. I could maybe call him on the phone and verify his key that way, but I don’t know his voice, and I don’t have his phone number. Or maybe he’s even under duress.
Luckily, my friend Alice has signed his public key. I trust Alice to have verified his key properly. I have validated and trusted Alice’s public key personally. Thus I have a good reason to believe that Bob’s key really belongs to him.
This is why it’s important to validate other people’s keys very carefully and to build a web of trust–so you can communicate with people whose keys you can’t personally verify.
See the Signing a Key section above to see how to sign someone else’s key and upload it to a keyserver.
Conversely, you may not want to publicly sign the keys of people you communicate with. You may not want others to know who you communicate with. You may have more than one keypair, and use them selectively for communications with a single person once they’ve demonstrated strong cryptographic practices.
This is serious business. An example from Syria shows how people die when others don’t protect their communications.
If you don’t want anyone to be able to analyze who you’re talking to, even by traffic analysis of key IDs, you can specify hidden recipients in your messages.
Good Encryption Practices
By using encryption improperly, you can make your encrypted communications easier to break. Some of the tips here are speculative and may not apply to all cryptographic algorithms, but many cryptographic algorithms are subject to common types of attacks. These tips will help mitigate those potential weaknesses if algorithms are found to be vulnerable to these types of attacks.
Don’t be predictable. This is the way that much crypto has historically been broken–by knowing words or phrases that are likely to occur in the message. This is known as a “known-plaintext” attack. For example, the WWII German Enigma machine codes were partially broken because people would end with expected phrases like “Heil Hitler!” or from spelling out numbers. (Looking for the number “eins”, (1), the most common number, was a useful tactic in breaking Enigma.)You think this is academic and known-plaintext attacks can’t happen? Well, take a look at this recent break on the widely-used RC4 cipher. (It’s used in SSL/TLS and in WEP/WPA in wi-fi.) It was found that if you knew a small amount of plaintext, you could recover the rest of the message (given a fairly large amount of encrypted communications, to be sure.) With as little as 6 bytes of plaintext, and a large number of communications, the rest of the message could be decrypted with high probability. (The more bytes are known, the easier it is to break.) Also, keep in mind that breaks in cryptographic algorithms only get worse.
Don’t be polite. As a corollary of the above, don’t start and end your message with predictable phrases or pleasantries.
Don’t send HTML-formatted encrypted emails. There’s a large amount of predictable boilerplate in HTML.
No signatures! As a corollary of the above, when sending encrypted messages, don’t include your usual .sig file with your name, e-mail address, phone number, password, website, company policy, etc.This doesn’t mean “no cryptographic signatures!” You still want cryptographically strong signatures like the kind you get with --sign. Smart e-mail add-ons like Thunderbird with Enigmail can suppress your signature when using encryption. Or you should encrypt just the meat of your email (and not the signature) if you need that silly signature.
Don’t quote previously-encrypted text. When replying to an encrypted message, don’t quote the original text. Again, having large stretches of expected text has been the downfall of many cryptographic algorithms.
Don’t encrypt the same message multiple times. Some codes have weaknesses that if the same plaintext message is encoded several times (say, to several different people, or to the same person multiple times,) then more information can be derived about the contents or the key. If someone isn’t able to read your encrypted message, don’t send it again. After all, they’re not following good cryptographic practice if they can’t read it, and you should limit encrypted communications with them. Or, if you must send it again, alter it as much as possible before encrypting and sending it again. If encrypting the same message to multiple people, encrypt to all of them at once (assuming you want them to know who you’re communicating with. They will at least see the key ID numbers.)
Don’t have encrypted and unencrypted versions of the same information. As noted above, gpg does not automatically delete the plaintext version of a file when you encrypt it! Read that section on securely deleting files if possible.
Garbage is good. One of the hard problems in cryptography is identifying when a message has been successfully decrypted. How do you know? When it all comes out as mostly alphanumeric characters? When its word frequency looks like English? Make it hard for the bad guys. Jam in a bunch of random bytes into your message if you can. It’ll make it harder to even detect the fact that the message was decrypted properly. Send your friends encrypted random bytes every day just for fun because screw the surveillance state we live in! If everyone did this, it would be utterly prohibitive to try and decrypt all of the random data flying around.
If it’s received encrypted, store it encrypted. Some e-mailer plugins will offer to decrypt messages and store the decrypted versions in your mail folder. Don’t do this. It allows someone to mount a chosen-plaintext attack on you just by sending you an encrypted message. Yes, it will make your messages impossible to search for content. But that’s good.
Don’t encrypt stuff from untrusted sources. There is a class of attacks called a “chosen-plaintext” attack. Some encryption algorithms can be weakened or completely defeated if the attacker is allowed to choose the text that you are going to encrypt with your key. Always refuse to encrypt something specific that a third party asks you to encrypt, especially if it’s lengthy.
Hide your encryption entirely! There’s a branch of cryptography called “steganography” which hides secret communications in innocuous places that are very hard to detect. For example, by slightly modifying the least-significant-bits in the pixels of a JPEG image, you can hide encrypted messages in pictures of kittens! Or, you can hide them by adding slight, undetectable noise to audio files.It becomes very difficult and expensive to determine that a particular image even contains steganographic content. That’s the best way to hide your information, especially as the NSA has decided that using cryptography to protect your privacy is probable cause that you’re a terrorist, and they allow themselves to keep encrypted content “for as long as necessary” to break it.
I have built some web-based Steganographic Tools that let you experiment with steganography from your browser! If you want to be more secure, of course, you’ll run the steganography tools on your own machine. That page tells you more about the steghide program. (Hint: in Fedora it’s yum install steghide )
Symmetric Encryption/Decryption
Sometimes you don’t want to use public key encryption. You can use old-fashioned “symmetrical” encryption where everyone shares a common password. In gpg, you do this by using --symmetric instead of --encrypt:
gpg --symmetric filename
gpg will then prompt you for a password.
Warning: (I’m repeating this again.) When gpg encrypts or decrypts a file, it usually leaves the original file intact!. You must remember to delete the original file yourself, securely if possible. See the warning above for more details on how to do this.
If you want to paste the encrypted file into an e-mail or something, you can use the --armor option.
The encrypted file can be decrypted by passing it back into gpg:
gpg filename.gpg
If you want to force the encryption algorithm used (the default is maybe CAST5), you can add the --cipher-algo name command-line option, for example --cipher-algo AES256 . The list of available encryption algorithms in your version of gpg can be found by running the gpg --version command.
Symmetric encryption has its problems. It doesn’t let you simultaneously sign the message to indicate that it hasn’t been tampered with or replaced with another file that someone else generated! (You can, however, sign it manually later using the techniques in the Signing Messages section, but it’s theoretically possible that an attacker can replace that file in the brief time between when you encrypted it and when you signed it.)
If you use symmetric encryption, you also need to solve the age-old problem “how do I communicate the password securely?”
Why Public-Key Encryption is Cool
In short, public-key encryption solves the age-old problem “how do I communicate a password securely?” You no longer have to. You just need the other person’s public key, which can be published to the world.
You can also encrypt a message that you can not decrypt! This may sound silly, but you may want to write something to someone that you cannot ever possibly be compelled to decrypt! It will be impossible for you to decrypt, even though you wrote it and encrypted it and even if you have the file in your possession and even if you have all your secret keys and you know all of your own passwords and have them written down! That is cool. (You can smile serenely while they’re beating you with a rubber hose, knowing that you can’t endanger the lives of your sources, nor give up your rights, even if you felt like that might be entertaining for a change.) You can see how to do this physically in the Encrypting Messages You Can’t Decrypt section.This actually has many important and practical uses:
If you’re a reporter (or other human) traveling abroad, you can encrypt materials using public-key encryption, to someone else’s key, butwithout encrypting to your own public key. (Warning: some tools will encrypt to yourself by default. Read on.) It’s easy to create a message that you can never possibly decrypt yourself, and cannot possibly be compelled to do so! Ever! You could encrypt them, say, using only the public key belonging to your newspaper’s editor or lawyer. (And if your newspaper’s editor and lawyer don’t have public keys, have them contact me and I will help them. They need to do this. Now. Before they kill people.) You can be detained and couldn’t ever be compelled to give up the password, as you never had it!You don’t have to be in Syria (although journalists who don’t use encryption kill people; read the link) or North Korea for this type of Orwellian police state coercion to happen. Even the otherwise-civilized United Kingdom has vile horrendous laws that can jail you without trial if you don’t give up passwords.
Edward Snowden has also stated that he has in his possession encrypted documents that he cannot possibly be compelled to decrypt, even under torture. (But maybe other trusted people potentially can decrypt them.) Public-key encryption is probably what he was hinting at. Nice work.
Also see the Hidden Recipients section of this document to see how to hide the people to whom you’ve encrypted. That may be veryimportant for journalists or dissidents or ordinary people who want to assert their rights to free association. It also allows you to post encrypted messages to public forums without anyone knowing who you’re talking to.
Also see my Steganography tools which let you hide the fact that any hidden communications are happening at all! You can hide secret communications in pictures of kitties.
Let’s say you have a web server that collects very sensitive user information. You don’t trust the security of the web server, but you have to keep the information on that web server for a while before you move it elsewhere. Say, to a computer completely disconnected from the outside world. With public key encryption, you can encrypt information with a public key stored on the web server. However, the secret key would not ever be kept on that server! Even if someone breaks your web server wide open and has total access to every single file, andevery single algorithm, and the public key, they will still never, ever be able to decrypt the private information on the server because the secret key needed to decrypt it is not on the server at all!Miracles!
If you rent space in a server farm, this can prevent malicious administrators at the hosting company (who probably hold superuser access on your machine, and can read all your files) from being able to do anything with your data. And it keeps your web server administrator or database administrator from seeing that sensitive data, even if they have complete access to every file on the computer.
A real-world example of storing sensitive communications: The Federal Communication Commission’s (FCC’s) Lifeline subsidized cell-phone program for low-income people leaked highly sensitive customer information for over 170,000 people, including Social Security numbers, birth dates, home addresses, and sensitive details about family finances from a public web server. Think about how you could use public-key encryption to collect and encrypt this data securely on the webserver, and only be able to decrypt it somewhere else much safer.
Again, see how to do this in the Encrypting Messages You Can’t Decrypt section.
It’s easy to revoke access to one member of a group. If everyone in a group shared a password, it would be very difficult to remove one person’s access. A different password might have to be created, and that password would have to be communicated securely to all other members of a group. Public-key encryption means that you can control exactly who is allowed to read future communications. If you don’t want someone to read it, just stop encrypting to that person’s public key. Even if they can still see your encrypted communications (like on a public mailing list,) they will no longer be able to decrypt it.
Fun Tips and Tricks
Here are a collection of fun tips and tricks and puzzles for using GPG. Please send me more.
Verbose Information
You can use the -vv command-line option to gpg to give verbose output about what algorithms are actually being used. (Note that if you’re pasting in decrypted text, after you’re done pasting, you may need to send your operating system’s “end-of-file” character. This is Ctrl-D in most Unixlike systems and Ctrl-Z in Windows-like systems.)
gpg --list-packets can list the packets of any GPG file and give details on what’s contained therein. This tends to output not-very-meaningful numeric data about which encryption algorithms were used, but you can decode these by looking at the specification for the Open PGP standard, RFC 4880, specifically Section 9.
You can also use programs like pgpdump to see what’s included in a PGP message.
Also see the Automating GPG section below to see more options for dumping detailed information about what GPG is doing.
Requiring Multiple Decrypts
You can encrypt documents that require several people must cooperate to decrypt, by encrypting with multiple passes, specifying a different recipient each time. They will need to decrypt in the reverse order that you encrypted.
TODO: Make an example, preferably one that writes no intermediate files (e.g. output to stdout using --output -) and doesn’t make you enter passwords multiple times. Naïve versions make gpg complain with weird “broken pipe” errors and races in password entry.
Hidden Recipients
Sometimes you want to hide the recipients of your message from any snoopers. Normally, the key IDs of the recipients are part of the message. However, you can hide these by specifying --hidden-recipient recipient for each recipient you wish to remain hidden (instead of using the -r or --recipient flag to specify recipients.) The decrypting program will have to try all available secret keys to try and decrypt the message. (Hidden recipients’ key IDs show up as all zeroes in the encrypted message.)
The --throw-keyids command-line option is essentially the same as using --hidden-recipient for all recipients.
There are other interesting options for hiding recipients in the GPG key-related options documentation.
Encrypting Messages You Can’t Decrypt
The section Why Public-Key Encryption is Cool explains reasons that you might want to create an encrypted message that you can never be compelled to decrypt. This section discusses how that is performed.
In GPG
When you encrypt a message in GPG from the command-line, it does not encrypt to you by default! You would need to specify your own e-mail address as a recipient with the -r recipient@email.com option for you to be able to decrypt it.
(See the Manually Encrypting for E-mail section, including the warning, or the Encrypting Files section, including the warning.)
Thus, there’s nothing to do when using gpg on the command-line other than remembering not to specify your own e-mail address as a recipient. (Note: You can change the “encrypt to self” behavior in your gnupg.conf file, so be careful if you’ve modified that.)
This is why I encourage people to learn and use the GPG command-line for sensitive communications. Its defaults are usually safer than what your e-mail program exposes to you.
Migrating to a New Key
This section of the document describes the process for migrating to a new GPG key, which is two different but related problems:
Creating a new public/secret keypair key for yourself which you will then communicate to others.
Updating when someone else generates a new public key.
These are addressed in the sections below.
Creating Your Own New Key
Sometimes you want to generate a new public key for yourself, and migrate away from the old one. There are a few steps to this process:
Generate the new key. For this step, you will probably want the old and new keys to co-exist on your keyring at the same time. As noted in the Getting Started section, you will begin the process of creating a new key with:
gpg --gen-key
Know your old and new key IDs. Throughout most of this document, you use e-mail addresses to identify keys. However, once you have more than one key for a given e-mail address, things get a bit trickier. GPG behaves somewhat dangerously and uses the first secret key in your keyring, unless you explicitly tell it otherwise. Thus, you will need to know the key IDs of your old and new keys, and use them in the right places below.You can list your secret keys with:
gpg --list-secret-keys
or the equivalent:
gpg -K
(note that that’s a capital K. A lowercase k lists all keys.)
sec 4096R/ED873D23 2014-07-22
uid Alan Eliasen <eliasen@mindspring.com>
ssb 4096R/5314E70B 2014-07-22
I have highlighted the key IDs in bold. They appear on a line beginning with sec. As you can see by the creation dates, the old key ID is B05676B1 and the new key ID is ED873D23. Yours will be different, of course. Make a note of them.
Create a revocation certificate for the new key. This will let you revoke the key if you lose it. See the directions in the Generating a Revocation Key section of the documentation, but substitute your new key ID for the e-mail address. You may also want to change the filename if you already have a revocation key for your old key.
Ensure that the new key uses strong cryptography preferences. By default, the encryption preferences specified in your public key are probably not as strong as they should be. Follow the procedure in the Using Stronger Algorithms section of the documentation, but substitute your new key ID for your e-mail address. That is, the command-line will be:
gpg --interactive --edit-key newKeyID
Sign the new key with your old key. If people have your old key, this helps them trust that the new key was generated by you.When signing a message, the gpg options --local-user keyID or the equivalent -u keyID lets you specify which key is doing the signing. Thus, to sign the new key with your old key, you would use the command:
gpg -u oldKeyID --sign-key newKeyID
(Optional) Trust the old key’s signatures. You may have signed other peoples’ keys with your old key. You can tell the new key to trust signatures made by the old key using the procedures in the Signing a Key section, specifically the trust command. The command-line may look like:
gpg -u newKeyID --interactive --edit-key oldKeyID
And then using the command trust followed by save. (Which in some versions is just quit.)
Set the new key as your default key. As noted before, GPG uses the first secret key in your keyring to sign messages. You thus have a few options to make gpg use your new key by default. Choose one of the options below:
(Recommended) Set the default-key option in your gpg.conf file to your new key ID. (See the Sandbox section to see where yourgpg.conf file may reside.) The line in the file will look something like:
default-key newKeyID
(Not recommended) This is ponderous and easy to forget, but you can specify the new key ID on the command-line with each signing command: -u newKeyID
(Optional) Disable the old key in your keyring. You’d think that this should not be necessary if you followed step 1, but be warned that GPG and Enigmail will encrypt to the old key ID and sign with the old key ID if you specify your e-mail address as one of the recipients, as it uses the first key that matches the e-mail address. Ugh. The command would be:
gpg --interactive --edit-key oldKeyID
And then using the command disable followed by save. (Which in some versions is apparently just quit). You can theoretically re-enable it in the future using enable.
(Optional, possibly dangerous) If you’re absolutely sure that you’ll never need the old secret key, you can delete it. Keep in mind that this will make it impossible for you to decrypt any old communications that were encrypted to the old key! You probably don’t want to do this, so I’m not going to tell you how, (but I’ll say that the help command from the --edit-key mode is your friend, and contains lots of interesting tricks. Take a look!)Because of the glaring problems and outright bugs in Enigmail and GPG’s handling of multiple keys for the same e-mail address, it’s not a bad idea to delete the old key when you can finally be free of it.
Communicate the new key to people who have your old key. One of the best ways to do so is to create a migration document that explains your reasons, your old and new key information, and sign that message with your old key using:
Import the new signatures from your friends. People may publicly sign your key and return it to you, or upload the signed key to a keyserver. See the Signing a Key section of the documentation for more information. Also, be sure to periodically refresh your keys from a public keyserver using:
gpg --refresh-keys
(Optional) Upload the new key to a keyserver. See the Publishing your Public Key section for how to do this. This step is important if people have signed your key and sent it back directly to you, as their signatures will not appear on public keyservers until someone uploads to a keyserver.
(Optional, Potentially Dangerous) Revoke the old key. If you know what you’re doing, you can (and eventually should) revoke the old key. Since this is somewhat dangerous, I’m not going to give you explicit steps, but this section of the GPG guide will get you started. (Link opens in new window.)Revoking a public key is not the end of the world, though. That guide notes that:
“A revoked public key can still be used to verify signatures made by you in the past, but it cannot be used to encrypt future messages to you. It also does not affect your ability to decrypt messages sent to you in the past if you still do have access to the private key.”
However, this paragraph is deceptive if not outright wrong! People can and will continue to encrypt future messages to you using the revoked key if they don’t know about the revocation, and haven’t updated your key! They will only know about the revocation if they periodically refresh your key from a keyserver using something like:
gpg --refresh-keys
Since you have no guarantee that people do that (and few people do it regularly, in my experience,) then you need to make sure that you communicate the revocation to people you have communicated with in the past. Again, see the “Communicate the new key…” section above for a sample document explaining how to do this.
Using Someone Else’s New Public Key
People that you communicate with may generate new public keys, and you need to ensure that the new key is valid, and that you are using the new key instead of the old key. There are a few steps to this process:
Import the new key. If the person emails you the new key directly, it should be trivial to import. Otherwise, you can import it with
gpg --import
either specifying a filename to read from or pasting the new key in directly. (When you’re done pasting, you may need to send your operating system’s “end-of-file” character. This is Ctrl-D in most Unixlike systems and Ctrl-Z in Windows-like systems.)
You may also fetch the new key from a keyserver. Be sure to read on and validate that the person actually uploaded it!
Know their old and new key IDs. Once you have multiple keys for a person, GPG behaves very badly. It uses the key for the first e-mail address that matches, and ignores the others!For the next few steps, you will need to know the key IDs for the old and the new keys. You can list all keys associated with their e-mail address by doing:
gpg --list-keys their@email.address
or the equivalent:
gpg -k their@email.address
This produces output something like:
pub 1024D/B05676B1 2002-06-26

uid Alan Eliasen (http://futureboy.homeip.net/) <eliasen@mindspring.com>

sub 1024g/70AC29FB 2002-06-26
pub 4096R/ED873D23 2014-07-22
uid Alan Eliasen <eliasen@mindspring.com>
sub 4096R/5314E70B 2014-07-22
I have highlighted the key IDs in bold. They appear on a line beginning with pub. As you can see by the creation dates, the old key ID is B05676B1 and the new key ID is ED873D23. Yours will be different, of course. Make a note of them. You will need them in the following steps.
Validate the new key with the person. You should always be warned that anyone can generate a public key for any e-mail address. Anyone can post that key to any key server, so you need to follow the instructions in the Procedure or Verification section of the document to validate that key with the person!If the person has signed the new key with the old key, (and they should have!) then you can perform another procedure to have a strong certainty that whoever is in control of the old key created the new key. (But if the old key was stolen/compromised, you need to be extra careful!) You can check signatures on the new key by running:
gpg --check-sigs newKeyID
This will produce output that looks something like:
pub 4096R/ED873D23 2014-07-22

uid Alan Eliasen <eliasen@mindspring.com>

sig!3 ED873D23 2014-07-22 Alan Eliasen <eliasen@mindspring.com>

sig! B05676B1 2014-07-22 Alan Eliasen (http://futureboy.homeip.net/) <eliasen@mindspring.com>

sub 4096R/5314E70B 2014-07-22

sig! ED873D23 2014-07-22 Alan Eliasen <eliasen@mindspring.com>
The exclamation points following sig are the important things here. The line in bold, with the old key ID, indicates that the old key (which you can identify by the key id you found in an earlier step) signed the new key and the exclamation point after sig indicates that the signature check passed.
Sign the new key. Once you have validated the new key with the person, you can sign the key. See the Signing a Key section above to see how to sign someone else’s key, but note that you’ll have to substitute the new key ID instead of the e-mail address, or GPG will likely just give you the first matching e-mail address (which is the old key):
gpg --interactive --edit-key newKeyID
(Optional) Send the signed key to its owner. Again, see the Signing a Key section above to see how to sign someone else’s key and export it for e-mailing, or to send it to a keyserver.
Delete or disable the old key. Since you now have both keys on your keyring and you no longer want to accidentally use the old key, you should delete or disable the old key.With all the problems with GPG and Enigmail’s handling of multiple keys for the same e-mail address, deleting it is by far the safest option, but simply disabling it means that it should no longer be used for encryption (although the bugs listed above for Enigmail leave me with little confidence in its ability to choose the right key.) However, GPG may still trust signatures made by a disabled key, so if the other person’s old key was stolen (and not revoked) then you might be at risk of accidentally trusting it!
To disable or delete the old key, do:
gpg --interactive --edit-key oldKeyID
Check that you have the correct key, and then type either disable or delete. After that, type save and save your changes.
Note that some versions of GPG appear not to have a delete command from the interactive menu, so you may have to do something like:
gpg --delete-keys oldKeyID
Keysigning Party
A keysigning party is just a bunch of repetitions of the Procedure for Verification described above. You meet other people, validate their identities, and exchange fingerprints of your public keys. Later, usually after the party, you can download their public keys from a keyserver, verify that the fingerprint you got from the person matches the one you downloaded from the keyserver, and then sign the key and send the signed key to its owner. You don’t need to (and are often warned not to) bring a computer to the keysigning party, as long as you are prepared using the guidelines below:
Before the keysigning party:
Print out a bunch of copies of your public key’s fingerprint on strips of paper. Keep them safely in your possession until the keysigning party:
gpg --fingerprint your@email.address
It may look something like this (I’ve put the fingerprint, name, and e-mail address in bold.)
Here’s a fancier one I printed out 4 to a page for a keysigning party at DEFCON: DEFCON fingerprint document.
Bring a pen, some paper, and a photo ID. You may wish to obscure sensitive details on your photo ID (e.g. license number, address, birthdate) if you’re not meeting with people you know and trust. Blue painter’s tape works well for this.
If your key is on a public keyserver, then there is no step 3! You’re ready! If your public key isn’t listed on a keyserver, then either publish it to one or, (less friendly,) provide a way for others to download it. (Say, by publishing a URL on the paper that contains your fingerprint.) I definitely don’t recommend exchanging flash drives at a keysigning party!
During the keysigning party:For each person you meet at the keysigning party:
Exchange paper copies of your fingerprints. You should both give and receive one, but it does not necessarily have to be symmetrical. (If you run out of pieces of paper, you can always copy fingerprints by hand, or take a picture of one, etc.)
Attempt to validate the other person’s identity, usually by asking to see their photo id if you don’t know them otherwise. Be courteous. You don’t have to share your ID with anyone you don’t want to, and they don’t have to share with you. Again, it’s good to mask out sensitive details on your ID, (like with blue painter’s tape.)
Once the identity is validated, sign or initial the fingerprint you received from them, and keep it in a secure place. You will need it later.
(Optional) Go around the room in a group with people you know. If you personally know someone that you’re exchanging keys with, let your friends know that, and ask them to do the same. Introduce each other. It enhances the trust level.
(Optional) Ask the person if they have a photo of themself in their public key. (You can attach a small photo to your public key, which makes it harder to impersonate you in person.) If they do, you might ask to take a picture of them to compare with the picture in the public key later.
After the keysigning party:After the keysigning party is when you usually do the actual signing of keys. For each person that you met:
Import their public key from a keyserver. Again, note that the last 8 or 16 hexadecimal digits of the fingerprint are their short or long public key ID, respectively. For example, if all you have is the fingerprint:
EC23 92F2 EDE7 4488 680D A3CF 5F2B 4756 ED87 3D23
Then you can instantly determine the short key ID, which is the last 8 hexadecimal digits of that fingerprint (removing spaces), which givesED873D23. (The long key ID is the last 16 digits.)
With just that number, you can request their public key from a keyserver:
gpg --recv-keys keyID
You will see something like:
gpg: requesting key ED873D23 from hkp server keys.gnupg.net

gpg: key ED873D23: public key "Alan Eliasen <eliasen@mindspring.com>" imported

gpg: 3 marginal(s) needed, 1 complete(s) needed, PGP trust model

gpg: depth: 0 valid: 2 signed: 0 trust: 0-, 0q, 0n, 0m, 0f, 2u

gpg: Total number processed: 1

gpg: imported: 1 (RSA: 1)
(You can even fetch public keys from keyservers using all 40 digits of the full fingerprint (with spaces removed) but people usually use the short key ID because it’s easier to type from a piece of paper. You will still verify the full fingerprint in the next steps.)
You can also search for keys by e-mail address instead of key ID, using gpg --search-keys their@email.address but if you don’t even have the e-mail address, the fingerprint alone is sufficient.
(Note that with just an 8-hex-digit short key ID, it’s possible that there may be key collisions when downloading from a keyserver. You can reduce this possibility by using the 16- or 40-bit fingerprint. See the Short key IDs are Bad News section of this document if you want to know more about key collisions.)
Generate the local fingerprint of the key you imported. This verifies that the public key you received has the proper fingerprint:
gpg --fingerprint keyID
Again, you could also search by e-mail address instead of key ID. See the Fingerprint section of this document to see how to verify fingerprints in Enigmail.
Verify that this fingerprint matches the one you have on paper. You just do this with your eyes, comparing the 40-hexadecimal-digit numbers.
Sign the key if everything matches. See the Signing a Key section for detailed information on how to do this. You may sign the key publicly or locally. Signing the key tells your cryptographic software that you’ve validated the other person’s identity and that your software no longer has to warn you that the key has not been properly verified and trusted.Since you have the key ID, the best way to generate the fingerprint, sign, and trust the key is to edit it interactively using a command like:
gpg --interactive --edit-key keyID
and then using the commands sign (which will show you the fingerprint, you can also generate it with fpr) and trust followed by save orquit. Hint: Type help for the interactive commands.
If you’ve publicly signed the key, return the signed key to its owner. This allows them to import your signature and share that signature with others. Again, see the Signing a Key section of this document for ways to do this.In some circles, it may be considered more courteous to email the signed key back to its owner rather than to upload the signed key back to a keyserver directly, but be warned that anyone can sign any key and upload it to any keyserver, so someone may do this without your knowledge or consent. In short, exporting the key for e-mailing back to its owner will probably look something like:
gpg --armor --export keyID
and then emailing that output to the owner of the key.
On the other hand, you may not want to send an unnecessary encrypted message, so you can upload the signed key directly to a keyserver using:
gpg --send-keys keyID
Again, be warned that the key’s owner and other people will not see or know about that signature until they do:
gpg --refresh-keys
When you receive your own signed key from others, import it. See the detailed steps in the Importing a Key section of the documentation above.
Periodically publish your newly-signed key to a keyserver. As you get new signatures, publish them to a keyserver. See the detailed steps in the Publishing your Public Key section of the documentation above. Most people won’t see the new signatures until they’re published to a keyserver!
Periodically refresh keys from a keyserver. See the detailed steps in the Updating Keys section of the documentation above to collect all the new signatures from the keysigning party. You may find that other people have signed your key and uploaded them directly to the keyserver. This also helps you collect the web of signatures from all the people who were at the keysiging party.In a nutshell, you can do this with:
gpg --refresh-keys
For fun, look at all your new signatures! You can list the signatures using:
gpg --list-sigs your@email.address
If you see signatures that have [User ID not found] you might have better luck examining your key at pgp.mit.edu or sks-keyservers.net.
Technical Notes
The rest of this document contains advanced technical notes. Please send me more.
Short Key IDs Are Bad News
As mentioned above, key IDs are usually specified as 8-character hexadecimal strings. The GPG program makes it sort of hard to see that your full key ID is actually a 16-character hexadecimal string. With only 816 (which is a bit over 4 billion) unique short key IDs, there is a probability that there are collisions of short key IDs in public key servers. That probability is 1, as we know collisions occur. (The probability is infinitesimally close to 1 in mathematical analysis.)
With (at the time of this writing) over 3 million keys in public keyservers, (obtained from the sks-keyservers status pages) there are likely many collisions. One would first expect to see a collision with only about 82,000 keys in the keyserver.
The mathematics of finding the probability of collisions can be found in the Wikipedia Birthday Attack article.
However, read on to see a more common way to find the 16-hex-character key ID using only the fingerprint.
Key IDs and Hash Algorithms
You might not have noticed that your key ID is the final digits of the fingerprint of your key. It took me a long time to realize that.
A fingerprint is usually the SHA-1 hash of a key, which is 160 bits, or 20 bytes, or 40 hexadecimal characters.
Your short key ID is the last 8 hexadecimal digits of your fingerprint. Your long key ID is the last 16 hexadecimal digits of your fingerprint. So you can always find the long or short key ID if you have someone’s full fingerprint, and use that long or short ID (or the full fingerprint!) to import from a keyserver.
Enigmail, gpg-agent, and Gnome keyring bugs
This section describes workarounds for Fedora Linux (and perhaps other Gnome and Mate environments) where Enigmail apparently remembers passwords forever, even if you don’t want it to.
I noticed that Enigmail never expired my gpg passphrase, even when I told it to expire after 2 minutes of idle time. Even worse, it would then automatically and silently decrypt PGP/MIME messages when I tried to view them, even though I told Enigmail to not automatically decrypt. That’s dangerous. If an attacker adds lot of attachments, they can mount known-cryptext attacks and recover your entire signing key, even with an acoustic attack that never touches your computer!
I thought this was related to gpg-agent, which sometimes handles passphrase input, so I tried putting the following into a new ~/.gnupg/gpg-agent.conf file to tell it to forget passwords after 60 seconds:
default-cache-ttl 60
However, that didn’t work. I tried switching off “use gpg-agent for passphrases” in the Enigmail advanced preferences, but that didn’t work either.
After further research, I found out that the Gnome and/or Mate desktop environments were setting up their own GPG keyring daemons which just weren’t behaving well. (These processes may be called gnome-keyring-daemon and/or mate-keyring-daemon. Note that this same process name may be controlling your ssh keys as well, so you may not want to kill them outright. Read on.) These can be turned off in Fedora’s main menu by going to System | Preferences | Startup Applications| Startup Programs and unchecking GPG Password Agent: Gnome Keyring: GPG Agent and since I’m running Mate, also unchecking GPG Password Agent: Mate Keyring: GPG Agent. (There are probably lots of other things you might want to turn off in there.)
Enigmail then wouldn’t talk to gpg-agent usefully so I cut it out of the loop also. I disabled “use gpg-agent for passphrases” in the Enigmail advanced preferences. After that, Enigmail popped up its own gpg key dialog, and everything worked just fine, with Enigmail forgetting the passphrase after the specified time.
Note that this may not work just fine if you’re using gpg2, which may require the use of gpg-agent, so you may have to work harder to set that agent up correctly.
Please let me know if you have better workarounds.
Automating GPG
If you’re automating things, you can specify the password for encryption and decryption with the --passphrase password command-line option. Note that the password may get stored in your command history, will be visible in a process list, etc., so this is generally a Bad Idea. You can mitigate this somewhat with the --passphrase-file filename option. Just protect that file! Note: In gpg2 and possibly some versions of gpg, you will have to specify the --batch option for gpg2 to actually use those passwords or passphrases! It doesn’t hurt to specify it in these cases. The --batch option also prevents gpg from popping up a password entry field or anything requiring human interaction.
Signing a key with --sign-key still prompts you if you really want to sign, even with --batch and a passphrase, but you can add the --yes option to automatically choose “yes” to the prompts.
The gpg program usually sends a lot of status information to standard error (stderr) but you might want that output directed elsewhere, or sent to a file. The --logger-file filename or --logger-fd filedescriptor will redirect that output.
For more machine-parseable output, there’s a status file that can be written using the --status-file filename or --status-fd filedescriptor options. This gives lines that indicate details of what was found in the message, what was tried, and the detailed status of each step. More details about this output can be found in the Unattended Usage section of the GPG documentation.
For more fun, here are some Esoteric GPG Options that you may need to know to automate GPG.
Read on to the next section to see how to specify where gpg stores its configuration files and keys.
Making a Sandbox / Multiple keyrings
Often, you’ll want to experiment with GPG without actually making changes to your primary keyring. You can easily create a “sandbox” to make changes to a completely separate keyring. GPG looks at the GNUPGHOME environment variable to see where to read its public and private keys from. (On Linux-like systems this defaults to ~/.gnupg while on Windows it’s stuffed away in the (possibly hidden) directories:
C:\Documents and Settings\username\Application Data\GnuPG
or C:\Users\username\Application Data\GnuPG
or C:\Users\username\AppData\Roaming\GnuPG
If you want to make multiple keyrings, set this environment variable before running your gpg commands. (e.g. in a Linux shell,export GNUPGHOME=/directory/of/your/keyring or in Windows, set GNUPGHOME=c:\directory\of\your\keyring and then subsequent commands in that shell will use your “sandbox” keyring.)
Note that gpg will check the permissions on that folder and operations that call external programs (like connecting to a keyserver) will be disallowed if others can write to that directory. In a Unix-like system, you can fix that with:
chmod 700 $GNUPGHOME
For example, you can create a whole new keyring for automated processes:
# Following commands in this shell will use that home
gpg --import file1
Alternately, you can pass the --homedir dir option to gpg on the command-line with each command.
Forcing Different Algorithms
First, read the Using Stronger Algorithms section above to see how to configure gpg to prefer that people use certain algorithms when sending to you. That section is probably more important than this one. It’s far more important that you and the person you’re talking to use the recommendations in the Using Stronger Algorithms section above.
GPG contains many different encryption and hashing algorithms. You can get a list of the included algorithms with the command:
gpg --version
gpg (GnuPG) 1.4.13

Copyright (C) 2012 Free Software Foundation, Inc.

License GPLv3+: GNU GPL version 3 or later <http://gnu.org/licenses/gpl.html>

This is free software: you are free to change and redistribute it.

There is NO WARRANTY, to the extent permitted by law.
When manually encrypting, (either with public-key encryption or symmetric encryption,) you can specify an encryption algorithm with the --personal-cipher-preferences "alg1 alg2..." option and a digest/hashing algorithm using the --personal-digest-preferences "alg1 alg2..." option:
Expert tip: If you really want to force the algorithm used, you can use the --cipher-algo name command-line switch for symmetric or public-key encryption. The --personal-cipher-preferences options above should be used if you don’t want to accidentally violate the OpenPGP specification. You can use the --cipher-algo name argument if you know that your recipient has a modern version of GPG but doesn’t have their public key set up well. Again, encourage them to improve their public key using the Using Stronger Algorithms section above.
Protecting your Secret Keys
Warning: This section is somewhat speculative and may not help you really improve your security against a sophisticated attacker, but may help defeat some threat models.
Your secret keys are, by default, encrypted with older encryption algorithms (CAST5) and hashing algorithms (SHA-1, iterated over 65,536 rounds). You can modify these preferences, though.
You must use a strong password to protect your secret keys. This is the weakest link of your security. If someone is able to obtain your secret key files, they can mount a brute-force attack on it by testing many passwords in a dictionary attack. If you want to make it harder to perform a naïve brute-force attack on your secret keys, you can change the encryption algorithm and increase the number of rounds that are necessary to decrypt and validate your secret key. One way of doing this is to change the password for your secret key with something like the following:
and then changing the password using the passwd command, saving/quitting using save and saving the changes.
This forces your secret key to be encrypted with the AES-256 algorithm, SHA-512 hashing, and the mode is iterated and salted. The count means that the hash will be applied 65 million times (which is about the maximum allowed.) This will greatly slow down the decryption of your secret key (it takes about a second on my computer, but that’s rarely a problem,) which might significantly slow down attackers attempting to brute-force your password. Reduce the count if you need to decrypt many messages very quickly, as you will encounter a noticeable delay every time you decrypt a message!
Technical Note:s2k is short for “string to key”. This refers to an algorithm that turns a textual string (i.e. your password) into an n-bit number that can be used as a cryptographic key. (For example, AES-256 requires a 256-bit-long key. Your password is probably not that long, nor evenly distributed bitwise, so these functions try to turn a shorter string into a well-distributed longer key.)
The more expensive that you make attacks on your secret keys, the better. This may not protect you against the highest-level attackers, nor will it prevent attacks directly against the symmetrically-encrypted parts of your message (see the Using Stronger Algorithms section above to improve this,) but it will certainly discourage someone who has obtained your secret keyring and is trying to brute-force the password (say, by using the password-generating features of John the Ripper and passing them into the GPG executable.) This will slow down the speed of password cracking by many orders of magnitude, which is often enough to make brute-force attacks greatly infeasible.
More information at Christopher Wellons’s excellent blog entry.
In the OpenPGP standard, the number of iterations is actually coerced into a single byte, so not all numbers of iterations are possible. Here’s more information about the equation and valid values for --s2k-count.
There is some dispute if these particular options are the best, so do your research. For example, AES algorithms are designed to be fast, so a slower algorithm might actually be better if you’re trying to slow down attackers.
It is also possible that this could weaken your security if the hashing algorithm has fixed points or cycles, that is, values where the input to the hashing function equals the output from the hashing function. Extending the number of iterations may make it more likely that a fixed point or cycle is struck. (Read Donald Knuth’s amusing anecdote about fixed points in his homemade random number generator in Volume 2 of The Art of Computer Programming about how easy it can be to strike fixed points. (Legal links, anyone?)) More research is warranted. Update: I did more research in the technical note below.
Technical Note: I decided to do the math on this, to estimate the probability of a hash cycle or collision with highly-iterated hashing. If we can assume that the output of the hash function is approximately random with respect to the input, (that’s a rather strong assumption,) the mathematics of the problem reduce to an analog to the Birthday Problem (that is, the probability that at least one birthday is shared by at least 2 people in of a group of n people.)
The probability p of a cycle with n iterations and states states in the hash function can be estimated by:
p(n, states) = 1 - e(-n)(n-1)/(2 * states)
Since the argument of the exponent is often a very small number, due to the number of states being very high, (2128 for MD5, 2160 for SHA-1, 2512 for SHA-512,) we will have to use an arbitrary-precision exponential function and extended precision in many environments. Below is a Frink program (a programming language that I wrote) that calculates the probabilities.
This function can then be called as follows (for the SHA-1 function with 2160 states and 65 million iterations):
p[65 million, 2^160] 1.445e-33
Thus, we can derive the following probabilities of hitting a cycle in various hash functions, assuming they’re close to random:
Hash Function
Bits
Bytes
Cycle probability in 65 million iterations
MD5
128
16
6.2*10-24
SHA-1
160
20
1.4*10-33
SHA-224
224
28
7.8*10-53
SHA-256
256
32
1.8*10-62
SHA-384
384
48
5.4*10-101
SHA-512
512
64
1.6*10-139
Thus, the probability of seeing a random hash cycle with the SHA-512 procedure above are so low (given our assumptions!) that we can estimate that it won’t happen in the lifetime of anyone on the planet living today, and we can proably safely assume that using many iterations, as noted above, will probably improve our security. QED.
Note: I’m also running homemade programs that are attempting to find cycles in iterated MD5 hashes. It builds a giant hash table of the last 100 million hashes it has seen, and will detect any cycle shorter than this. It’s not likely I’ll find one if the hashing function is designed well.
Backing Up Your Secret Key
If, for some reason, you want to back up your secret key and possibly print it, you can use the --export-secret-key --armor option to gpg, possibly using the --output filename option to output to a specified file. Then you could, say, engrave that onto a piece of metal and store it away in a cave for 1000 years. Or whatever. It will be ponderous and error-prone to type that key back in, especially with a large key or a key that contains a photo.
“Creating the perfect GPG keypair”
Warning: Read this whole section before making any decision. This section is actually a warning against these practices, rather than a recommendation.
Alex Cabal has a document entitled “Creating the perfect GPG keypair” (Link opens in new window) in which he describes creating subkeys of your keypair that you can use on a device like your laptop, which somewhat mitigates the risk of your laptop being stolen. In short, it allows you to create a new subkey that is used only for signing, which you keep on that laptop. If the laptop is stolen, you can revoke that signing key which is claimed to prevent the thief from impersonating you. However, I think that this practice is very dangerous, if not outright wrong. There are good tips about managing secret keys in this document, but I argue against its primary premise.
You should be most strongly warned that these practices will leave your communications wide open for interception. The document linked above does not warn youin the strongest possible terms that the practice of creating the “perfect key” lets whoever stole your laptop decrypt and forever continue to decrypt all your email (if they can guess the password used to encrypt your secret key) yet you go on blithely pretending they can’t! That is very poor practice. All that the subkey business does is prevent the attacker from impersonating you by signing messages. (But, again, only if they can guess the password used to encrypt your secret key, and only if your recipients know that you’ve revoked the key.) If they can guess your password, the attacker could still read all your encrypted messages forever. Read on.
Unless everyone that you communicate with regularly does something like:
gpg --refresh-keys
to find out that keys have been revoked, they may never even know that you revoked the signing key, and they will continue to trust your signature.
If the person who stole your laptop (and thus your secret keys) could ever impersonate you (because they guessed the password for your secret key), then they canforever decrypt all the communications sent to you with that same key if you follow the “perfect keypair” advice.
Allowing your attacker to read your encrypted communications forever, and pretending it didn’t happen, is extremely bad and wrong cryptographic practice, obviously. If your decryption key is stolen, revoke that entire keypair and never use any part of it again! Otherwise, your attacker can forever read messages encrypted to your public key.
It appears that the primary benefit of following this procedure is not having to rebuild your web of trust with a new key. However, how much trust should you give to someone who still uses a key that has been knowingly compromised and does not properly protect your communications with them? The answer is none. None more trust.
OpenPGP Specification
For details on the public OpenPGP specification, see RFC 4880.
This project aims to recognize main facial expressions (neutral, anger, disgust, fear, joy, sadness, surprise) in image sequences using the approaches described in:
src
  \-->dataset        Scripts for dataset management
  \-->facecrop       Utilities and modules for face cropping and registration
  \-->gaborbank      Utilities and modules for generating gabor filters and image filtering
  \-->adaboost       Utilities and modules for adaboost train, prediction, and feature selection
  \-->svm          Utilities and modules for svm training and prediction
  \-->detector     Multiclass detector and preprocessor
  \-->utils        String and IO utilities, CSV supports, and so on..
doc                Documentation (doxigen)
report             Class project report (latex)
resources          Containing third party resources (eg. OpenCV haar classifiers)
assets             Binary folder
test               Some testing scripts here
Build
Dependencies:
CMake >= 2.8
Python >= 2.7, < 3.0
OpenCV >= 2.4.5
Compiling on linux:
mkdir build
cd build
cmake .. ; make ; make install – now the asset folder should be populated
Cross-compiling for windows:
Using CMake or CMakeGUI, select emotime as source folder and configure.
If it complains about setting the variable OpenCV_DIR set it to the appropriate path so that:
C:/path/to/opencv/dir/ contains the libraries (*.lib)
C:/path/to/opencv/dir/include contains the include directories (opencv and opencv2)
IF the include directory is missing the project will likely not be able to compile due to missing reference to opencv2/opencv or similar.
Then generate the project and compile it.
This was tested with Visual Studio 12 64 bit.
Detection and Prediction
Proof of concept model trained using faces extracted using the detector cbcl1 are available for download, mulclass strategy 1 vs all and many vs many can be found.
NOTE: watch for illumination! At the moment optimal results can be obtained in live webcam sessions using direct illumination directed to the user’s face. Don’t worry you are not required to blind you with a headlight.
If you’d like to try emotime without any further complication you should take a look to thex86_64 release.
If you just want to take a quick look to the project we strongly suggest to go to the release section and download compiled binaries for Linux 64bit, then:
download and unzip the binaries in an empty folder
run ./download_trained_models.sh
Then cd assets and ./emotimegui_cli ../resources/haarcascade_frontalface_cbcl1.xml none 48 48 3 5 4 svm ../dataset_svm_354_cbcl1_1vsallext/classifiers/svm/*
Training
After mkdir build; cd build; cmake ..; make ; make install go to the assets folder and:
The Cohn-Kanade database is one of the most used faces database. Its extended version (CK+) contains also FACS code labels (aka Action Units) and emotion labels (neutral, anger, contempt, disgust, fear, happy, sadness, surprise).
Validation
First, rough evaluation of the performance of the system Validation test involved the whole systemface detector + emotion classifier, so should not be considered relative to the emotion classifieritself.
Of course, a more fine validation shuld be tackled in order to evaluate emotion classifier alone. For the sake of completeness the reader have to know that the cbcl1 face model is a good face locator rather than detector, roughly speaking it detects less but is more precise.
Following results are commented with my personal – totally informal – evaluation after live webcam session.
multicalss method: 1vsAllExt
face detector:     cbcl1
eye correction:    no
width:             48
height:            48
nwidths:           3
nlambdas:          5
nthetas:           4

Sadness                   <-- Not good in live webcam sessions too
  sadness -> 0.67%
  surprise -> 0.17%
  anger -> 0.17%
Neutral                   <-- Good in live webcam sessions
  neutral -> 0.90%
  contempt -> 0.03%
  anger -> 0.03%
  fear -> 0.02%
  surprise -> 0.01%
Disgust                   <-- Good in live webcam sessions
  disgust -> 1.00%
Anger                     <-- Good in live webcam sessions
  anger -> 0.45%
  neutral -> 0.36%
  disgust -> 0.09%
  contempt -> 0.09%
Surprise                  <-- Good in live webcam sessions
  surprise -> 0.94%
  neutral -> 0.06%
Fear                      <-- Almost Good in live webcam sessions
  fear -> 0.67%
  surprise -> 0.17%
  happy -> 0.17%
Contempt                  <-- Not good in live webcam sessions
  neutral -> 0.50%
  contempt -> 0.25%
  anger -> 0.25%
Happy                     <-- Good in live webcam sessions
  happy -> 1.00%
multicalss method: 1vsAll
face detector:     cbcl1
eye correction:    no
width:             48
height:            48
nwidths:           3
nlambdas:          5
nthetas:           4

Sadness                   <-- Not good in live webcam sessions too
  unknown -> 0.50%
  sadness -> 0.33%
  fear -> 0.17%
Neutral                   <-- Good in live webcam sessions
  neutral -> 0.73%
  unknown -> 0.24%
  surprise -> 0.01%
  fear -> 0.01%
  contempt -> 0.01%
Disgust                   <-- Good in live webcam sessions
  disgust -> 0.82%
  unknown -> 0.18%
Anger                     <-- Almost sufficient in live webcam sessions
  anger -> 0.36%
  neutral -> 0.27%
  unknown -> 0.18%
  disgust -> 0.09%
  contempt -> 0.09%
Surprise                  <-- Good in live webcam sessions
  surprise -> 0.94%
  neutral -> 0.06%
Fear                      <-- Sufficient in live webcam sessions
  fear -> 0.67%
  surprise -> 0.17%
  happy -> 0.17%
Contempt                  <-- Not good in live webcam sessions too
  unknown -> 1.00%
Happy                     <-- Good in live webcam sessions
  happy -> 1.00%
Also main difference between the 1vsAll and the 1vsAllExt mode experimented in livecam sessions are related to the amount of unknown states registered and the stability of the detected states. In detail 1vsAll multiclass method provide more less noisy detections during a live web-cam session, 1vsAllExt mode instead is able to always predict a valid state for each frame processed, but sometimes it result to be more unstable during the expression transition.
Sorry for the lack of fine tuning and detail, but it is a spare time project at the moment.. If you have any idea or suggestion feel free to write us!
Further Development
Tuning GaborBank parameters for accuracy enhancement.
Tuning image sizes for better real-time performance.
Better handle illumination, detections are good when frontal light is in place (keep it in mind when you use it with your camera).
Claims that intelligence agencies can read overwritten data on disk drives have been commonplace for many years now. The most commonly cited source of evidence for this supposed fact is a paper (Secure Deletion of Data from Magnetic and Solid-State Memory) by Peter Gutmann presented at a 1996 Usenix conference. I found this an extraordinary claim, and therefore deserving of extraordinary proof. Thanks to an afternoon at the Harvard School of Applied Science library I have had a chance to examine the paper (http://www.usenix.org/publications/library/proceedings/sec96/full_papers/gutmann/index.html ) and many of the references contained therein.
Of course, modern operating systems can leave copies of ” deleted” files scattered in unallocated sectors, temporary directories, swap files, remapped bad blocks, etc, but Gutmann believes that an overwritten sector can be recovered under examination by a sophisticated microscope and this claim has been accepted uncritically by numerous observers. I don’t think these observers have followed up on the references in Gutmann’s paper, however.
Gutmann explains that when a 1 bit is written over a zero bit, the “actual effect is closer to obtaining a .95 when a zero is overwritten with a one, and a 1.05 when a one is overwritten with a one”. Given that, and a read head 20 times as sensitive as the one in a production disk drive, and also given the pattern of overwrite bits, one could recover the under-data.
The references Gutmann provides suggest that his piece is much overwrought. None of the references lead to examples of sensitive information being disclosed. Rather, they refer to experiments where STM microscopy was used to examine individual bits, and some evidence of previously written bits was found.
There is a large literature on the use of Magnetic Force Scanning Tunneling Microscopy (MFM or STM) to image bits recorded on magnetic media. The apparent point of this literature is not to retrieve overwritten data, but to test and improve the design of drive read/write heads. Two of the references (Rugar et al, Gomez et al) had pictures of overwritten bits, showing parts of the original data clearly visible in the micro-photograph. These were considered by the authors as examples of sub-optimal head design. The total number of bits seen was 6 in one photo and 8 in the other. Neither photo-micrograph was a total success, because in one case only transitions from one to zero were visible, and in the other case one of the transitions was ambiguous. Nevertheless, I accept that overwritten bits might be observable under certain circumstances.
So I can say that Gutmann doesn’t cite anyone who claims to be reading the under-data in overwritten sectors, nor does he cite any articles suggesting that ordinary wipe-disk programs wouldn’t be completely effective.
I should qualify that last paragraph a “bit”. I was unable to locate a copy of the masters thesis with the tantalizing title “Detection of Digital Information from Erased Magnetic Disks” by Venugopal Veeravalli. However a brief visit to his web page shows that this was never published, he has never published on this or a related topic (his field is security of mobile communications) and his other work does not suggest familiarity with STM microscopes. So I am fairly sure he didn’t design a machine to read under-data with an “unwrite” system call. In an email message to me Dr. Veeravalli said that his work was theoretical, and studied the possibility of using DC erase heads. [Since writing this paragraph the paper has been posted. It is indeed theoretical but has quantitative predictions about the possibility of recovering data with varying degrees of erasure. There isn’t any suggestion that ordinary erase procedures would be inadequate].
Gutmann claims that “Intelligence organisations have a lot of expertise in recovering these palimpsestuous images.” but there is no reference for that statement. There are 18 references in the paper, but none of the ones I was able to locate even referred to that possibility. Subsequent articles by diverse authors do make that claim, but only cite Gutmann, so they do not constitute additional evidence for his claim.
Gutmann mentions that after a simple setup of the MFM device, that bits start flowing within minutes. This may be true, but the bits he refers to are not from disk files, but pixels in the pictures of the disk surface. Charles Sobey has posted an informative paper “Recovering Unrecoverable Data” with some quantitative information on this point. He suggests that it would take more than a year to scan a single platter with recent MFM technology, and tens of terabytes of image data would have to be processed.
In one section of the paper Gutmann suggests overwriting with 4 passes of random data. That is apparently because he anticipates using pseudo-random data that would be known to the investigator. A single write is sufficient if the overwrite is truly random, even given an STM microscope with far greater powers than those in the references. In fact, data written to the disk prior to the data whose recovery is sought will interfere with recovery just as must as data written after – the STM microscope can’t tell the order in which magnetic moments are created. It isn’t like ink, where later applications are physically on top of earlier markings.
After posting this information to a local mailing list, I received a reply suggesting that the recovery of overwritten data was an industry, and that a search on Google for “recover overwritten data” would turn up a number of firms offering this service commercially. Indeed it does turn up many firms, but all but one are quite explicit that they can recover “overwritten files”, which is quite a different matter. An overwritten file is one whose name has been overwritten, not its sectors. Likewise, partitioning, formatting, and “Ghosting” typically affect only a small portion of the physical disk, leaving plenty of potential for sector reads to reveal otherwise hidden data. There is no implication in the marketing material that these firms can read physically overwritten sectors. The one exception I found (Dataclinic in the UK) did not respond to an email enquiry, and they do not mention any STM facility on their web site.
A letter from an Australian homicide investigator confirms my view that even police agencies have no access to the technology Gutmann describes.
Of course it has been several years since Gutmann published. Perhaps microscopes have gotten better? Yes, but data densities have gotten higher too. A hour on the web this month looking at STM sites failed to come up with a single laboratory claiming it had an ability to read overwritten data.
Recently I was sent a fascinating piece by Wright, Kleiman and Sundhar (2008) who show actual data on the accuracy of recovered image data. While the images include some information about underlying bits, the error rate is so high that it is difficult to imagine any use for the result. While the occasional word might be recovered out of thousands, the vast majority of apparently recovered words would be spurious.
Another fact to ponder is the failure of anyone to read the “18 minute gap” Rosemary Woods created on the tape of Nixon discussing the Watergate break-in. In spite of the fact that the data density on an analog recorder of in the 1960s was approximately one million times less than current drive technology, and that audio recovery would not require a high degree of accuracy, not one phoneme has been recovered.
The requirements of military forces and intelligence agencies that disk drives with confidential information be destroyed rather than erased is sometimes offered as evidence that these agencies can read overwritten data. I expect the real explanation is far more prosaic. The technician tasked with discarding a hard drive may or may not have enough computer knowledge to know if running the command “urandom >/dev/sda2c1” has covered an entire disk with random data, or only one partition, nor is it easy to confirm that it was done. How would you confirm that the overwrite was not pseudo-random? Smashing the drive with a sledgehammer is easy to do, easy to confirm, and very hard to get wrong. The GPL’ed package DBAN is an apparent attempt to address this uncertainty without destroying hardware. Hardware appliances with similar aims include the Drive Erazer” and the Digital Shredder.
Surveying all the references, I conclude that Gutmann’s claim belongs in the category of urban legend.
Or it may be in the category of marketing hype. I note that it is being used to sell a software package called “The Annililator”.
Since writing the above, I have noticed a comment attributed to Gutmann conceding that overwritten sectors on “modern” (post 2003?) drives can not be read by the techniques outlined in the 1996 paper, but he does not withdraw the overwrought claims of the paper with respect to older drives.
Daniel Feenberg
National Bureau of Economic Research
Cambridge MA
USA
21 July 2003
24 March 2004 (revised)
22 April 2004 (revised)
14 May 2004 (revised)
1 Oct 2011 (correction)
1 Jan 2013 (corrections)
“Magnetic force microscopy: General principles and application to longitudinal recording media”, D.Rugar, H.Mamin, P.Guenther, S.Lambert, J.Stern, I.McFadyen, and T.Yogi, Journal of Applied Physics, Vol.68, No.3 (August 1990), p.1169.
“Magnetic Force Scanning Tunnelling Microscope Imaging of Overwritten Data”, Romel Gomez, Amr Adly, Isaak Mayergoyz, Edward Burke, IEEE Trans.on Magnetics, Vol.28, No.5 (September 1992), p.3141.
We often need to put some confidential data on the hard drive, in which case it becomes essential to have some kind of security mechanism to keep it hidden from unauthorised access of any kind. It could contain credit card numbers, bank statements and list of passwords for various online services.
One way to protect such data with security is to put them in a directory that is password protected or is encrypted. So the encrypted content will need a password everytime to be viewed. Ubuntu comes with a few handy tools to do this, although they are terminal based and will require a bit of effort to setup and use.
Install and setup encfs
The tool is called encfs and is easily installable from synaptic.
$ sudo apt-get install encfs
Once it is installed it will need a minimal setup. Lets say we want to create an encrypted directory called .encrypted inside the home directory whose content shall be available in the directory ‘visible’ upon request. Then run the following command.
$ encfs ~/.encrypted ~/visible
On the first run it will ask a couple of questions like mode and password etc.
$ encfs ~/.encrypted ~/visible
The directory "/home/enlightened/.encrypted/" does not exist. Should it be created? (y,n) y
The directory "/home/enlightened/visible" does not exist. Should it be created? (y,n) y
Creating new encrypted volume.
Please choose from one of the following options:
 enter "x" for expert configuration mode,
 enter "p" for pre-configured paranoia mode,
 anything else, or an empty line will select standard mode.
?> p

Paranoia configuration selected.

....truncated....

New Encfs Password:
Verify Encfs Password:
$
Now it is setup and to use it run the same command everytime.
$ encfs ~/.encrypted ~/visible
EncFS Password:
It will ask for the password that was set earlier and upon entering the correct password, the contents of the ‘.encrypted’ directory will be available in the ‘visible’ directory.
Now put all your confidential data inside the visible directory and will be go into the encrypted directory. Once you are done working with the confidential data, simply unmount the visible directory by issuing the following command
$ fusermount -u ~/visible
It will unmount the encrypted directory and all content that was visible in the visible directory will vanish. Rest assured it is there in the encrypted directory and will become available again by running the previous command.
Cryptkeeper
Cryptkeeper is a gui tool that makes the process of mounting and unmounting the encrypted folder a bit easier by providing a taskbar icon. Install it from synaptic.
$ sudo apt-get install cryptkeeper
Now it can be run from “Applications->System Tools->Crytpkeeper” menu in gnome or the K->System->Cryptkeeper menu in kde. Once the taskbar icon comes up left click on it and click “Import EncFS Folder”. Select the encrypted directory and the directory to mount from the popup dialog. Now again left click on the taskbar icon and select the directory to mount it. It will ask for the password and will mount the directory then. To unmound again click the icon and unselect the directory. Simple as that.
How to create password protected zip archive
Command Line
The zip command can be used to create password protected zip files easily. Here is a quick example
$ zip -P *secret* compressed.zip file.txt
Note that the P is capital. Can also type “–password” instead of the “-P”.
$ zip --password *secret* compressed.zip file.txt
The above approach might be a bit insecure since the password is visible and the command is stored in the terminal history and can be retrieved. Another option is the e option which prompts user to enter the password.
$ zip -e compressed.zip file.txt
Enter password:
Verify password:
The zip utility can be installed on ubuntu through apt-get
$ sudo apt-get install zip unzip
Password protect existing zip files
The above methods work well, but there is an easier way. First create a zip file using any of your favorite gui tools and then password protect it using the zipcloak command.
$ zipcloak confidential.zip
Enter password:
Verify password:
This is the quickest method since you don’t have to remember any commandline parameters. Just the name of the command is enough.
Gui
There is a cross platform gui archive manager called Peazip which can be downloaded from
It is probably the most featureful gui archive manager available for Linux. With peazip you do not need the commandline/terminal and everything can be done from the gui interface very much like winzip on windows.
For a short while ago right now, the way to configure your flash player settings changed and need to be done a second additional time for each browser now. You still need to configure flash player from the little application on your local machine, but you will now be also needed to configure the Flash Player for each browser by visiting some Macromedia webpage to configure your browser settings for Flash Player.
This can be done by visiting this webpage:
If you are using a VPN, then you are good to go. Because all traffic inclusive FTP traffic will be routed true the VPN adapter. But if you are using some kind of proxy without a vpn connection, like let’s say if you are tunneling your internet traffic true a SSH proxy, SOCKS proxy, SSL proxy or even if you are connected to the TOR network directly from your home network without being first connected to some VPN provider. In any of these situations the FTP protocol is a dangerous threat to your privacy, because FTP services are routed outside of the tunneled proxy you are using and could expose your real identity. So blocking FTP is a important thing when you want to protect your privacy.
To block FTP services, you can use the so called portfiltering on your router or firewall for port 21 that’s the standard port used by ftp.
Portfiltering works by blocking all traffic on a specific port.
But blocking all trafic on port 21 won’t give you a full protection against this kind of threat. Because someone can config a server to use the ftp protocol on a different port, for example let’s say on port 80. That’s the same port that is used by HTTP services, and would make portfiltering pretty useless to defeat against some nasty traps.
A better option to completly block FTP can be done by setting up a custom filter group with the Adblock Plus Add-on in your browser. The Addblock Plus Add-on can be downloaded for almost any browser. But please take in mind that the Adblock Plus filters are ONLY working if you have javascript activated in your browser! Be aware of the fact when you are having javascript activated you are vurnable to so called hidden iframes, with a size of 1 by 1 pixel these can’t almost not be seen with the naked eye. One can use the No-Script add-on to block iframes. But at all make sure that javascript is not blocked by the No-Script add-on in order get Adblock Plus working correctly.
After installing Adblock Plus in your browser, go to the Adblock preferences -> custom filters -> add filter group. And add the following 4 rules to your custom filter group: ftp://*/
ftp://*/files
ftp://%2A/
ftp://%2A/files
Then save the settings you have changed, and restart your browser to have them get activated and working.
To check if your custom filters are working correctly you can use the Jondonym IP-check at https://ip-check.info because this test tries to read out your real IP-address by using the FTP protocol.
If your browser is still leaking your real IP, then reactivate your custom filter group in the Adblock Plus settings and try again.
If you frequently use open WLANs (Airport, public Internet local, …), you don’t want to be identifiable by the WLAN provider using your MAC address. Also in other LAN cases a change of the MAC address can be useful.
Never send or upload pictures and/or documents to the internet, social media or anythings else online.
Metadata, also known as EXIF-data contains lots of critical information that can used against you in a later stadium in almost any thinkable way.
Some example, pictures contains unique identifier from each camera that is stored in the metadata from picture. If someone know that unique identifier from the camera on your phone, then he will be able to search the internet for all the pictures that where made with your phone. The same will be if you are buying a new phone and you are selling your old one, the new owner go look and search for all your critical and private pictures if you have never have removed that metadata from your pictures. And so there are many different other reasons why it would be wise to clean out all metadata from all your pictures and documents.
-Always think twice before uploading anything.
-Upload files only, which you, carefully scrubbed yourself.
-For example, if you want to upload photos or videos, unless you know what you are doing, get a separate camera, which you only use for anonymous usage.
Keep in mind that even if de-anonymization is not possible, identity correlation to the same pseudonym might still happen. For example, let’s suppose you created a video using a video creation software and uploaded it to a popular video portal under the pseudonym A. Then you created another video using the same software on the same machine and uploaded it under the pseudonym B. An adversary checking the metadata could correlate pseudonym A with pseudonym B.
For Linux users there is a program called: MAT, also know as: Metadata Anonymisation Toolkit.
Information about the project can be found on: https://mat.boum.org
Or downloaded it from: https://mat.boum.org/files
Never use the (SLOW) standard DNS servers from your internet service provider, they make the world smaller then it really is..
Use a search-engine (like: etools.ch) if you don’t know how to change the dns settings for your operating system.
Choosing a hosting provider can be a difficult task, especially to non-technical people. What do all the technical terms mean? Do they matter? Do they matter to me and my project? By outlining some questions you can ask and topics you can discuss with providers, we hope you will be able to make a better, more well informed choice.
Choosing a hosting provider is not about choosing the best provider but about choosing the best provider for you. Your website might have different demands than that of other organizations. This might also mean that your demands for a hosting provider vary from others.
Communication
Good communication is very important. Different hosting providers will have different methods of communicating. Which forms of communication matter to you and your organization? Here are some things to keep in mind:
What communication methods does the provider provide?
Some providers might only wish to be contacted via e-mail. Others will gladly talk to you on the phone as well, or via online chat. What communication methods are important to you? Here’s a list of examples to consider:
Telephone
E-mail
Skype
Chat
How can you transfer your website?
Before people can visit your website, you will need to transfer it to the hosting provider. What methods are available to do so? There are many options, but not all options are equal. FTP for example, is an unsafe protocol. Preferably, the provider will allow you to transfer your data over SSH or sFTP.
Does your website require special permissions?
Sometimes web applications might require special permissions to function optimally. For example, if you want users to be able to upload photos, the website will need permission to write information on disk. Not all hosting providers allow for these options or allow for these options in the same way. Checking this with your website developers and hosting providers can prevent a lot of headaches.
How can you manage your services?
Your web application might use some additional services, such as a database and a domain name. Does the hosting provider offer easy to use services that allow you to quickly configure these options yourself, or do you need to contact them to do that for you? Please note that if you’re not very technical, the latter option of them doing it for you might actually be preferable to doing it yourself!
Security
No matter what type of website you’re running, security is always important. Even if it is just a single page website which displays your organization’s information, having that page altered will look bad for you. If your website is about LGBT rights in a country where they are not accepted, your security requirements will most likely increase dramatically. Take a moment to think about your website and what type of negative attention it might attract. Keep that in mind when looking at the following questions:
Does the provider have a security policy?
A security policy is a policy that describes various security related issues, ranging from the earlier mentioned authentication of customers to how to deal with hacked websites. If the hosting provider has such a policy, it is a good indication that they have given serious thought to the matter. This is important to you as a customer as it indicates they will be able to respond quickly and adequately to any security issues that might arise.
Does the provider have an abuse policy?
An abuse policy is a policy that describes various abuse related issues. Abuse is a term for unwanted behavior on your web application. For example, what will the provider do when your website starts sending out a lot of spam? Will they simply shut it down or will they notify you and try to help resolve the problem? How long will they take to verify that you have resolved the abuse issue before they turn your website back on?
How does the provider deal with security incidents?
What if despite your best efforts, someone manages to hack your website? Or that of another customer at your hosting provider? How does the provider deal with such incidents? If the incident involves your website, will they help you resolve the issue or simply shut you down? If it was a breach somewhere else in their network that might have affected you, will they notify you of such an incident? If their customer database is hacked, will they inform you?
What availability can the provider offer and what do I need?
Computers crash. This is no different for the computer that hosts your website. In some cases, it might not be such a big problem if your website doesn’t function for a couple of hours a month. In other cases, it could be a disaster. Ask yourself how critical your website’s availability is and inform the provider. The higher the (guaranteed) availability needs to be, the higher the costs involved.
Does the provider make backups?
If your website is a couple of pages that no one can change, having backups might not be very important since you can back them up on your own machine. If however your website is a web application where users can contribute data or where you will regularly post news and other information, your website will change daily and needs to be backed up. Ask your provider if they create backups, how often they create them and for how long they keep them. If your site doesn’t change that much, a weekly backup that is kept for a month might be fine. If it changes daily, you will want at least daily backups.
How robust is the provider’s infrastructure?
Not every opinion is as popular as loving sunshine or icecream. Hosting websites that advocate certain rights or causes might come under attack from parties who oppose those rights. Often this comes in the form of a so-called Distributed Denial of Service attack, or DDoS. In these types of attacks, your website will be flooded with so many bogus requests it won’t be able to handle the legitimate requests anymore either. Ask your provider if they have systems in place to mitigate these types of attacks and if they can give examples of how they have in the past if you’re running such a website.
Is there an intrusion detection system?
An intrusion detection system is the online version of a home alarm system. It will monitor the network at the provider and will detect certain types of attacks that take place on it. If you’re hosting a website that you fear might come under attack, having an Intrusion Detection System (IDS) can be very helpful in preventing your site from being hacked and perhaps even seeing from where the attacks take place.
How will other customers affect me?
We’ve spoken before about how your website might come under attack, but what if you share a server with other customers that are under attack? This too might impact the availability of your website. Ask your hosting provider how the different customers are separated from each other to ensure these situations will have limited or no impact on the availability of your website.
What privacy policy does the provider have?
Privacy of customers and customer data is important. In some cases, it can even be vital information. Ask your provider about their privacy policy and how they deal with certain requests for information. Do they have a strong privacy policy with strict rules or will they sell your data on to anyone who is willing to pay? Will they give in to any government request or will they require legal documents that force them to do so? Additionally you could ask the following questions:
How is logging being done?
All computers keep logs. Websites for example, keep logs of what computers requested what pages. These logs can be useful for analytical purposes but in the wrong hands they can also reveal exactly what people visited your website. Ask your provider if information is being logged, for what purpose and for how long. Also, who has access to the logs? Are they covered by the earlier mentioned privacy policy? Logging can be very useful to find out what is happening with your website, especially if something went wrong. If you are afraid that people might get in trouble if they are found in your logs, consider turning logging of completely.
Administration options
Where there’s a transaction, there’s administration. Consider these options and their importance to you when choosing a provider:
What payment options are accepted?
How can you pay your provider for the services you buy from them? Banktransfer, creditcards, Paypal, Bitcoins? Take into account what works best for you.
Is anonymous registration and payment an option?
Perhaps the website your hosting is so controversial you do not even want your hosting provider to know who you are. Ask them if it is possible to host the website anonymously and pay anonymously, via Bitcoin for example.
What happens when you stop paying?
Obviously you want to pay for the services you buy. But what if, for whatever reason, you might be unable to pay for a certain period. Will the hosting provider simply delete your website and all its content after missing one payment or will they keep the website up and running for half a year? This might be particularly relevant if you are operating from an environment that is sensitive to financial sanctions from the West or if your operations might be vulnerable to a banking blockade.
Legal matters
Keeping in mind certain legal issues that could arise is important when choosing a hosting provider. Here are some examples:
What jurisdiction covers your provider and their servers?
Your hosting provider might seem a company in your country, but it might actually be a legal entity in another. Similarly, although the hosting provider might seem to be operating in your country, their actual servers might be located somewhere else. This is important to keep in mind, your website might not be in violation of local laws but might violate others. Similarly, if your website is in violation of local laws, hosting it in another country might save you a lot of trouble. Also keep in mind that when dealing with American countries or countries that operate in America, they all need to comply with the US Patriot Act, which forces them to hand over information when requested by the American secret services. This might severely compromise the security and privacy of your users.
Does your hosting provider own and operate their own infrastructure or are they a reseller?
Your hosting provider might not actually be much of a hosting provider. It could be nothing more than an office that is reselling the services of another hosting provider. This severely impacts how they will be able to assist you and how much freedom they have in dealing with certain matters and policies. Knowing if your hosting provider operates their own infrastructure or is a reseller is very important.
What is the notice and take down policy?
Notice & take down is a term used for when your hosting provider is notified that your website is in violation of the law and requested to take it down. This mainly happens in case of copyright infringements but has been known to happen on other bases. Some providers will comply with any notice and take down letter they receive, others will simply ignore them. How your hosting provider deals with these notifications can have important consequences for your website. You don’t want your website taken down because a user uploaded a copyrighted movie, song or picture to it. Asking your provider how they deal with these situations is important.
The internet and all the things one can do on the internet today are not going be safer by it self. The only one that will let you make use the internet on a more safely way is yourself. And that’s something you will have to keep in your mind.
Be aware of the fact that the way the internet is build true the years, there was nobody knowing how the internet will look like as it is Today. So almost nothing is build with the intention or special reason for his later usage of it. Especially this could make things dangerous for people without any knowledge about all these things or for people that don’t know how to use the internet on a safe way.
These days almost anyone is connected 24/7 with the internet, if not from his computer then it will be from his (smart)phone. This makes life not any easier for the one that don’t know what they are really doing online. And remember us once again, how important it is that someone understand these things and know how these are actually all working and functioning together.
If you are caring about privacy and/or security, you should really now these things already. But if not and you want to make your future-life easier then you should invest some time in spending reading or watching some guides. Don’t let censorship make lead your life. Today censorship is used as a weapon to control peoples life’s.